
I believe that archives pages on many (or most?) blogs are sorely neglected and poorly put together, which ultimately results in a poor navigability and by extension a poor user experience. And given that it doesn’t take long at all to put a useful archives page together, there really is no excuse not to.
Last week I revealed the archives page on my blog to you in my post on what makes a good blog archives page. It gives visitors three different ways of browsing through the content and should address the needs of the majority. Putting the page together required a little manual work but nothing intimidating.
In this post I want to show you how I put my archives page together so that you can do the same.
My Archives Page
First of all let’s take another look at my archives page:
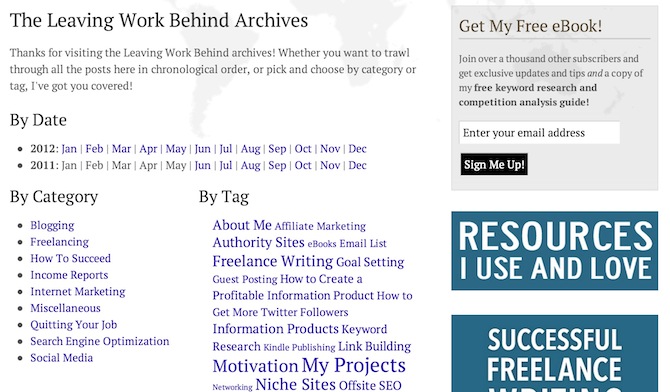
As you can see it’s split up into three sections:
- Date-based archives
- Posts by category
- Posts by tag
This should cover the requirements of just about any visitor. If they are interested in a particular broad topic (say “Internet Marketing”) they can pick a category. If they are interested in a specific topic (say “Kindle Publishing”) they can pick a tag. And finally, if they want to browse through my blog’s content in chronological order or if they want to find a particular post by date, they can do so by using the date-based archives.
How to Construct Your Archives Page
One could of course put a page like the one shown above together by manually providing links to each month, category and tag, but that would be a laborious job and there is a better way. The construction of your archives page can in fact be split easily into the three sections, so that is how I will approach it.
We will be using a page template to put our archives page together. Don’t worry, it’s not particularly complicated — all you need is FTP access to your site (you can ask your hosting provider about this) and some rudimentary HTML and CSS knowledge. I’m by no means technically proficient and I worked this out so I have full faith in you being able to do the same!
First of all, follow the following adapted step-by-step guide from WPTuts+ to create your custom archives page:
- Create a new file in the directory of the theme you are currently using. Call it ‘page_archives_custom.php’.
- At the top of the file, insert the following code:
<?php /* Template name: Custom Archives */ ?>
- Open the existing page.php file within the theme you are currently using.
- Select all of the code and copy it to the clipboard.
- Paste the copied code beneath the code you just inserted
- Save the file. Upload it to your theme directory where applicable.
- Login to WordPress and edit the page you would like to use to try your new page template on (this can always be reverted, and we won’t be modifying the content of the page itself, so you won’t lose any data saved on the page).
- Under ‘Page Attributes’ (usually found on the right-hand side of the editor), select ‘Custom Archives’ from the ‘Template’ drop-down.
- Update/Publish your page.
Now when you view your page, it should look exactly the same! That’s because we haven’t done anything to customize our custom page template yet! But it’s good to see that the page is still working. If you get an error, make sure you copied the code correctly.
To confirm that your page is using the new ‘page_archives_custom.php’ file rather than ‘page.php’, delete any chunk of code from ‘page_test.php’ (‘the_content();’ is usually a good bit to delete), then save (and upload) it. Refresh the page on your website, and the bit you deleted should be missing. If it us, undo the change you made and save (and upload) again. If not, check that you copied the code from this tutorial and the page.php file correctly.
Alright, so you should now have your custom page template up and running. All you need to do now is add the three elements and we’re done! Let’s look at each in turn.
Date-Based Archives
This is only element of the three that I create manually, for two reasons:
- It is easy to do so
- It allows me full control over the formatting/wording
Date-based archives are enabled by default on your WordPress blog, but make sure that you have not disabled them (via a plugin such as WordPress SEO).
The permalinks of your date-based archives should be as follows:
http://www.yoursite.com/year/month/
So if you want to link to say January 2012 in your archives, you would use the following URL;
http://www.yoursite.com/2012/january/
That’s it! Here’s a screenshot of the code included in my archives custom template page:
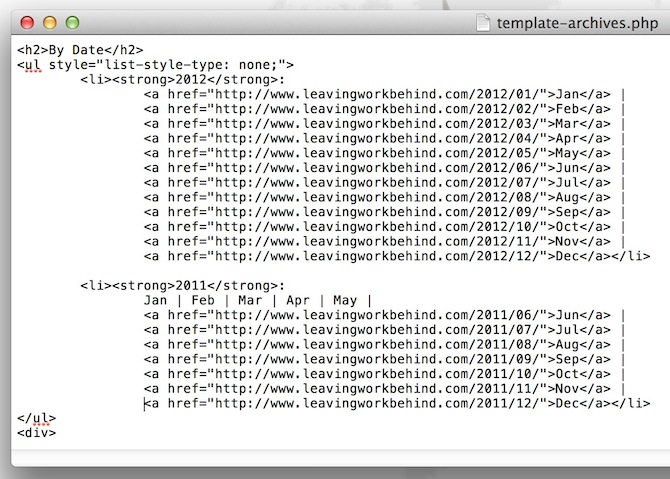
This code should be inserted within the content div of your custom page template. It should be pretty obvious where that is but if not you can figure it out through trial and error.
At the start of each month I add a new line for the previous month and that’s it!
Categories
This is where we can use some simple PHP to get the job done for us. Just including the following within your page:
<?php wp_list_categories( 'title_li=&hierarchical=0&show_count=0' ); ?>
This PHP simply tells WordPress to list categories in alphabetical order without the post count on show (you can change ‘show_count’ to 1 if you do what people to see the number of posts per category). It will create a list item tag (<li></li>) for each category so make sure that you surround the PHP in <ul></ul> tags.
Tags
We follow a very similar process to the one above to display tags. In this instance we are going to tell WordPress to display our tag cloud. The code we’re going to use this time is:
<?php wp_tag_cloud(); ?>
That’s it! WordPress will now display a cloud of your tags on the page.
Formatting Your Page
The only thing left to do is to format your page with a little CSS so that it doesn’t appear as a jumbled mess.
There isn’t really a need to format the date-based archives beyond what I’ve already shown you as it will fill the available space naturally. It’s the side-by-side categories and tags listings that you need to arrange. To do so you need to wrap each element in a div as follows:
<div style="float: left; width: ?;"></div>
“?” is the desired width that you would like each element to have. For instance, I set my categories div to be 55% wide and my tags div to be 45% wide. Wrapping the code in these divs will ensure that your categories and tags remain side-by-side (as opposed to stacked on top of each other).
My Code in Full
In case you’re confused by any of the above, here is all of the code I used in my custom archives page to produce the effect you see on my blog:
<h1>The Leaving Work Behind Archives</h1>

<p>Thanks for visiting the Leaving Work Behind archives! Whether you want to trawl through all the posts here in chronological order, or pick and choose by category or tag, I've got you covered!</p>

<h2>By Date</h2>
<ul style="list-style-type: none;">
<li><strong>2012</strong>:
<a href="http://www.leavingworkbehind.com/2012/01/">Jan</a> |
<a href="http://www.leavingworkbehind.com/2012/02/">Feb</a> |
<a href="http://www.leavingworkbehind.com/2012/03/">Mar</a> |
<a href="http://www.leavingworkbehind.com/2012/04/">Apr</a> |
<a href="http://www.leavingworkbehind.com/2012/05/">May</a> |
<a href="http://www.leavingworkbehind.com/2012/06/">Jun</a> |
<a href="http://www.leavingworkbehind.com/2012/07/">Jul</a> |
<a href="http://www.leavingworkbehind.com/2012/08/">Aug</a> |
<a href="http://www.leavingworkbehind.com/2012/09/">Sep</a> |
<a href="http://www.leavingworkbehind.com/2012/10/">Oct</a> |
<a href="http://www.leavingworkbehind.com/2012/11/">Nov</a> |
<a href="http://www.leavingworkbehind.com/2012/12/">Dec</a></li>

<li><strong>2011</strong>:
Jan | Feb | Mar | Apr | May |
<a href="http://www.leavingworkbehind.com/2011/06/">Jun</a> |
<a href="http://www.leavingworkbehind.com/2011/07/">Jul</a> |
<a href="http://www.leavingworkbehind.com/2011/08/">Aug</a> |
<a href="http://www.leavingworkbehind.com/2011/09/">Sep</a> |
<a href="http://www.leavingworkbehind.com/2011/10/">Oct</a> |
<a href="http://www.leavingworkbehind.com/2011/11/">Nov</a> |
<a href="http://www.leavingworkbehind.com/2011/12/">Dec</a></li>
</ul>

<div style="float: left; width: 45%;">
<h2>By Category</h2>
<ul>
<?php wp_list_categories( 'title_li=&hierarchical=0&show_count=0' ); ?>
</ul>
</div>

<div style="float: left; width: 55%;">
<h2>By Tag</h2>
<div style="margin: 0 20px 0 20px;">
<?php wp_tag_cloud(); ?>
</div>
If you have any questions at all then please do not hesitate to ask them in the comments section!
Photo Credit: Thomas Hawk

Bright Joe
Thank you so much for sharing this!
Walter
I think your way to create a Custom Archives Page is not the best solution because you must update the page every month.
Manoj
Excellent post. Currently I am using a plugin for the purpose, but which is updated a long time ago. I will follow your guidance to create a custom archive page for my site.
Thank you very much.
Much love,
Kristine
Thanks for sharing the code. Your archive page is the best I’ve ever seen.
Wasim Sajjad
Is there any plugin which i can use to create the archive for my bog automatically?
Waaz
Great info. Just was what I was looking for about an Archive page.
Aris
Hello, Tom.
I would wish to thank you for your good site.
I am interesting to create an Archives page on my blog (not published yet) without publication day and tag cloud. I wish to have on my page the next items:
1. The categories (plus the number of posts corresponding to each category)
2. The Tags (plus the number of texts which include them)
Thank you.
Aris Giavris
PS: Please take in to consideration that the original language of my blog (e-keimena) is greek language.
Tom Ewer
You’re welcome Aris!
gaurav
sir i am getting error means page is still not creating, please help me
Tom
What’s the issue you are having? Have you tried searching the problem and looking for solutions?
Sarah
PS – Just found a site (wpbeginner.com) that answers my questions. Thanks again – and I LOVE your archives page!
🙂
Sarah
Hi again,
It’s me…the woman who commented on your earlier article this AM (and you responded back. Thank you.)
So – here’s the deal. I am a wordpress.COM member, not wordpress.ORG. Does that matter in terms of working w/ your codes above in terms of ultimately getting it to work? I am not able to create a ‘Custom Archives’ page like your article recommended…not because I can’t figure it out but b/c .com users aren’t given that ability (to create our own templates, etc.) However, I did copy/paste your code onto a page that I am now calling ‘Archives.’ Some of it is working like your site and other parts aren’t…
Before I launch into all of my questions, let me start but first asking if you would mind if I ask you for help! I don’t want to spend time asking stuff only to have you say that you’re not able (b/c you don’t know how or whatever) to help.
Thanks, in advance, for answering this!
Sarah
Wally Mountz
Sorry Tom, but you lost me on step 1. I don’t know how to do that in Word Press.
Tom Ewer
Hi Wally,
As I say in the post, you need FTP access to your site and some rudimentary HTML and CSS knowledge. If you don’t then this tutorial is probably a little too advanced I’m afraid.
Cheers,
Tom
Kathleen
Thank you PM, I appreciate your help and grateful to Tom who published the slightly OT post. I’ll save your suggestions to test. I had another automated index solution but it broke a long time ago. It didn’t handle the 3,000 or so pages on my site very well.
Again, thank you so much!
photoMaldives
Hi there, Kathleen.
I found 2 great plugins a while ago, which work very well together as a site visitor index page –
Multi Column Tag Map – http://wordpress.org/extend/plugins/multi-column-tag-map/
Creates a book-like index from your tags (& other parameters).
WP Realtime Sitemap – http://wordpress.org/extend/plugins/wp-realtime-sitemap/
Lists posts &/or pages in a various ways.
See them both in action on my site here – http://marinesavers.com/site-map
(Apologies to Tom, for going against the main DIY-inspired idea of the article !)
Hope that helps.
Kathleen
I’d be more interested in automated solutions for an archive which lists every entry by title. My blog is entering into its 9th year, is highly technical in an already specialized niche. Tags and categories are useful for people who already know what subject areas interest them but not those who lack taxonomy. Anyway, I’m doing mine manually. Such a pain…