Last week I published Is Blogging the Best Content Publishing Format for WordPress Users? It represented a pivotal moment for me as a blogger — the realization that the standard blogging format is simply not good enough for my purposes.
And those purposes are simple — to enable visitors to my blogs to access my best content with ease. One of the ways in which you can do this is to provide well-indexed taxonomies full of highly relevant content. But I argue that you should take a step further and develop your most important archive pages into fully-fledged “content buckets” in which the particular topic is properly introduced.
For me the key is in striking a balance between the ease with which you can maintain your blog’s archives, and the ease of access and intuitiveness for visitors to your blog. I believe that’s what the solution revealed below offers.
What’s Wrong with Categories and Tags?
Categories and tags can serve admirably as navigational aids on a blog, but there are two problems:
- They alone are not sufficient
- They are usually abused
For the purposes of this post my focus is on the second issue. By “abused”, I mean that well-intentioned bloggers create poorly phrased taxonomies and pack them with content of dubious relevance. If a visitor attempts to access your archives and does not find what they want (assuming it is available somewhere on your blog), your navigation has failed. Such outcomes are all too common.
The solution is to categorize and tag your content conscientiously — something I covered here and here. When you learn to do that, you can rely upon categories and tags as an effective means of navigating your blog’s content. The next step is to give your blog’s visitors a little bit of context in order to aid their browsing.
Why Create Content Buckets?
I was first introduced to the concept of content buckets by Derek Halpern of Social Triggers. The idea is to create static pages that link to only your best content relating to a specific topic. You should also include some introductory text and a call to action (such as a newsletter subscribe form). The idea is that content buckets are far more useful to a visitor as they are quickly and intuitively introduced to your best content.
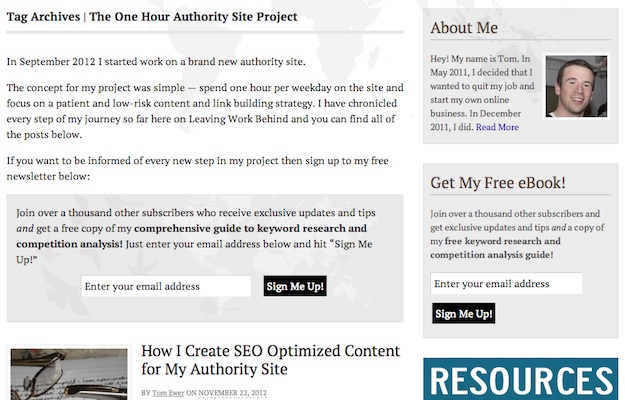
This is all well and good but can be a lot of work to maintain — especially if you have multiple content buckets. The compromise I propose is to add custom content to your dynamic taxonomy pages. You can still link to select content if you want to (just create a specific tag for the page) but it’s far easier than manually maintaining a list of posts. Here’s a screenshot of one such content bucket on my blog:

As you can see from the title, it is just a standard tag archive page. However, it includes some introductory text and a call to action that makes it (a) so much more useful for the visitor and (b) great for me in terms of boosting my subscribe rates.
So how did I do it?
How to Create Your Own Content Buckets
The process is remarkably simple — if you have ever played around with a PHP file in any capacity you will be able to handle it. Note that you can follow this process for both categories and tags, but in this example I will be using a tag.
1. Add the Custom Content
The first thing we’ll do is locate the specific tag you want to use for your content bucket. Remember — any post you tag will show up, so be selective in order to present only the best and most relevant content.
Go to Posts > Tags in your WordPress dashboard’s sidebar and click Edit on your chosen tag. You will be presented with the following screen:

You’re no doubt familiar with the Name and Slug fields, but perhaps not so with Description. This is where you will enter the text that you want to display on your taxonomy page. You may notice that I have used <div> tags to separate my paragraphs — this is because <p> tags weren’t working for me. This may be unique to the theme I use (Canvas by WooThemes) or it could be a wider issue, so make a note of it.
Once you’ve added whatever content you like into the Description field, save your changes.
2. Edit Your Theme’s Tag File
Now it is just a case of telling your theme to insert content contained within the Description field into your taxonomy pages.
There is a chance that your theme already does this so check first to make sure. If not you’ll have to manually edit your theme’s tag file. Before we do that, make sure that you have a child theme set up, as we would always recommend when making changes to a theme.
You’ll need to locate your theme’s tag file — it will be named something obvious (like loop-tag.php). If you cannot find such a file then your theme may not have a specific file for tag pages — instead it may have a generic archive.php file. If that is the case you will need to create a standalone tag file as per your theme’s documentation. Because of the huge variances in theme structures I cannot give exact instructions here, but you should be able to find a solution either via the theme developer or the WordPress.org forums.
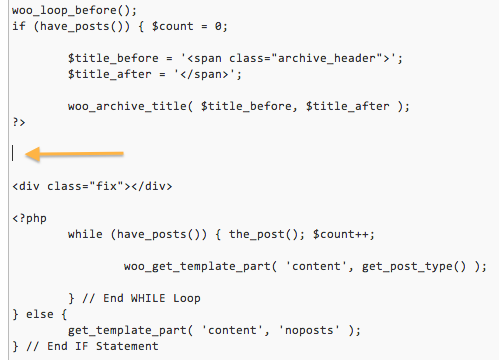
Once you have located or created the tag file, you need to pick the spot where you want the custom content to appear. This would typically be between the header and the post loop. In my theme that is here:

Once you have located the spot (if you’re having trouble, trial and error will get the job done) just paste in the following code:
Save your changes and you’re done! Whatever is contained within a particular tag’s Description field will now display on the relevant page on your blog’s front end. You can use the CSS class “tag-description” to format the text as you see fit.
Make it Count
Of course, none of this is much use if you don’t create content of worth for your content buckets. Any introductory text should be just that — an introduction to the topic at hand so that a visitor will instantly know if they are in the right place or not.
What are your thoughts on content buckets and my particular low-maintenance solution for creating them? Let us know in the comments section!
Creative Commons image courtesy of longhorndave

Leave a Reply