
Multisite can be an extremely efficient way of creating multiple WordPress sites that can be administrated centrally, but you may have a need to split multisite installations down into individual WordPress websites. For instance, you may have seen the light and decided that ManageWP is a much better option under many circumstances 😉
Fortunately, Automattic have been streamlining the process for splitting off individual sites and it is far easier now than ever before.
Let’s take a look at the steps required to split off a site and move it to its own installation.
Note: this is one potential solution, but in reality, multisite can get very complicated. Another tutorial we recommend can be found here.
A Little Info About Multisite
Those of you that build websites for clients or have multiple sites and projects may have come across WordPress Multisite before.
Using Multisite allows you to create numerous websites in one installation separated either by sub-domains (such as those used with WordPress.com) or directories (such as http://mywebsite.com/mini-website/). These sites can then be reached using your chosen structure or by domain mapping individual URLs with relative ease using a few DNS tweaks.
Multisite used to be its own flavor of WordPress but in recent versions it has been rolled into the core software and can be activated with a few additions to your wp-config file. The instructions for doing so can be found in the WordPress Codex.
Multisite installations are administrated from a central point. This allows you to use one set of plugins and themes for all of the sites as well as having one Super Admin to easily maintain them all. For developers and those who want to have a greater control over their sites without having to login to multiple installations, this centralized form of control is a useful feature.
Backing Up Your Multisite Installation
Before you even consider exporting the site or setting up a new WordPress installation there is one vital step that you must carry out.
Back up everything! I honestly can’t emphasize that point enough.
If this process goes wrong for any reason, (power failure/web-host server crash/alien invasion) and you don’t have a working backup, you are in big trouble. Backup your Multisite installation and make sure that you can restore from that backup.
If you don’t have a backup system in place then get one and test it before you go any further. I recommend VaultPress. It comes with an annual or monthly fee but is one of the best WordPress backup system out there. Of course, if you move your new site over to ManageWP then automated backups are included in the subscription.
Exporting Your Site From the Multisite Installation
Now that you have a working backup of your installation you are ready to move onto the next step — exporting your site.
With the latest versions of WordPress, exporting and importing site information has greatly improved. That improvement makes this whole process far easier than it used to be.
Simply login to the site you need to split away from the multisite installation, and in the dashboard go to Tools > Export.
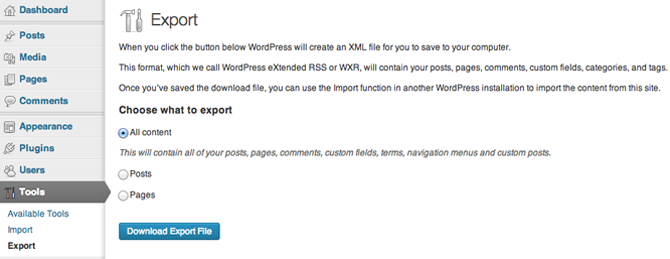
In the export screen select to export “All content”. This will create an XML file with all of the data from the site needed in order to move it to its own installation. When you click the Download Export File button, the exporting process will begin and then download the XML file to your computer when it is completed.
Once you have the XML file, the next step is to copy the theme and any plugins you use on the site. You can do that by logging into the web host using an FTP application (such as FileZilla — my app of choice). The plugins and themes are found in the wp-content directory — a copy of all the ones you are using for this site should be downloaded to your local computer.
You now have all of the necessary information from the Multisite installation to begin creating the new site.
Creating The New WordPress Installation
Whether you are moving the site to a new host or to a new server with your current host, you need to create a brand new WordPress installation. This is just the usual, extremely simple WordPress installation that should only take you a few minutes. The installation instructions can be found in the WordPress Codex.
Once you have the new site installed you need to login as the site admin and delete the “Hello World!” post, the “Sample Page” and the sample comment that WordPress creates during the installation. Before you begin the import process you should also change your permalink structure to match the Multisite version. This setting can be found in Settings > Permalinks.
Now that this fresh installation has had a few basic settings configured, you should then go to Tools > Import and select the WordPress option on the bottom of the list.
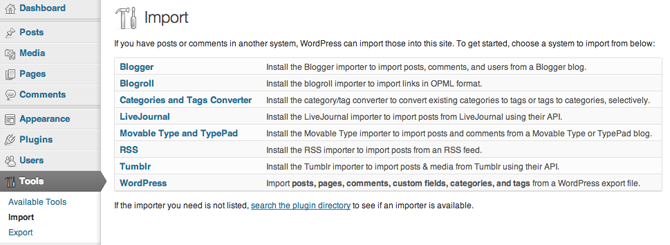
This will prompt you to install the WordPress importer plugin. Do so. After the importer is installed you can select the XML file you wish to import. This file is the one you previously downloaded to your local computer from your multisite installation.
With the file selected, click the Upload and Import button. You will then be taken to a page that allows you to assign authors to the posts and pages you are importing.
There are three options at this point:
- You can import the user accounts associated with the posts.
- You can create a new user during the import that will be given a random password and assign the posts to it.
- You can associate all of the imported posts and pages with a user on the current site.
On this page you are also given the option to download and import the attachments from the Multisite installation. This checkbox should be ticked. This will grab all of the media files currently associated with your posts and pages and then create the correct structure for them in the new site.
The Final Stages Of The Site Move
Once this import has completed, it’s time to upload the theme and plugins you copied from the multisite installation. Using your FTP program of choice, upload the theme folder you previously downloaded. This should go in the new wp-content/themes/ folder. You also need to upload the plugins you downloaded to the wp-content/plugins/ folder.
The theme and plugins you upload will need to be activated and the settings on them all will require reconfiguration.
An easy and safe way to match the previous settings from the Multisite installation is to have both versions open in separate tabs in your browser and go through each setting manually. When you have all of the site settings identical, it is time to check that everything has been imported correctly. You may want to check all of the links and media on each post and page to ensure everything works as it should.
If you are confident that the new version of the site has been moved successfully then you should deactivate the Multisite version. You can do that by logging into the Sites Admin dashboard of your Multisite installation and selecting the deactivate option for that site.
Using deactivate (rather than delete) gives you a quick and easy option to roll back to this version of the site if any problems occur. After a few days — or weeks if you prefer being extra careful — you can delete the site from your Multisite installation.
Conclusion
As you can see, the process of splitting off a site onto its own installation from Multisite isn’t too difficult. This simple method can be used to completely break apart your Multisite installation by repeating the instructions for each individual site.
If you have to split a Multisite installation of WordPress down to individual sites, let us know about your experiences in the comments below.
Photo Credit: Pasukaru
Leave a Reply