

If you’re a regular reader of the ManageWP blog then you know that my last couple of posts have either been about creating or curating content for a WordPress blog.
In one post I discussed a simple method I’ve developed for concepting months worth of great blog posts. In my most recent post I attempted to answer a question that has been bothering me for a while: what is the most efficient way to sort through and curate a large number of online sources for a WordPress blog? I tried using an autoblogging plugin but as you might expect it performed wonderfully as an aggregator but poorly in terms of curation.
So for today’s post (as a follow up to both of those articles) I’d like to explain a method I’ve come up with that allows me to sort through and curate up to 700 sources a day for my visual arts curation blog. A feat I am quite proud of regardless of the fact that for me, it needs to be executable in just a few hours in order for it to be ideal. But it is a promising start and I think many of you will find it helpful.
Here’s what you’ll need to follow along:
- The Google Chrome Browser
- Awesome Screenshot Chrome Extension
- TabCloud Chrome Extension
- An RSS Reader (I’ll be using Feedly)
- And the WordPress “Press This” Bookmarklet, which can be found under WordPress Admin > Tools > Available Tools.
But First: Let’s Clarify Some Commonly Confused Terms
 Before I dive into this method, I want to take a minute or two to clarify some commonly used terms that I think get confused on a regular basis. Partially because they’re over-used, partially because they’re popular buzzwords and then partially because most people online do a combination of them all at the same time – but only attribute one term to what they do.
If that sounds confusing I’ll be able to clarify better after we cover the terms and their definitions. So here we go:
Content Creation: The act of writing original words, taking an original picture, shooting an original video, etc.
Content Sharing: Taking a piece of content created by yourself or others and distributing it to a following or audience. This can be done in many ways and through many channels; blogs and social media outlets being just a few of the more popular examples.
Content Aggregation: This is like content sharing on steroids. An aggregator typically uses software that automatically pulls in content from multiple sources (such as RSS feeds) and reposts it all at one central location, usually a blog.
Content Curation: Similar to content aggregation, content curation also pulls from many sources. However, instead of automatically posting every piece of content pulled in there is a manual filtering and sorting process that takes place in order to select only the most valuable pieces of content for a given audience. Curation also involves adding helpful annotation that frames the information already provided from the original source in such a way as to add additional value and/or understanding.
Examples in Action
 So with those definitions let’s look at some online examples and properly label them:
Link Sharing on Twitter: Many people are quick to call link sharing on twitter content curation. And in a way it is since it involves manually choosing something and distributing it. But with the 140 character limitation of Twitter it’s difficult to add meaning and value. I’d say this is (at best) 20% curation and 80% sharing.
Clicking Share on Facebook: Without adding a comment that brings additional value or understanding this is probably 90% sharing and 10% curation (since you had to friend or like something for it to show up on your Facebook feed in the first place).
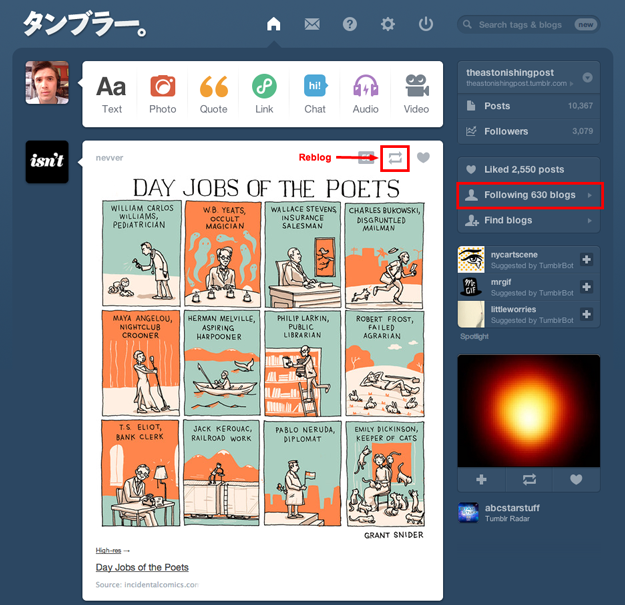
Clicking Re-Blog on Tumblr: Similarly to the Facebook share feature this method of sharing something requires very little thought or effort (translating into little to no added value) and therefore comes out about the same at 90% sharing and 10% curation.
Using an Autoblogging Tool on WordPress: Supposing you are simply pulling in content from various sources and reposting them automatically, this is about 90% aggregation and 10% curation. Of course you had to choose the sources in the first place, but almost everything else about the process is automatic and in many ways offers less value than the original because you’re simply pointing your visitors back to the source.
Writing an Original Essay or Article: Obviously, this is your pure version of content creation. It can be expected that you’ll probably use some creative commons images or videos to accompany your thoughts but for the most part you’re a content creator in this instance.
As you’re probably beginning to realize, the most elusive of these terms is the one that gets thrown around the most: content curation. Obviously we know what it is now, but what are some good examples of content curation for us to look at and study?
Well, there are three that I look to on a regular basis. Each of these websites takes content created by others and repackages/reframes it in such a way as to add value.
1. TED

TED finds individuals who have done or said something important already. Their message is already out there in its original form. However, TED repackages that idea into a live talk. They also reframe that idea by making that talk a part of an event with a larger theme or context.
2. Open Culture
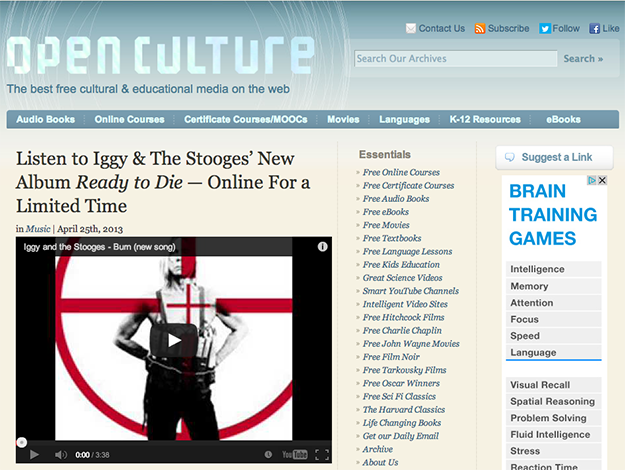
At Open Culture, the curators take existing free educational content from around the web and re-organize it into courses. They also introduce one-off pieces of content (videos, images, etc.) via blog posts where they add a lot of original annotations and helpful information; often linking to other resources they’ve gathered on their site.
3. Brain Pickings
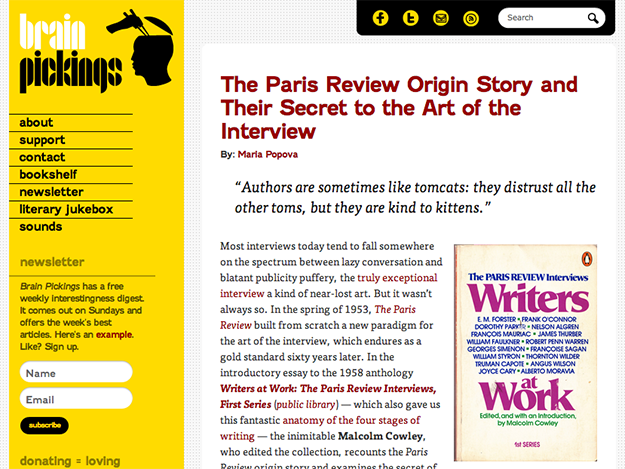
At Brain Pickings the goal is to foster combinatorial creativity – the cross-pollination of ideas. To accomplish this they take existing content (from the web and elsewhere) and write blog post introductions/reviews. They also provide features that make great ideas easier to consume such as their bookshelf page and literary jukebox feed.
In each instance the process of curation requires that the curator also create something of their own in addition to sharing content created by others. And that is the biggest difference between content curation and content aggregation or sharing.
So that’s where I’m coming from in this post. From a place that says true curation takes some serious time, effort and creativity. It can be aided by tools, but not put on autopilot or dumbed down to merely clicking share or re-blog.
The Origins of My Curation Method
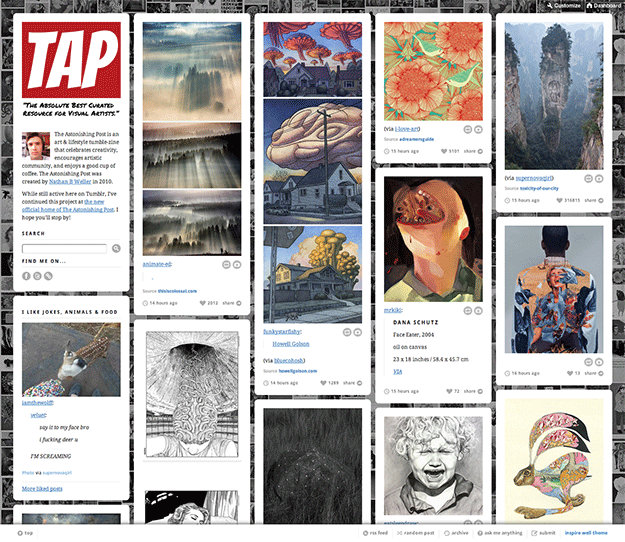
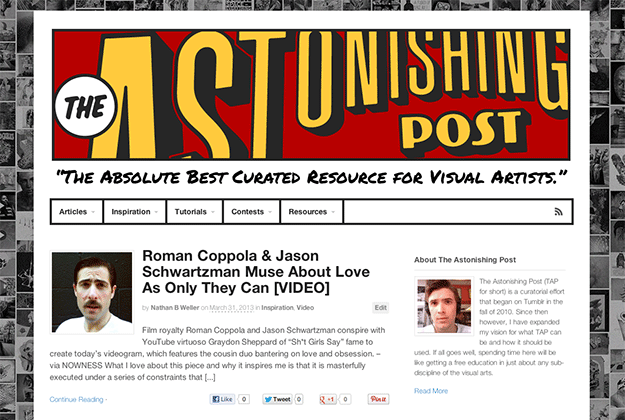
In the fall of 2010 I began a tumblr called The Astonishing Post (or TAP for short). In its infancy it was basically just a bookmarking tool. A place where I could post cool art that I found around the web and refer back to if I wanted to dive deeper with a post for one of the popular art and design blogs I wrote for at the time.
However over the course of a year or so I began to attract a following of my own and decided to take things a bit more seriously. I developed this method of sorting through my RSS sources in an attempt to figure out a way for my one person tumblr to keep up with the post volume produced by some of the large multi-person blogs I was writing for (and ultimately competing with).
Here’s how it worked:
1. Open up Feedly and go through my art sources feed by feed; “tabbing out” anything that looked interesting.
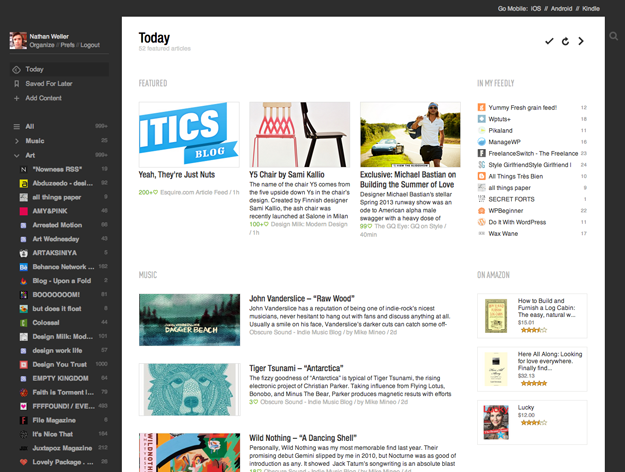
![]()
2. Beginning with the tabs on the far right I would then use the tumblr bookmarklet to sort through and create one or multiple posts from the content on each tab.
3. After I’d been through all of my rss sources and blogged the posts that I’d tabbed out, I would move into tumblr itself and begin re-blogging the best posts from the blogs I followed there, as well as several posts per day from popular art related tags.
In this way I would sort through and blog the best works of art from nearly 700 sources a day. And what’s really awesome about this is that if I was hustling I could get that all done in under two hours! But of course there was a downside.
While tumblr is a great place for posting/consuming content quickly, it’s not so great for a lot of other stuff – such as on-site navigation, internal search, SEO, long-form articles, building an email list, launching e-courses/e-zines, creating start pages, etc. And for me this meant that I wasn’t delivering the best curated experience that I possibly could. In fact, I was just aggregating manually. And I wanted more than that. So I shopped around for a new blogging platform and of course I decided upon WordPress.
Unfortunately, as I discussed briefly in my last post here, blogging on WordPress is a bit more complicated and time consuming than blogging on tumblr. Because of the power and flexibility of the platform there is a lot more you can and should do for each post far above and beyond copying an image link and attribution link (as on tumblr).
If you’re wondering what those things are then I recommend checking out these four posts as I don’t have time to get into all of that at the moment:
- A Simple 90 Min Exercise For Planning Out Months of Great Posts
- A Step-by-Step Checklist for Planning Your WordPress Blog Posts
- A Step-by-Step Checklist for Writing Your WordPress Blog Posts
- A Step-by-Step Checklist for Publishing Your WordPress Blog Posts
Anyways, what this effectively meant is that until I either made enough money to hire on a team of bloggers or someone came up with a great WordPress curation tool or set of tools, I was stuck doing the same old thing on tumblr that I’d been doing to attract a following in the first place. Which was fine, but not what I was hoping for.
As a result things at TAP sort of plateaued while I kept things going, mostly with re-blogs, and waited on a solution to present itself. One didn’t, but after creating the full WordPress version of TAP for my last post here I decided to look outside of just the plugin world and come up with a solution of my own.
My Adapted Method of Curating for WordPress
After trying out two different automated plugins, the premium Auto Blog by WPMU and the free MyCurator from the WordPress plugin directory, I knew what I didn’t want. I didn’t want a plugin that pulled content directly into my blog, cluttering it up with posts and media I ultimately didn’t want and wouldn’t publish (and would have to delete). What I really needed was something to help me quickly sort through a lot of sources, hand pick the pieces of content that interested me and then quickly convert those into posts or drafts on my blog.
Here is what I came up with:
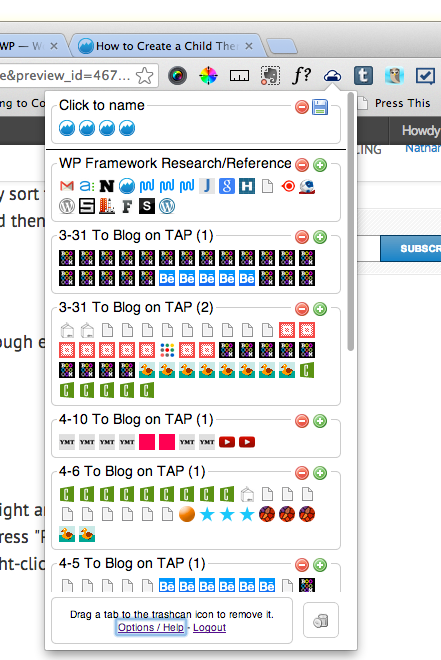
1. This part is the same as before. Open up Feedly and sort through each feed, “tabbing out” the articles of interest.
![]()
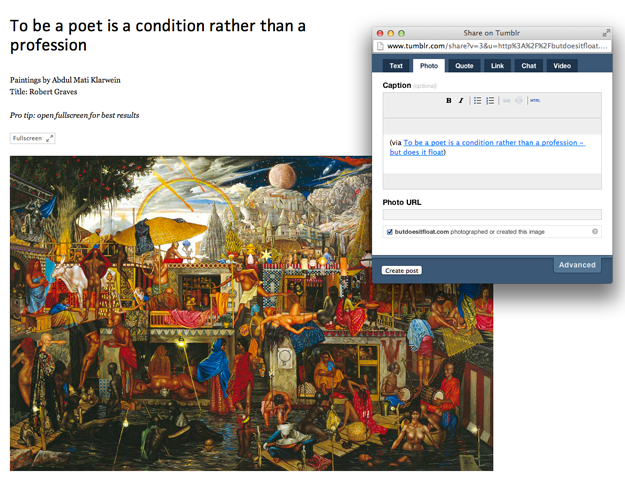
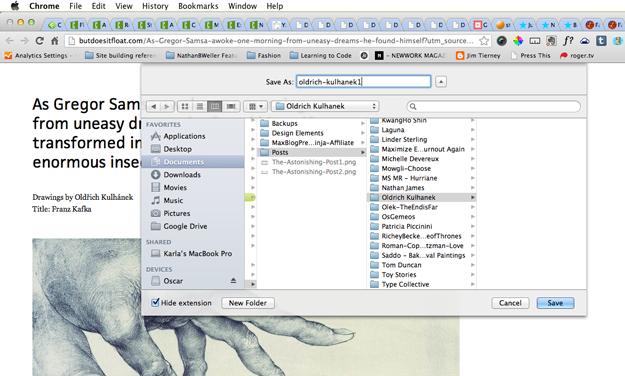
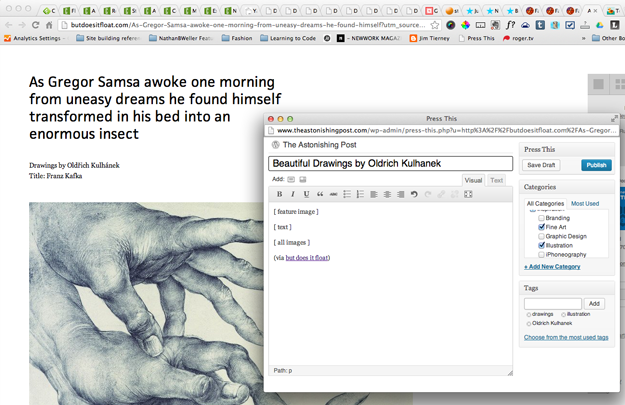
2. And again, same as before, I begin with the tabs on the far right and begin blogging my way back towards the Feedly tab using the WordPress “Press This” bookmarklet. But before I ever click “Press This” I’m sure to right-click save-as and re-name all of the images I want to include in my post.
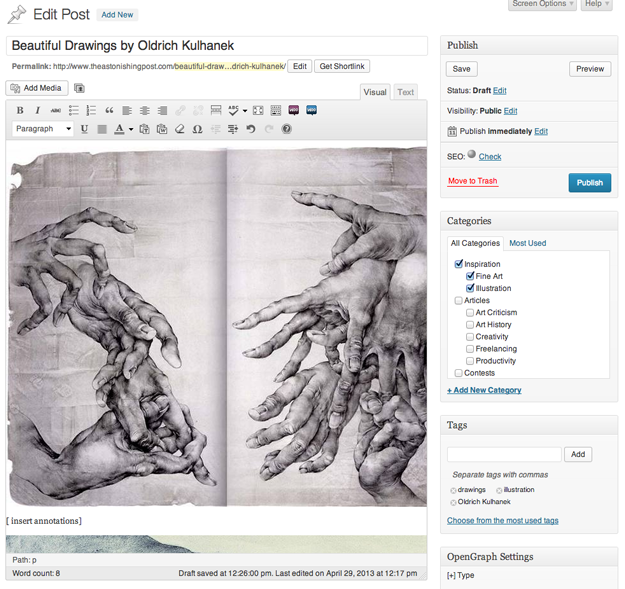
Once I’ve opened “Press This” I simply re-name the post, outline it very simply, assign my categories/subcategories/tags and click save draft.
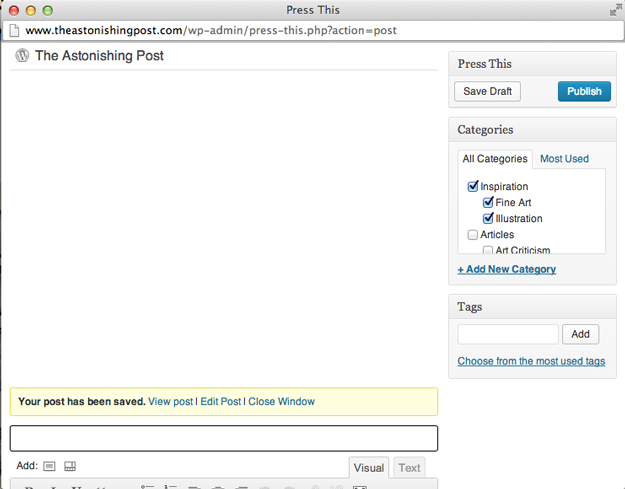
It’s at this point that I have the option to keep blogging straight through my tabs or click the edit post button and finish the post on the spot. For this example I’ve clicked Edit Post.
As you can see in the image below I am immediately brought to my full post in the backend of my blog’s WordPress Admin.
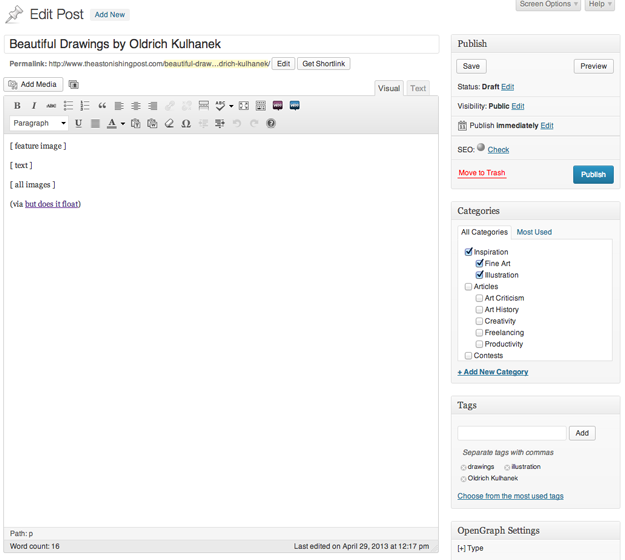
Here I can quickly and easily upload the images I’ve already saved, add my own annotations and publish or schedule.
I also do the same thing with the posts I find via tumblr, resulting in an awfully lot of open tabs! Which brings us to step three…
3. Inevitably I’m unable to get through all of my tabbed out posts each time I sit down to blog. That’s where the TabCloud extension comes in. I simply save the browsing session and when I have some more time either later that day or the next, I revisit those tabbed out posts and repeat step two.
There’s a lot to like about this method. Even though it’s far from automatic, it’s the fastest way I know of to manually sort through, track and blog from that many sources.
Improvements That Could Be Made
 Feedly and TabCloud work great. They’re exactly what I need them to be. Feedly provides a beautiful magazine style page where I can quickly identify the articles I want to use.
TabCloud allows me to save and keep track of my browsing sessions so that if I can’t finish my blogging right away I don’t have to leave a ton of tabs open; or worse, lose the work I’ve already put in.
“Press This” on the other hand could be a lot better. If given the chance to assign a features overhaul for the bookmarklet, here is what I would do:
- “Press This” would recognize if you’re running SEO by Yoast and Edit Flow so that you can fill in your SEO info as well as assign custom post statuses.
- It would allow for scheduling.
- It would give you the option of scraping all or just a few images from whatever page you’re on and allow you to name them. Preferably there would also be an option to simply grab your post title and fill it into every image’s title and alt text fields with the numbers one through whatever to differentiate them.
- It would allow you to set the featured image.
- It would recognize and embed audio and video into an iframe pre-configured for your blog.
Of course there are probably more features I’d want that I’m not thinking of at the moment, but these are definitely the big ones.
Final Thoughts
What I’ve learned is that when it comes to creating a curation blog, there’s no getting around the time-consuming manual work of actually curating. However, there are a lot of little technical details that various tools can help out with to a great extent. I guess my problem with most of the tools I’ve come across so far is that they over-compensate in some areas while completely under-performing in others.
A great example of this is how AutoBlog and MyCurator pull in a ton of content to your blog. You’re not going to use all of that content. In fact, if you’re actually sorting it properly you will probably end up deleting most of it. But that means until you do delete it, it’s there, taking up space on your server and potentially slowing your whole website down. To me, that’s insane. Why on earth would I ever want to host a bunch of content that I’m never going to use?
I’d much rather use my method and simply keep tabs on the things I want to blog in the future, while only ever hosting the content I plan on publishing. In my opinion, we don’t need an amazing content curation plugin for WordPress. We need a better bookmarklet.
But what do you think? Tell me all about it in the comments below.
Image Credits: Trey Ratcliff, Cassandra Rae Nelson, Rosaura Ochoa and Mike Paine
Leave a Reply