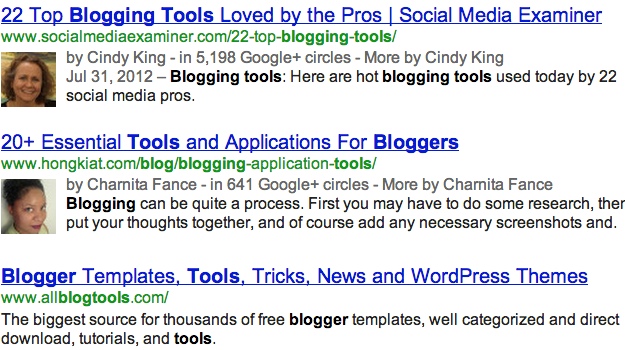
When you search for information on Google, have you noticed that some of the search results have a photo next to them? You’re probably already aware that the image you see in search results comes from the author’s Google+ profile. Sure, that image lets you know who the content creator is, but it’s so much more than just that.
That photo is much like a stamp of approval from Google and shows that you’ve verified your authorship on Google. It also lets others know that Google trusts you as a quality content creator.
So if you’ve been wondering how to get your Google+ profile image in search results, keep reading to find out just how easy it is. I’ll show you how to do this via a WordPress plugin called Google Plus Authorship.
First, let’s find out why Google authorship so important.
The Importance of Google Authorship
As you can see from the screenshot at the top of this post, search results with a profile picture next to them really stand out. Whether you’re connected to that person or not, seeing that photo makes you want to click on that result – rather than one without a photo. This is one reason why it’s important for you to set up and verify your authorship on Google.
Another reasion why it’s so important is because having your image in search results will give you a huge SEO boost. Imagine how many more clicks you’ll get just because others can see a picture of you in their search results; it adds a personal touch and human element to your content.
Not only will your click-through rates increase, but your verified authorship status will improve your chances of showing up more in search results – which of course means higher rankings.
Using the Google Plus Authorship Plugin
So now let’s begin the authorship process. As I stated above, we’ll be using the Google Plus Authorship WordPress plugin; installing and using it is extremely easy.
- First you’ll need to install and activate the Google Plus Authorship WordPress plugin on your blog.
- Since there’s no settings for the plugin, you’ll then need to go to your WordPress user profile; from the WordPress dashboard go to the Users menu and then click on “Your Profile.”
- Scroll to the bottom of your profile and enter your Google+ profile URL and your preferred name.

- When you’re done, update your profile to save the information.
Although you’re now done with the plugin, there’s still more to the authorship process. Next you’ll need to add your blog link to your Google+ profile.
Linking from Your Google+ Profile
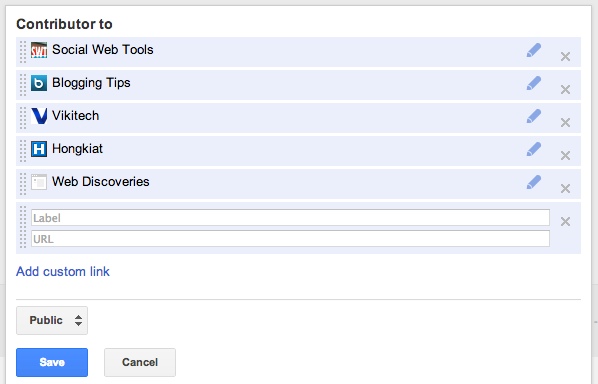
So after you’ve entered your Google+ profile URL in your WordPress user profile, you’ll need to be sure that there is a link to your blog on your Google+ profile. You may already have a link in the “Contributor to” section, but if not here’s how to do so.
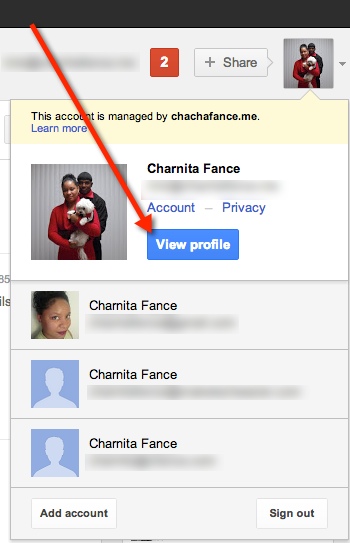
- Go to your Google+ profile; click on the “View profile” button from the Google drop down menu.

- Click on the “Edit Profile” button at the top center of your profile.
- Scroll down to the “Contributor to” section and click on it so that you can add your blog link.

- Click on “Add custom link” and enter a label (title) and URL.
- When you’re done, save you’re changes.
Now you’re all set. You’ll have a link on your blog to your Google+ profile, and a link on your Google+ profile to your blog. In blogger’s terms, you’ve exchanged links and you’re now on each others blogrolls.

Note: You should add links for all of the blogs that you contribute to. If the blog owner is not using a plugin that allows you to add your Google+ URL to your WordPress user profile, then you can just add a link to your Google+ profile right in your author bio.
Double Checking Your Efforts
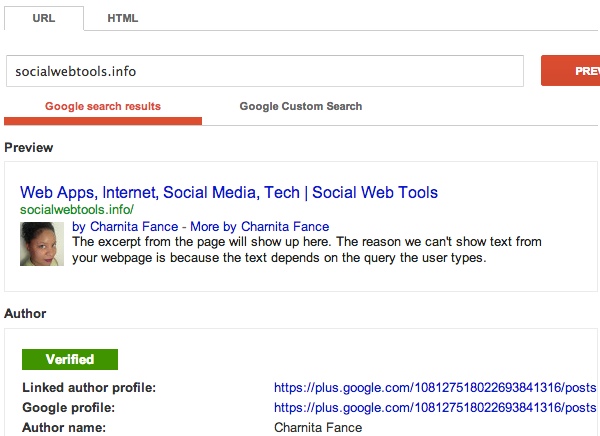
Just to be sure that you’ve linked everything properly, you can always use Google’s Structured Data Testing Tool, which shows you rich shippets. Just be sure you’re signed into the appropriate Google account before navigating to the link.

Enter the URL of your blog or the URL of a specific article on your blog (or an article that you’ve written on another blog) and you’ll see a Google search results preview. This preview lets you know exactly what others will see if that URL happens to show up in their search results.
As long as you see your Google+ profile image next to the result and the green “Verified” badge below it, you know that you’re good and that everything has been linked properly.
Since it can take up to a week or two (after setting up authorship) for your Google+ profile image to appear in results, you may not see your image in the preview or the green “Verified” badge. Unfortunately, you’ll just have to play the waiting game.
What Are You Waiting For?
If you have yet to set up Google authorship for your blog content, you should definitely do that ASAP. You’re truly missing out if you aren’t verified. Now that you see how easy the process is, what are you waiting for?
Have you verified your Google authorship? If so, did you use the Google Plus Authorship plugin or did you use another tool or method?

Leave a Reply