These days, it is so easy to start your own website.
The likes of WordPress.com and Tumblr can have you up and running with your own online presence in mere minutes. But whilst those services can be great for beginners, they impose limitations that any successful website will soon encounter.
That is why hosting your own website is always the best option. You have control over your content, and are free to do whatever you please with your site. However, the issue is that creating a self-hosted website can seem rather daunting.
Today, in the first post in an ongoing series, I am going to walk you through the exact steps necessary in order to create your first self-hosted WordPress site. It’s probably a whole lot easier than you think it is.
1. Purchase a Domain Name and Hosting
The first thing you need to do in order to create your own website is purchase a domain name and some hosting.
I’ve included screenshots from one of the more popular shared hosting providers below, but don’t let that lead you — the steps are very similar for all of the main providers. After all, it is in their best interests to make it easy for you to sign up!
You’re going to want to sign up to a basic package, such as one of the following:
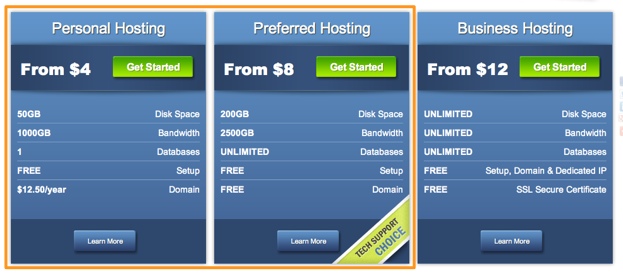
I recommend either Personal Hosting or Preferred Hosting. Personal Hosting only allows you to have one database (i.e. one website) and offers limited disk space and bandwidth. In layman’s terms, this means that the size of your website, and the amount of people who can visit it, are limited.
In reality, the Personal Hosting option is perfectly suitable for any beginner, but if you are planning to create more than one site, or have aspirations to build something big, then Preferred Hosting is a better option (plus, you get a free domain name with that plan). Either way, it’s not going to cost you a great deal.
Once you have picked your preferred option, you will need to select a domain name:
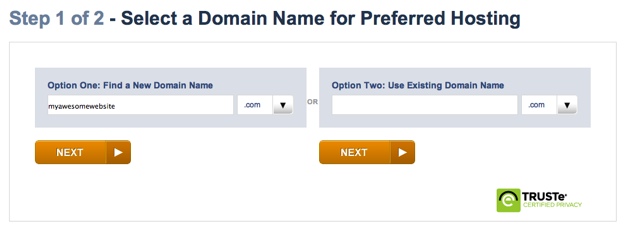
You will have to come up with something fairly unique, as practically all “common” domain names that you could think of will have been taken. This offers you an opportunity to consider a unique brand for your website, rather than something a little more generic.
Once you have chosen your website and its availability has been confirmed, you will need to enter your billing information and confirm your order details. You will be offered the following additional services:
- WHOIS Privacy Protection
- Dedicated IP Address
- DropClick Website Builder
You may wish to purchase the privacy protection, as that prevents people from being able to look up your personal information as the owner of a domain name. A dedicated IP address is unlikely to be important to you at this stage, and you certainly won’t be needing the website builder (because we’re going to be using WordPress).
Once you have made your decisions, complete the order and you are done! You are now the proud owner of a domain name, and you have everything you need with which to create your very own WordPress website.
2. Install WordPress
After completing your order, you will receive a notification of your purchase via email, along with a confirmation of the username and password for your account, which you can access here.
Once you have successfully logged into your WestHost account, you will see the following screen:
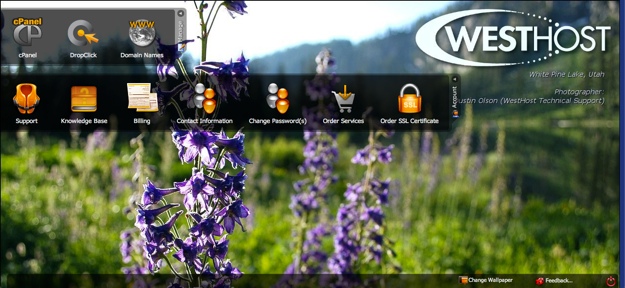
Click on the cPanel button in the top left. You are going to use the cPanel to install WordPress on your domain.
The cPanel can be overwhelming at first, but we are just looking for one button. Locate the search box in the sidebar and type in “Softaculous”. This will reveal the application that you will use to install WordPress:
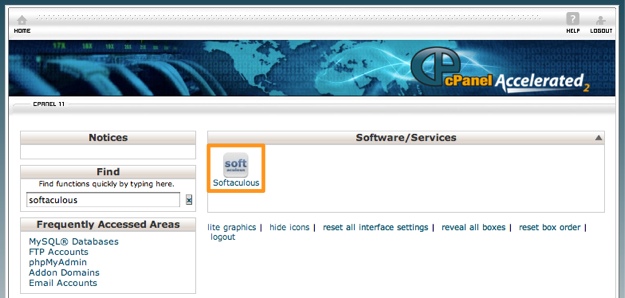
Click on the Softaculous button, and select “WordPress” from the “Top Scripts” on the following screen:
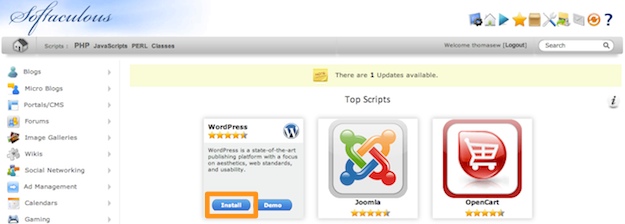
You will now be presented with the WordPress setup screen. Let’s go through all of the options you need to consider in turn.

The two fields you need to worry about under “Software Setup” are the domain, and the directory where WordPress will be installed. Given that you only have one domain, it should already be selected.
In order to install WordPress to the root directory of the domain (so that your new WordPress blog displays when you visit “http://yoursite.com/”), you need to delete “wp” from the “In Directory” field, which will leave it blank.
You can change the Database Name, but it will have no bearing on your site.
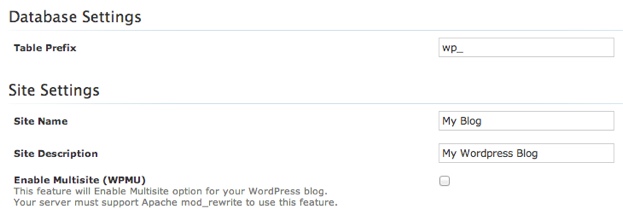
As an extra security measure, it is recommended that you change the table prefix. You can change this to whatever you like, such as “mysecretprefix_”.
At this stage you can also choose to set your website’s name and description, but don’t worry — these can be changed at a later date. Leave the “Enable Multisite” option unchecked, as you will not be needing it.
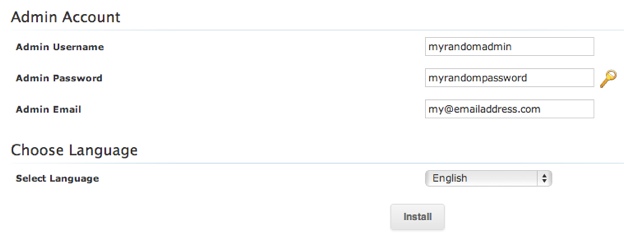
Finally, you need to select account details and pick a language for your WordPress installation. As with the table prefix, it is recommended that your rename your Admin Username to something more unique. You should also choose a secure password — if you click on the key icon, one will be generated for you. For your Admin Email, enter an existing email address account that you have access to.
Once you’re finished, click on the Install button, and WordPress will be installed on your domain!
3. Logging In and Getting Started
In order to login to WordPress, just navigate to “http://yoursitename.com/wp-admin/”. You will be presented with the WordPress login screen:
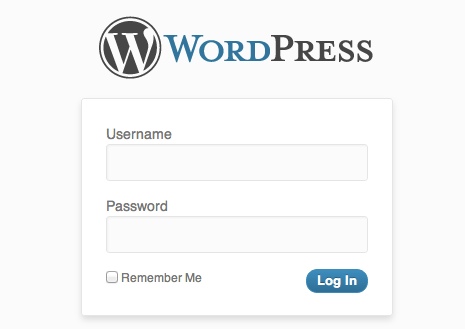
Enter your username and password, click the “Log In” button, and you will be logged into your brand new WordPress website!
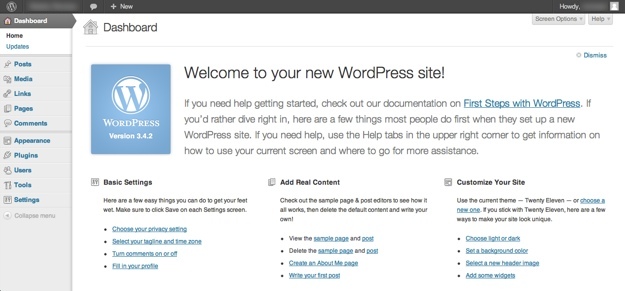
You now have everything you need to start creating your own website. The structure is already there, and whilst there is plenty you can do in terms of changing your blog’s design and functionality, you can start publishing content right away!
Just hover over the “Posts” option in the sidebar, and click on “Add New”. You will be taken to the “Add New Post” screen:
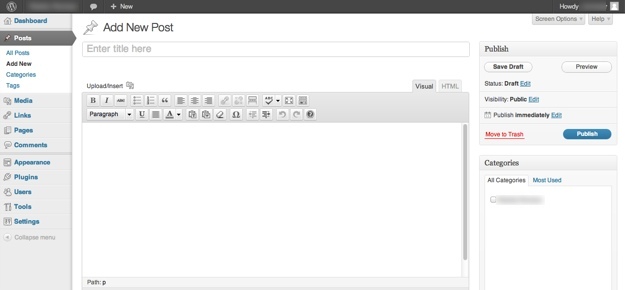
Just enter a title for your post in the “Enter title here” field, add some content in the text editor below, and hit “Publish”. Hey presto! You have just published your very first WordPress blog post. That’s how easy it is to produce content in WordPress.
What Next?
As I mentioned at the beginning of this tutorial, this is the first post in a series. In future posts we are going to explore everything that you need to do in order to create a variety of different WordPress sites — from personal sites, to corporate blogs, to eCommerce sites and more!
If there is something specific that you would like to learn more about, please don’t hesitate to let us know in the comments section, and we will see what we can do!
The Building Better WordPress Blogs Series
- 3 Simple Steps to Setting Up Your First Self-Hosted WordPress Site
- Getting Started with Your WordPress Site’s Settings
- The ManageWP Guide to Essential WordPress Plugins
- How to Create a Personal Blog with WordPress
- How to Build a Freelancing Site with WordPress
- How to Create an Authority Blog with WordPress
- How to create local WordPress installation

Leave a Reply