 Backing up your WordPress sites has always been one of those painful necessities, hasn’t it? Fortunately, that no longer has to be the case with ManageWP’s integrated backup tool.
Once you have read this post, you will have backups scheduled for all of your sites in no time. We have created ManageWP’s backup tool to be as quick and intuitive as possible, so that you can simply “set and forget”.
We recommend that you carry out regular backups as follows:
- Daily backups of your database (which contains all posts, pages, comments and settings).
- Weekly backups of your entire site.
However, you can customize schedules as you see fit.
Let’s get to it!
Step 1 – Backup Creation
When it comes to creating a backup schedule, you have two options.
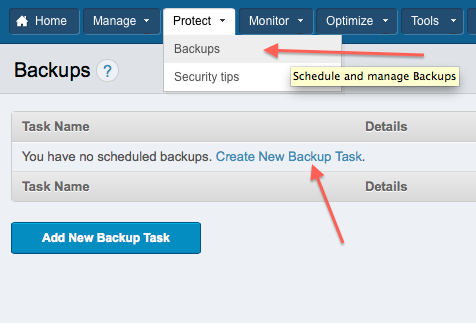
You can either select the option in your ManageWP dashboard:

Or you can access the backups management page via the navigation menu:

The backups screen will come in handy in the future, should you wish to manage your existing backups. We’ll talk about that later.
Once you have selected to add a new backup, you will be presented with a new screen.
Step 2 – Set Task Options
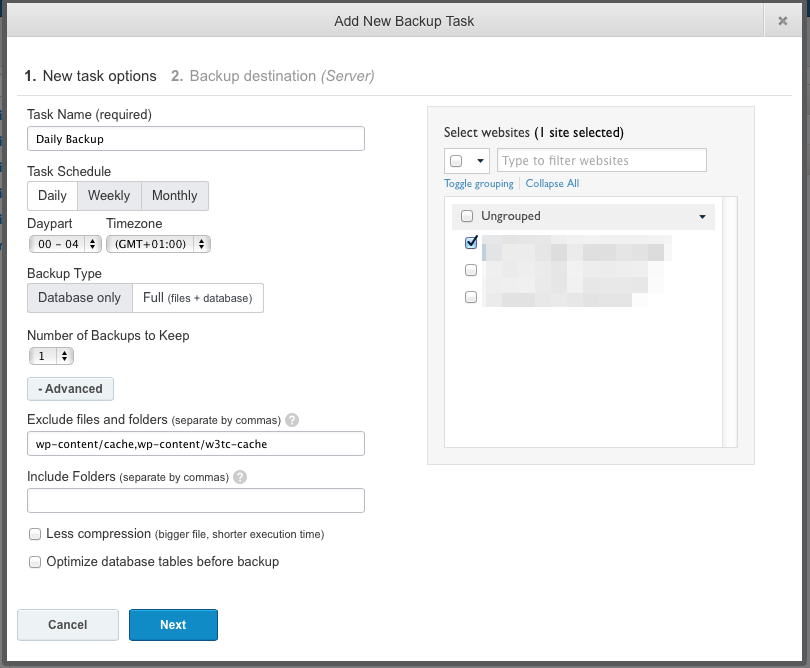
You should see a screen like this:

Let’s go through the settings, one by one.
- Task name: you are setting a type of backup here, that can be applied to multiple sites. So for instance, if you were setting up a weekly backup of all files, you might choose to name it “Weekly backup – all files”. It helps to give your backup schedules a descriptive name, in order to avoid confusion in the future.
- Task schedule: here you set how often a backup should be taken, and also at what time. You should set the backup to take place at a time when your site is historically quiet (in terms of traffic), in order to avoid putting undue strain on the server.
- Backup type: as you would imagine, a database backup takes up far less space, and is completed far more quickly, than a full backup.
- Number of backups to keep: ManageWP can manage your backups so that only so many are stored at any one time. You will want to keep the number of backups to a minimum if there are space restrictions in the location where backups will be stored.
- Exclude files and folders: here you can choose to omit certain files and folders from the backup process. This can be useful for many reasons. For instance, you might choose not to backup pictures, because you already have them stored on your computer.
- Include folders: if you have custom folders on your site, you can choose to include them here.
- Less compression: as you can see, this option should be ticked if you choose to create a backup file faster but with less compression.
- Optimize database tables before backup: this is recommended, as it will decrease the size of your backup.
Now you can choose which websites should be associated with your new backup schedule.
As you can see from the above screenshot, you can select sites individually, or select by group. The latter option can be useful if you have created a backup schedule for a specific type of website, for which you have a group.
Step 3 – Select An External Backup Destination
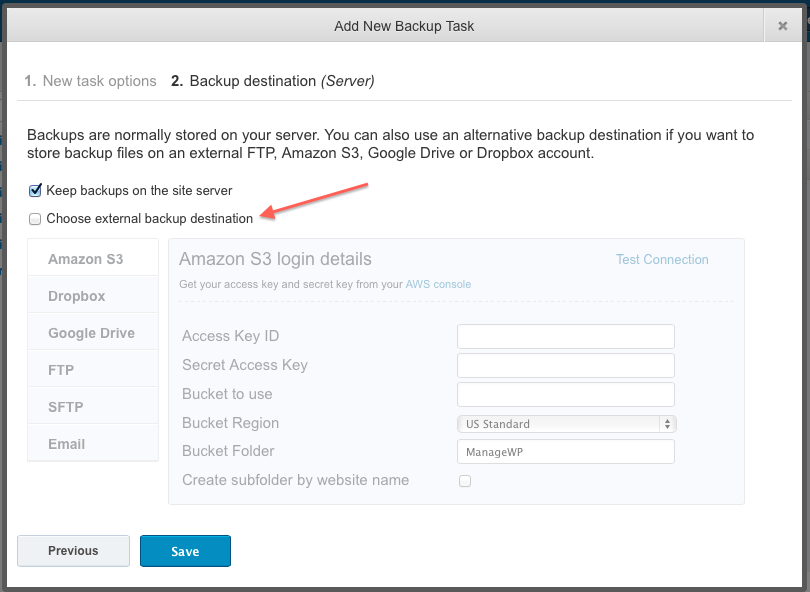
As I have previously mentioned, it is strongly recommended that you backup your WordPress sites to an external location, and this is the screen at which you can make that choice:

As you can see, there are six options:
Setting up each service is straightforward, and you have the ability to test the connection to confirm that it works.
And that’s it! Hit the “Save” button and you should receive the following message:

Step 5 – Backup Management
If you head back to the backups management page, your newly-created backup will be displayed. It’ll look something like this:

From this screen, you have total control. In the left column, you can edit your backup schedule, as well as view and download any stored backups. The middle column gives you a brief summary of the schedule, including the backup type and destination. And the right column gives you a status update on the schedule.
That’s It!
You’re now set up to create as many backup schedules as you wish.
We are constantly working to improve ManageWP. If you have any problems with the backup tool, do not hesitate to contact us. If you have an idea for how the tool can be improved, submit it here.
Blog post updated on June 19, 2014

Leave a Reply