WordPress can be overwhelming to the newcomer. And even for those of us who are more experienced, it is difficult to remember every single one of the little tweaks that you need to make to get things in order.
Fortunately, we have done all the hard work for you. Today we are going to walk you through all of the essential changes that you should make to the settings of a brand new WordPress blog. And once that’s taken care of, we are going to show you why you never need to go through this process again.
Time’s a wastin’, so let’s get to it!
Step 1 – Install WordPress
If you don’t actually know how to bring a website into existence, do not fear. It is a remarkably straightforward process. You can actually purchase a domain and hosting, install WordPress, and publish a post – all within 4 minutes. Don’t believe me? Check this video out:
As you can see, you can have a WordPress site up and running within minutes. And if you go with a popular hosting provider such as Bluehost or Hostgator (which we would recommend), the WordPress installation process can be completed with just a few clicks.
Step 2 – Plugins
You can access your plugins screen by hitting the “Plugins” option in the sidebar. A standard WordPress install currently comes bundled with three WordPress plugins:
- Akismet
- Hello Dolly
- Jetpack
Akismet is an excellent anti-spam tool that you will likely want for your blog. Just follow the instructions on the Plugins screen to get it up and running:

Hello Dolly is completely useless. Do yourself a favor and hit Delete:

You may or may not be interested by Jetpack’s features. Click here to find out more.
Step 2 – Set Up ManageWP
The next thing you will want to do is add your blog to your ManageWP account so that you can manage it remotely along with your other sites. Don’t have a ManageWP account yet? Click here to start your free trial!
Adding your blog to ManageWP is a piece of cake. Just read these two short guides and you will be up and running within minutes:
Step 3 – Your User Profile
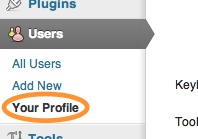
Setting up your user profile is an important step that many people miss. Depending upon your theme, some of your user profile data can be displayed publicly on your site, so you will want to make sure that it is all in good order. Go ahead and click on “Users > Your Profile” in the sidebar:

We recently published a post featuring 5 handy WordPress features you might not know about – check out tip number 1 for how you should name your profile.
Secondly, you may wish to alter the contact information fields within the user profiles screen. This is a piece of cake – just read this article to find out how you can do this.
Step 4 – Settings
This is where the bulk of your adjustments should be made. WordPress is very good at allowing you to display your content in a variety of ways, and it is in the settings screens that you will make your first few adjustments to get things looking the way you like.
You can access the settings screens via your sidebar. There are a huge number of options, but we are going to address only the most important ones.
General
Naming your blog is typically seen as rather important, and it is in this screen that you will do the honors. You should also choose a tagline for your blog, or remove the default tagline if you do not wish to have one.
Additionally, you will want to make sure that the email address in the General Settings screen is set correctly, otherwise you will not receive notifications from WordPress regarding your blog.
Finally, make sure that you get the timezone and date format set correctly. You are likely to get confused rather quickly if dates and times aren’t presented in the correct manner.
Writing
There are no absolutely necessary adjustments to make within the Writing Settings screen, but you should take the opportunity to update your ping list:

This is where you should place a list of site update services (which WordPress will automatically inform when you have made a change to your blog). For a list of recommended URLs to add to the list, click here.
Reading
On this screen, you can make the decision as to whether or not your blog’s homepage is a static page, or a display of your latest posts. Most blogs are the latter, so if you are in any doubt, leave the setting as it is.
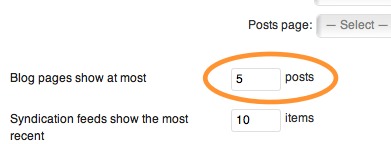
One change that we always recommend you make is to reduce the number of blog posts shown on your home page to 5:

Load time is extremely important when it comes to creating a successful blog, and changing this setting is a simple way of improving that factor, with no downside.
Finally, we recommend that you select post summaries to be shown, rather than the full text:

For an in-depth explanation as to why you should use blog excerpts, and how to use them most effectively, click here.
Discussion
This screen handles everything to do with the interaction between you and your readers.
The most important options on this page are the first three:

You will want to keep the first option checked – there is no downside to notifying other blogs of you linking to them.
However, you will want to consider whether or not people will be able to place pingbacks or trackbacks on your blog. For more information on trackbacks (and how you can utilize them to boost your blog’s exposure), click here.
Most importantly, you need to decide whether or not you want to allow comments on your blog posts. Simply unchecking the third box pictured above will remove that option. Most blogs have comments enabled, but if for whatever reason you do not want them on your site, this is where you turn them off.
The rest of the options on this page are tweaks relating to the presentation of blog post comments, in addition to moderation and notification settings. If you want to retain your sanity, you will probably want to turn off comment notification. Ensure that the following boxes are as such:

Permalinks
It is really important that you get your permalinks structure right for more reasons than we have time to go into here. Fortunately, doing so is a piece of cake.
The recommended format for your permalinks is simply the post name:

This is great for your onsite SEO and also makes logical sense for anyone navigating your site.
That’s It!
Those are the key changes you need to make to any new WordPress blog. Sure, there are a whole load of other things you can do, but the above options are the most important.
Just one more thing before you leave. Wouldn’t it be much better to start with a site that already has your preferred default settings in place, rather than making all of the above changes every time you start up a new site? The efficient thing to do would be to setup your new blog as a template, so that you can clone it onto any new site that you develop. Although that might sound daunting, it is a whole lot more straightforward than you think – just follow these simple instructions.
What Do YOU Do With A New WordPress Install?
We all have our different habits, and there is no doubt that some of you will have a different way of going about things than the steps covered above. So if you have any good suggestions as to what WordPress users should do when first setting up a new site, let us know in the comments section!
Creative Commons photo courtesy of JohnSeb

Leave a Reply