
Tell me, I’ll forget. Show me, I’ll remember. Involve me, I’ll understand. ~ Chinese proverb
I’m a sucker for practical case studies.
Don’t get me wrong; a good tutorial can often be all you need in order to get something done. But when it comes to more creative projects, a tutorial alone may not be sufficient to teach you what you feel you need to know about something. If on the other hand you can actually examine a practical example of how someone has achieved something, that experience can give you a far greater chance of creating something similar.
That is the aim of this two-part series, in which I am going to give you a candid view of what I have done over the past couple of weeks to convert a previously rather lacklustre authority blog of mine into something that I am proud to promote. By doing so I hope to give you direction in your own efforts to create a good-looking WordPress blog.
What I Started With
First let’s introduce the site: Free Online Dating Advice. It started life as a slightly customised Twenty Eleven theme:
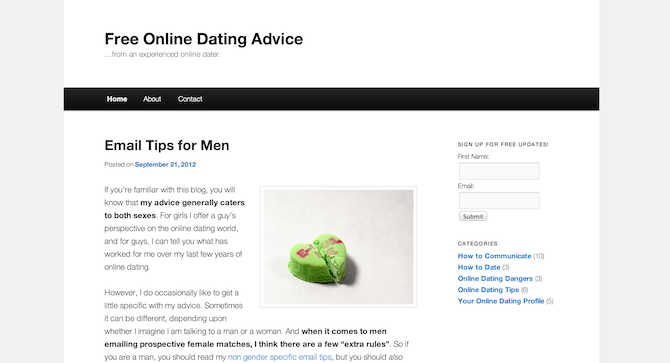
It wasn’t bad, per se, but it did lack any kind of originality (it certainly wasn’t going to win any design awards). It could well be a turnoff to those who visited it; especially other bloggers who would see it for what is (a default WordPress theme). That wasn’t a problem at the time as I wasn’t looking to attract other bloggers — my original strategy was based around search engine optimization.
My attitude was that I didn’t need to worry about design until I actually had some visitors and had a reason to create something a little more bespoke. That approach made sense at the time, but my efforts on that front were ineffectual (I managed to prove — as I had expected — that Google will not rank a site without backlinks, even for extremely low competition long tail keywords). As such, I decided to move onto a more traditional blog marketing strategy which would involve outreach, social media, and other “organic” forms of promotion.
I started to put a plan in place — I hired writers to keep the content rolling on a regular basis and started building a list of websites that I wanted to get links from. But I was left with a problem that would need to be resolved before I went any further: the design. If I wanted to convince bloggers that they should link to me, I would need to demonstrate that I meant business. That meant decent branding and a solid design — two things I did not have at the time.
After a couple of weeks of work I ended up with this:
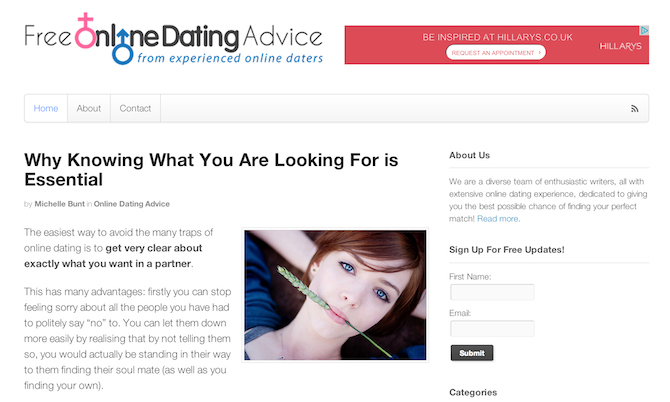
While it is still a relatively minimalistic design, I am sure you will agree that it is a vast improvement on its predecessor. I still have some improvements to make (which I will cover in the second post in this series) but this is the kind of design that I would be happy to show off to fellow bloggers. It is clean, easy to navigate and well-branded.
So what did I do to create this much-improved design? Let’s take a look!
Going Premium
My first step was an absolute no-brainer — install and activate the Canvas framework by WooThemes. If you want to see just how versatile it is, compare my dating site with my main blog, Leaving Work Behind (it’s the same theme):
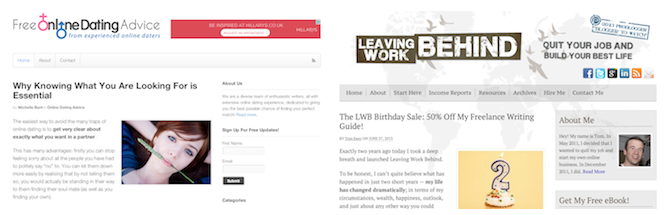
Canvas provides an awesome base from which you can easily customize and tweak your blog into something more unique. Although there are plenty of similar products out there (covered comprehensively in Nathan’s excellent post on theme frameworks), it is definitely my weapon of choice.
Canvas comes with a bunch of customization options (accessed via Canvas > Theme Options in your WordPress sidebar) which means you can create something relatively unique without having to get your hands dirty with code. I made a few simple tweaks this way, including:
- Adding a Google AdSense ad next to the site title (via General Settings > Advertising)
- Altering link colors (via Styling & Layout > General Styling)
- Changing the header font sizes (via Styling & Layout > Misc Typography)
- Disabling dynamic image resizing of featured images (via Dynamic Images > Resizer Settings)
I also took the opportunity to create a custom menu (via Appearance > Menus) so that the items in my navigation bar were labelled appropriately. Finally, I added some widgets (via Apperance > Widgets):
- An “About Us” box (text widget)
- An email subscription box (text widget)
- A categories widget
- A Woo Tabs widget (part of the free Woo Dojo plugin)
- A Woo Search widget
- A Woo Adspace widget
With those bits and pieces completed the site was starting to look a little more impressive. However, I still had work today — I had no logo and some of the default characteristics of Canvas were bugging me.
Installing Plugins
While the site already had a bunch of plugins installed at this point, I knew there were a couple more that I wanted to install.
First there was Fanciest Author Box — an awesome plugin that any multi-author blog should consider using. I reviewed it recently if you’d like to know more. It only costs a few bucks but there is a free version available with slightly less functionality. I also installed Custom WordPress Avatars so that I could easily upload avatars for my writers who didn’t have a Gravatar profile (a ridiculous requirement within WordPress).
With that done I looked to a couple of plugins that could help me increase engagement and boost traffic to the site. I started with Evergreen Post Tweeter — a plugin I developed myself that enables you to automatically re-tweet selected archived posts to your Twitter account. I coupled that with Related Posts by Zemanta — a new kid on the block in terms of related posts plugins, but one with promise.
I normally use Yet Another Related Posts Plugin but I decided to go with this alternative on the basis that it promises a boost in external traffic referrals and is ready to go with a pretty template out of the box.
Getting More Adventurous
So that was the easy stuff done and my site was already on its way. But I wasn’t done yet — I wanted to get my hands a little more dirty.
By that I mean setting up a child theme, implementing some custom code and CSS tweaks, not to mention getting my hands on a logo. I’ll cover all of that in the second part of this series!
In the meantime, if you have any questions or comments please do not hesitate to leave them via the comments section below.
Leave a Reply