This post is part of a series on building better WordPress blogs. You can find links to all posts in the series at the bottom of this page.
So — you’ve purchased a domain name and hosting and installed your first WordPress website. What next?
Well, you could get straight onto producing content — there is nothing to stop you. You could even start installing and fiddling with themes and plugins. However, you will save yourself some time and headaches down the line if you first optimize WordPress’ settings for your own unique needs.
Although that can seem daunting to the uninitiated, in this post I will take you through everything that you need to know.
Help is Always Available
As a WordPress user, the first thing you should understand is that you are part of an enormous community of people, many of whom are only too willing to help you out. If at any point you are stuck, or feel overwhelmed, you will almost definitely be able to find a solution to your problem.
Your first port of call can be found within your blog — more specifically, the little “Help” tab that is ever present on the WordPress back end:

Clicking on that tab will unveil a contextual help menu, featuring links to the WordPress Codex and support forums (which are typically your second and third ports of call, if you can’t find the answer to your question from within WordPress). Help is always at hand!
Customizing Your Dashboard
Your dashboard is like a new house — you own it, but you need to make a few personal changes to make it truly yours.
You’ll start off with something resembling this:
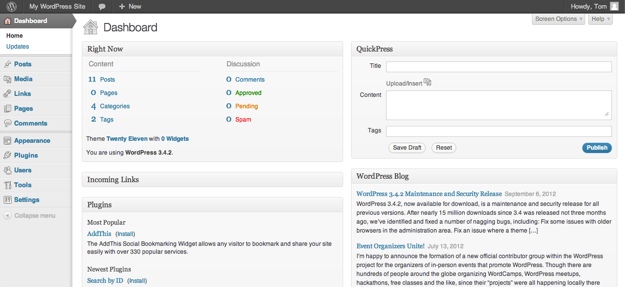
As you can see, the dashboard is made up of individual widgets of varying uses. Chances are that you have no need for some of these widgets. Fortunately, getting rid of unwanted widgets (and adding ones you do want) is a piece of cake.
Just click on the “Screen Options” tab at the top right of the page, and select the widgets you would like to see:
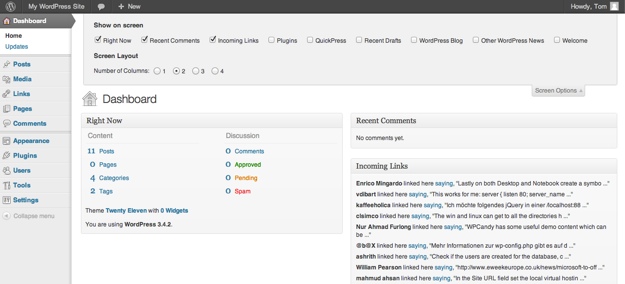
You can also select the number of columns you would like to see on the page, and drag and drop widgets into whatever position suits you best.
If you’re feeling adventurous and really want to refine your WordPress dashboard, check out our guide on doing just that.
Editing Your User Profile
When it comes to blogging, identity is important. With that in mind, you should take a moment to ensure that your user profile is set up properly.
You can access your user profile from the sidebar:

Whilst there are a variety of settings you can fiddle with her, we are only concerned with the most important bits — your name, email address, and biography.
1. Your Name
Your theme will probably display the name that is selected in your user profile on the front end of your site. As such, you should take a moment that it is what you actually want to show.

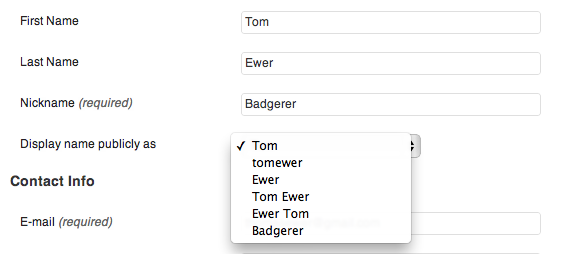
As you can see from the above screenshot, you cannot change your username (unless you get your hands dirty with your WordPress database, but let’s not concern ourselves with that for the time being). However, you can easily change the name that is displayed on the front end of your website. If you enter your first name, last name, and a nickname, you will then be able to choose from those options with the drop down menu:
2. Your Email Address

Your email address is important for one vital reason — it is the address that your WordPress site will use to contact you. Your email address will be utilized by the WordPress core, and any number of potential themes and plugins. Comments notifications are one example of when WordPress might email you. Another example would be if you have a security plugin installed, it might email you automatically if it detects a threat.
So with the above in mind, it is important for you to ensure that the email address entered into the above field is correct.
3. Your Biography

Depending on what theme you use, your biography may be utilized on the front end of your site (for instance, in an author bio box after blog posts). Therefore, you may wish to take a moment to fill it in with some relevant information. You can use simple HTML tags within the bio box (if you want to).
Settings
With your profile now set up and good to go, let’s move onto the various settings screens available to you from the WordPress backend. You can access each one via the sidebar:
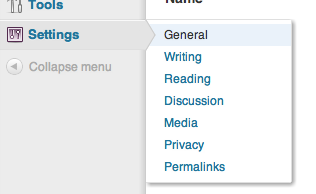
It might seem like an imposing list of pages, but in reality, you don’t need to worry about a lot of the settings within. Let’s just take a look at the most important pages and settings, and you can always come back to the rest later if you’re curious.
General Settings
This is where some of the most relevant settings are kept. As a bare minimum, you should take a quick look at everything on this page.

The site title and tagline are pretty self-explanatory. The contents of these fields are likely to show up at various points within your site, as well as within your title tags (i.e. what search engines (and search engine users) see). Obviously you’re going to want to change these from the default values, but don’t feel like you have to make a permanent decision, as you can always come back and change them at a later date.

You probably don’t need to touch the WordPress Address and Site Address fields. One thing you will want to consider though is which URL you want search engines to index (i.e. the canonical URL) — the “http://” or “http://www.” version. You can define that in these fields (either add or remove the “www.” as you see fit). If you find any of that confusing, don’t worry about it — it’s not vital.

As with your user profile’s email address, you should make sure that a valid address is included within the “E-mail Address” field on this page.

Below that, you have a couple of user registration options. To start with, you probably do not want anyone to be able to register, so leave the box unchecked.
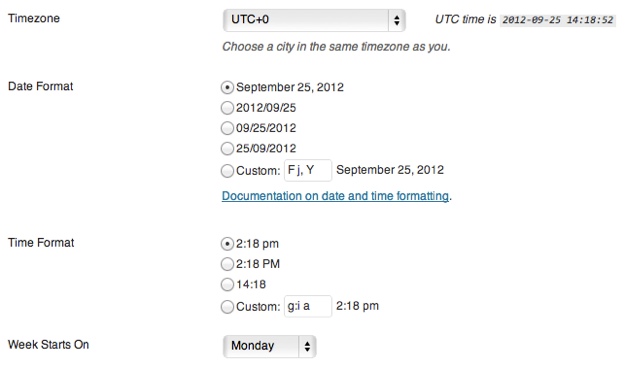
Finally, you’ve got the date and timezone related settings, which you should set according to your locale. As with plenty of the settings explored in this post, the timezone and date settings you enter here will be reflected on the front end of your site.
Reading Settings

Here you show how many (and how much of) your blog posts are displayed on various pages throughout your site. The settings you select here are largely up to personal preference, but I would generally recommend that you select 10 posts to be shown in summary format.
As for encoding, you don’t need to worry yourself about that.
Discussion
Blogging is intended to be an interactive exercise, so it is no surprise that there are a lot of settings at your fingertips when it comes to interacting with your readers.

It is rare that you won’t want to notify blogs when you link to them, so you will probably want to keep that option checked. However, the other two options are a little more personal. For instance, I do not allow link notifications from other blogs, because I think it makes my comments section very messy (not to mention the spam issue).
As for allowing people to comment — now is the time to make a decision as to whether or not your blog will feature comments. The vast majority do, but that does not mean that yours necessarily should. If you decide not to have comments on your site, you will be able to ignore all of the following comments related settings.

Most of the above settings are self-explanatory, but you may be wondering what is right for your blog. I would always recommend that comment authors are made to fill out their name and email address. However, I would say that they shouldn’t have to register to leave a comment — that’s too much hassle for most people. Whether you want to close comments is a personal preference, and not one I have ever exercised.
Threaded (or “nested”) comments simply serve to show when one comment is in reply to another, like this:
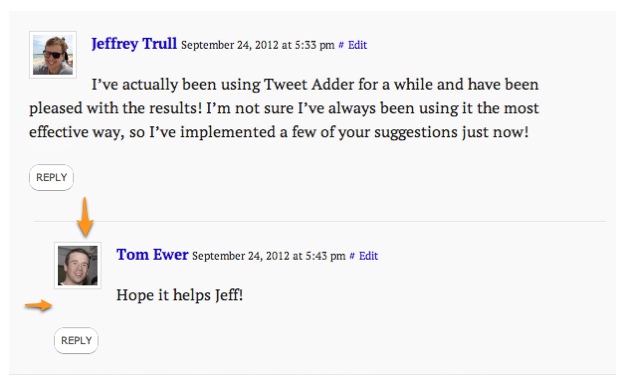
It is a good idea in terms of being able to see how a conversation has developed, but if you allow them to go too deep, it can look a little messy. The default setting (5) is a good number in my experience.

Comments notification by emails can be pretty exciting to start off with, but will soon get boring. Far better to rely upon WordPress’ excellent comments handling system. The same goes for notifications of comments held for moderation — your inbox will fill up before too long. However, it is of course up to you — I had email notifications for comments on for the first few weeks of my first blog’s life.

I am 99% sure you’re going to want to make sure that you do not always have to approve a comment. Not only will that get old really quickly, it will frustrate people who try to leave comments on your site.
It is a good idea to hold a comment for moderation if it has more than a couple of links — the reason for which is explained, as you can see in the screenshot above.
Below those settings, there are two boxes in which you can enter keywords that will automatically get comments marked for moderation, or as spam. Probably not something you need to get into right now.
Right at the bottom of this settings page, you have the Avatars section:
![]()
Avatars add a little color and spice to your site, so I would recommend that you keep them on. The other settings here really are down to your personal preferences.
Privacy Settings

This screen is dead easy — do you want search engines to index your site or not? If you are setting up a public site, the answer will almost definitely be yes. If you are setting up some kind of personal blog that you want to keep private, you may wish to ask search engines not to index your site.
Permalink Settings
Last but by no means least, you need to make a decision as to what your permalinks will look like. There’s a lot to confuse you on this page, but setting your permalinks is actually a piece of cake.
Unless you have particularly unique needs, you are almost certainly going to want any page’s permalink on your site to reflect the name of the page or post (e.g. a post entitled “My First Post” would have the permalink “http://www.yoursite.com/my-first-post/”). This structure makes URLs eminently readable for end user, and also boosts your onsite search engine optimization. So unless you’re feeling adventurous, select “Post name” as your permalink style:

You’re Good to Go!
That’s really all you need to concern yourself when it comes to your WordPress site’s settings. In reality, you could start blogging immediately without touching the settings, but getting yourself familiarized with the backend (and how your blog will behave) is always a good idea.
If you have any questions about the above settings (or about setting WordPress up in general), please do not hesitate to leave a comment below!
The Building Better WordPress Blogs Series
- 3 Simple Steps to Setting Up Your First Self-Hosted WordPress Site
- Getting Started with Your WordPress Site’s Settings
- The ManageWP Guide to Essential WordPress Plugins
- How to Create a Personal Blog with WordPress
- How to Build a Freelancing Site with WordPress
- How to Create an Authority Blog with WordPress
Creative Commons image courtesy of S. Diddy
Leave a Reply