As a WordPress developer, your job is to create functional sites for your clients. However, this goes beyond basic front end design. You also have a responsibility to make websites that are easy for clients to use on the back end.
When you customize WordPress sites for clients who are not so technically savvy, you offer them a more enjoyable website management experience. You also reduce the likelihood of them accidentally breaking their sites by editing code or altering settings.
Taking the few extra steps to add and remove certain functionalities in the admin dashboard can go a long way. To that end, this post will share six tips for customizing WordPress sites for your clients. Let’s get started!
An introduction to customizing the WordPress dashboard
As a WordPress developer, you’re probably very comfortable navigating the WordPress back end. However, imagine it from the perspective of someone logging into their site for the first time. It can feel a bit overwhelming.
Fortunately, you can customize WordPress sites for your clients to improve both the design and functionality of the back end. In most cases, this process involves adding and removing certain features.
For example, you may hide specific settings or tools, to prevent your clients from making well-intentioned changes that do more harm than good. This can save you from having to troubleshoot the resulting issues, while also removing clutter from the dashboard so it’s easier to navigate.
By customizing WordPress sites for your clients, you can offer a better solution than a generic Content Management System (CMS). In turn, this may increase the likelihood that they will be satisfied with your services and employ you again or recommend you to someone else.
How to customize your WordPress sites for clients (6 key tips)
Now that you understand how customizing the WordPress dashboard can benefit both you and your clients, let’s take a look at six ways to do so.
1. Replace the WordPress logo on the login page
The login page is the first thing your clients see when they visit their sites. While there’s nothing wrong with keeping the default logo, replacing it with the client’s is an effective way of making the site less generic and reassuring clients they’re in the right place.
To do this manually in WordPress, you can edit the functions.php file for the site’s theme. Access it via FTP or the WordPress file editor, and add the following snippet of code:
function my_login_logo() { ?>

<style type="text/css">

#login h1 a, .login h1 a {

background-image: url(<?php echo get_stylesheet_directory_uri(); ?>/images/site-login-logo.png);

padding-bottom: 30px;

}

</style>

<?php }

add_action( 'login_enqueue_scripts', 'my_login_logo' );
Make sure you replace site-login-logo.png with the file name for your client’s logo. WordPress also offers a handful of ways for further customizing WordPress login forms with CSS styling.
To speed up this process, you can use a plugin such as LoginPress:

This free tool enables you to easily change the layout of the WordPress login page, including error and password hint messages. You can also modify the logo image and size, as well as the background.
2. Add helpful tips and resources to the dashboard
Once the client logs in to their WordPress site, they are faced with the dashboard. Again, this can feel a bit cluttered and confusing to new WordPress users.
As a developer, you can make it easier for your clients by adding some helpful documentation to the dashboard. For example, you can create a welcome message with tips and resources they’re likely to find useful.
Having this support available and visible from the moment clients log in can save you time by answering questions before they’re asked. It’s also convenient for your clients, as they can access valuable resources conveniently at any time.
There are a number of methods you can use to accomplish this. One way is to manually add the code to create a custom widget in the theme’s functions.php file.
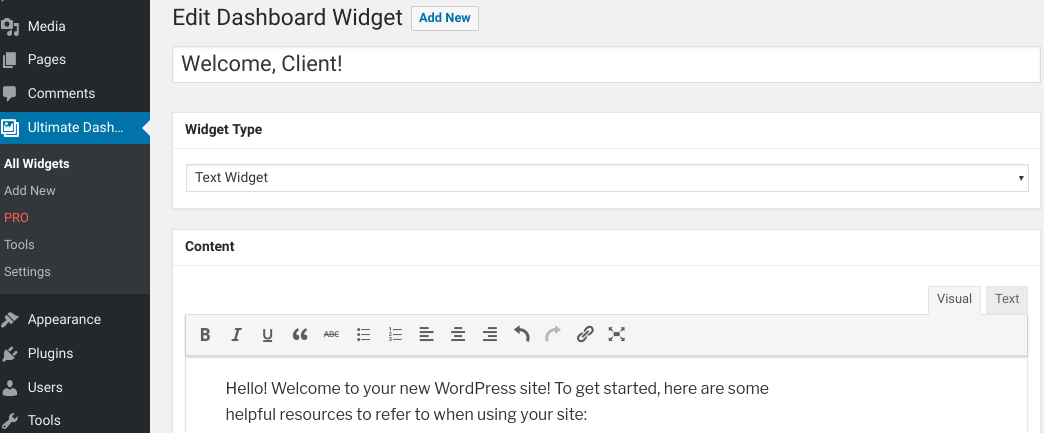
However, you can also use a plugin such as Ultimate Dashboard:

This tool enables you to create custom icons and widgets for the admin dashboard. For example, you might add a list of external links to WordPress tutorials or create a Frequently Asked Questions (FAQ) widget:

Once you add the widget, you can drag it to a prime location in the dashboard where clients can easily find it.
3. Hide unnecessary menu items
An easy way to customize WordPress sites to improve the experience for your clients is to simply remove items they won’t be using. The more options available in the dashboard, the more crowded and confusing it becomes.
By eliminating unnecessary menu items, you can make it easier for clients to focus on and find the ones they’ll actually use. Plus, this minimizes the risk of them changing a setting that could break the site.
In addition to the Settings pages, another common menu item to remove in the WordPress dashboard is Tools. To do this manually, you could insert the following code into the theme’s functions.php file:
function remove_menus(){
remove_menu_page( ‘tools.php’ ); //Tools
}

add_action( ‘admin_menu’, ‘remove_menus’ );
You could also use a plugin such as User Role Editor:

This tool enables you to completely customize the permissions and visibility of various admin areas for certain users. You can also add new user roles to your clients’ WordPress sites, as we’ll describe shortly.
4. Customize user roles
WordPress comes with several user roles out-of-the-box. Each has different levels of access and permissions in the back end. However, the default roles may not be well-suited to some clients.
If that’s the case, you may want to create custom user roles in order to set unique permissions, or hide certain functions from your clients as described above. To do this, you’ll need a plugin such as User Role Editor.
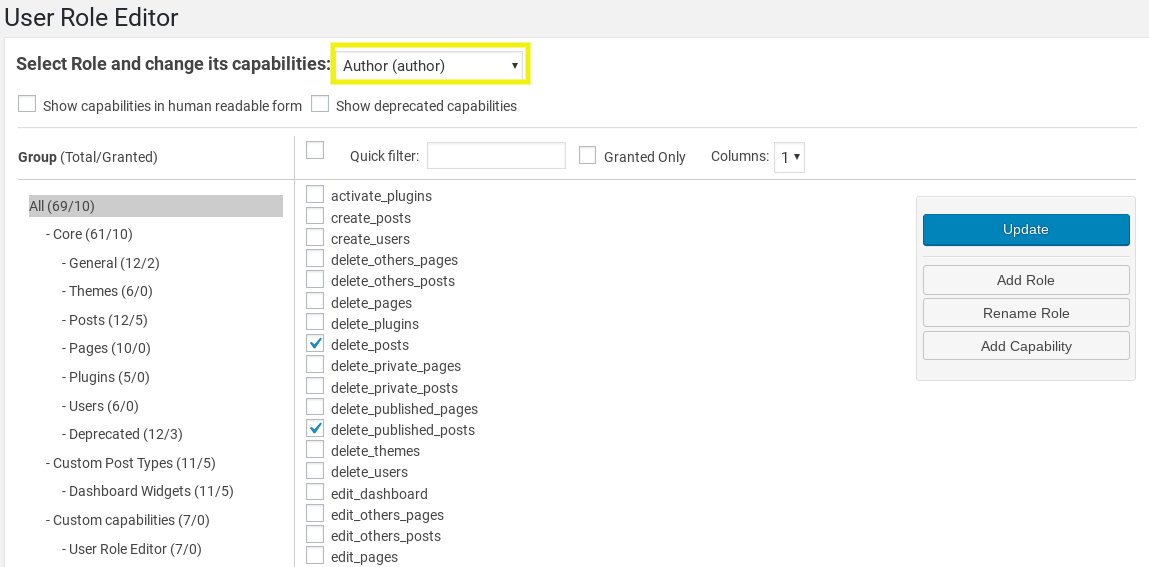
After you install and activate this free plugin, you can create and assign different levels of access to specific user roles. To do this, navigate to Users > User Role Editor in the WordPress dashboard.
This will bring you to a screen where you can customize the capabilities for each role:

To customize an existing role for a client to use, choose one from the drop-down menu. Then you can select the checkboxes to enable capabilities for any users assigned to that title, including your client.
Alternatively, you can click on the Add Role button to create a whole new title with unique abilities for your client. You might call this position Owner or something similar, to help them feel like they’re a step above default roles such as Editor or Author.
5. Add a custom admin theme
Custom admin themes in WordPress can be used to change the styling of your client’s dashboard. You can also use this method to incorporate additional functionalities.
An easy way of doing this without inserting code yourself is with the Ultimate Dashboard plugin we mentioned earlier. Upgrading to the Pro version enables you to customize the colors and branding of the WordPress dashboard.
It also includes other ‘white label’ features you can use to modify the back end. For example, you can add custom footers and version text, as well as a special admin bar logo URL.
If you have the Ultimate Dashboard plugin installed, you can upgrade by clicking on PRO in the plugin menu on your WordPress dashboard. You can also download it via the plugin’s website.
6. Disable theme and plugin editing for certain users
As a WordPress developer, being able to edit the theme and plugin files directly from the built-in WordPress file editor can be useful. However, your clients probably don’t need access to it.
To avoid your clients accidentally making detrimental changes to their sites’ code, you can add the following to their wp-config.php files:
define( 'DISALLOW_FILE_EDIT', true );
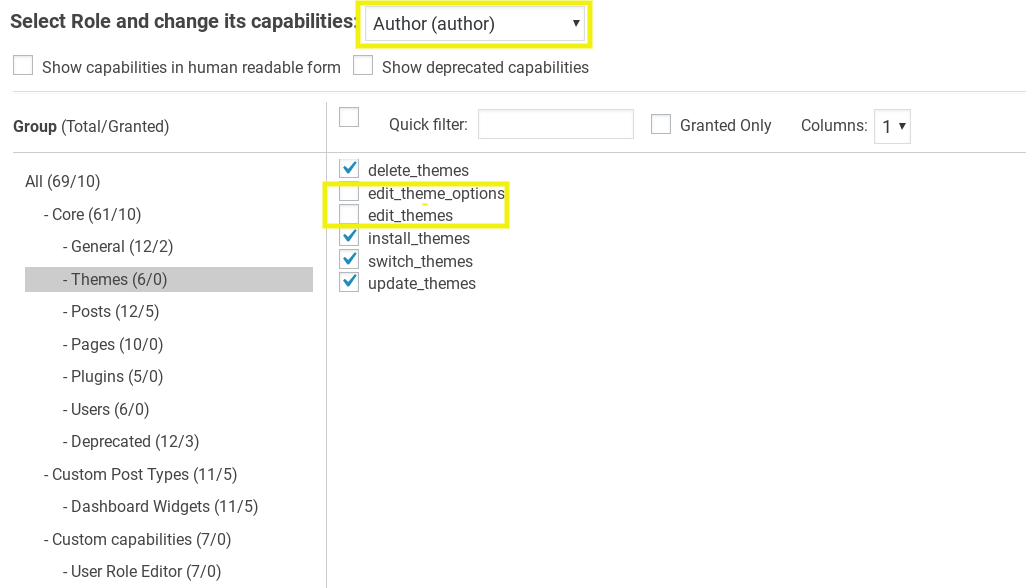
If you have the User Role Editor plugin we mentioned earlier, you can also disable theme and plugin editing permissions for certain roles:

This can save you time, by reducing the chance that you’ll have to step in to troubleshoot mistakes or even rebuild lost portions of the site.
Conclusion
As a developer, WordPress probably feels like a second home to you. However, it’s important to remember that the clients you build sites for often don’t have the same level of experience.
As we discussed in this article, you can improve usability for your clients by customizing their WordPress sites in the following ways:
- Replacing the WordPress logo on the login page.
- Adding helpful tips and resources to the dashboard.
- Hiding unnecessary menu items.
- Customizing user roles to restrict advanced functionality.
- Adding a custom admin theme.
- Disabling theme and plugin editing.
Do you have any questions about customizing WordPress sites for clients? Let us know in the comments section below!
Image credit: Pixabay.

Leave a Reply