How to Set Up Your WordPress Website in Google Webmaster Tools

How to Set Up Your WordPress Website in Google Webmaster Tools

Google is your friend.

Although it often gets bashed by bloggers (typically after an algorithm update), Google is a source of free traffic for your blog that you should seek to leverage. No website has a God-given right to be on the first page — all you can do is optimize your site as best as possible, and hope that positive rankings will come in time.

Search engine optimization takes many forms, but today I want to focus on something that all webmasters should do — register their site with Google Webmaster Tools. This is like shaking hands with Google at a cocktail party — you’re introducing yourself, and letting them know who you are and what you’re about.

Not only that, but Google Webmaster Tools offers up a whole suit of (you guessed it) tools that you can use to further optimize your site. With that in mind, let’s go through the process of setting up your WordPress website in Google Webmaster Tools.

Adding and Verifying Your Site

The first thing you need to do is head over to the Google Webmasters website, and sign in:
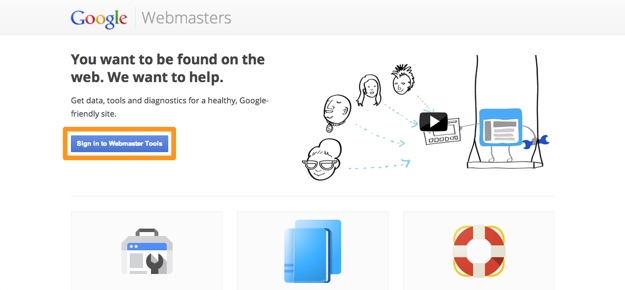
Google Webmaster Tools

Assuming you do not yet have any websites in your Webmaster Tools account, you will be presented with a blank page. To add your first site, click the “Add a Site” button in the top right:

Add a Site

You will be presented with a pop-up box, in which you can enter your site’s domain name. Enter your site’s domain name with the “www.” prefix (e.g. “www.mysite.com”).

Once you have done that, you will be prompted to verify your site. The quickest and easiest way to do this is via your Google Analytics account:
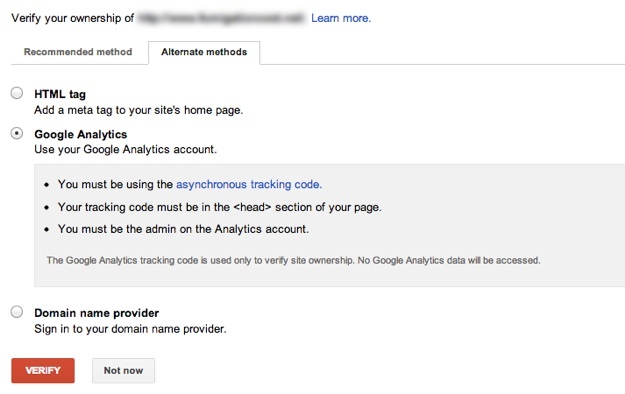
Verifying Your Website

If your site is already registered with Google Analytics, verification can be achieved with a couple of clicks.

If however your site is not registered with Google Analytics (and you do not want to register), the next best solution is to verify via HTML tag.

First of all, copy the meta tag that Google prompts you with:

Verifying Your Site

Then login to your WordPress site, and navigate to Appearance > Editor in the sidebar. Locate your “header.php” file in the list of theme files to the right of the screen:
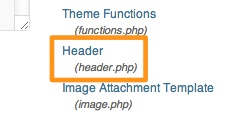
header.php

In the editor screen, locate the <head> tag, and paste the meta tag you copied earlier below it:

Google Site Verification

Re-save the file, and you can then go back to Webmaster Tools and complete the verification process.

I would recommend that you create a child theme and make a copy of your header.php file to do this. If you don’t, you run the risk of your meta tag disappearing when the theme is next updated. Besides, using a child theme is best practice anyway, so this is a good reason to do it. The process is not particularly complicated.

The final thing you need to do is repeat the above steps for the non “www.” version of your site (e.g. “yoursite.com”). This is an important step, as I will explain.

Setting Up Your WordPress Site in Webmaster Tools

Webmaster Tools offers up a host of useful tools that you can use to further optimize your site. However, you should not neglect the most basic tasks that every webmaster should carry out when setting their site up. I have detailed the “must-do” actions below.

Define Your Preferred URL

If you followed the steps above, you will now have two versions of your website verified with Webmaster Tools. The next step is to tell Google which is your preferred URL, which you can do by navigating to Configuration > Settings in the sidebar:
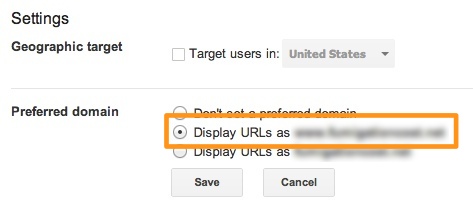
Preferred URL

You will want to repeat this process for both versions of the site (obviously, each preferred URL should point to the same version).

It doesn’t make a difference which one you go for — it’s an aesthetic choice more than anything. However, it is important that the version you pick matches the URL defined in the General Settings of your blog:

Canonical URL

The point of this exercise to demonstrate to Google which version of your site it should prioritize in the search results, in order to avoid duplicate content issues. You are defining what is known as the canonical URL. If you would like to learn more about canonicalization, click here. Take a look at permalinks guide too.

Set a Geographic Target (or Not)

Setting a geographic target is done via the same page in which you defined your preferred URL (as shown in the screenshot above).

Doing so is extremely relevant if you intend to target a specific locale with your site, because you will essentially be telling Google to prioritize your site’s rankings to searchers in a specific country. This can have a major impact on your rankings.

If you intend to target a global audience, do not touch this setting. But if you are targeting a single country, make sure that you inform Google via this method.

Add a Sitemap

The final step in getting your site set up in Webmaster Tools is to add a sitemap.

A sitemap is an XML file that lists every single post, page and taxonomy on your site that you want Google to index. Although having a sitemap isn’t essential, they give Google’s spiders an easy way of determining the layout and structure of your site, which can’t be a bad thing. Plus, with one of two free plugins, creating a sitemap can be done at the click of a button.

To create your sitemap, I recommend using one of two plugins:

  1. Google XML Sitemaps
  2. SEO by Yoast

The first option is just a straight-up XML sitemap generator, with no other bells and whistles. SEO by Yoast, on the other hand, is a fully-featured SEO optimization plugin. It is, in my humble opinion, by far the best SEO plugin available, here’s our guide for using it.

To create an XML sitemap with SEO by Yoast, just install and activate the plugin, then navigate to SEO > XML Sitemaps in the sidebar. On the resultant screen, just check the box to enable XML sitemap functionality, and you’re done!

Creating an XML Sitemap

The plugin will dynamically update your sitemap without you having to do anything.

Before you move on, open your XML sitemap and make a note of its URL.

Now head back to your Webmaster Tools account and navigate to Optimization > Sitemaps. Click “Add/Test Sitemap” on the resultant screen, and enter the location of your sitemap in the popup box:
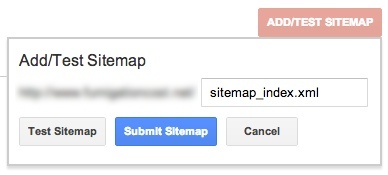
Add Sitemap

You can now test the sitemap for errors, then submit it.

Exploring Webmaster Tools

Congratulations — that’s all you need to do to get your site up and running with Webmaster Tools!

However, there are plenty of tools and resources for you to experiment with — from sitelinks, to crawl errors, to search queries. Take some time to explore your options — you may find a few things that are of real help.

Tom Ewer

Tom Ewer is the founder of WordCandy.co. He has been a huge fan of WordPress since he first laid eyes on it, and has been writing educational and informative content for WordPress users since 2011. When he's not working, you're likely to find him outdoors somewhere – as far away from a screen as possible!

31 Comments

  1. Narinder kumar

    Thanks for sharing a great stuff I am trying to submit my blog on webmaster but I am facing issue my website already submit in webmaster but when I am trying to find any webmaster meta tag in my head section. there is no here.

  2. Jeff

    Thanks Tom for the refresher course. I have to verify 4 websites with Google Analytics and your post did the trick.
    Best regards, Jeff.

  3. Dendi Hidayat

    I’m using All In One SEO and I click Update Sitemap button. And then show a message “Failed to notify google about changes to your sitemap”

  4. cheap Hurricanes jerseys free shipping

    Where to get cheap Hornets jerseys china online with free shipping. Buy cheap authentic nfl jerseys wholesale from usa.

  5. sophiaharison

    How to submit news?

  6. Savi

    Hi,
    I have wordpress site where yoast plugin is installed for seo. Please let me know further i only need to create backlinks or i also have add google site verification code and site map in my website. Kindly answer my this query.

    1. Tom Ewer

      Author

      I’m afraid I don’t understand your query Savi.

  7. MerelyAdventurous

    I am having a bit of trouble with this. I think my main problem is that my blog has a .wordpress extension, so I am assuming these directions (which were very clear!) would not apply to my blog?

    1. MerelyAdventurous

      Actually I got the Google Webmaster Tools to work, but the Pinterest verification will not work.

  8. Leon Dawson

    Thank you for the information, I have been looking for this all over the internet.

    Very Easy to implement.

    1. Tom Ewer

      Author

      Thanks Leon! Glad it helped 🙂

  9. Faisal Hassan

    I am beginner and new in this field. Please guide me

    I verified my site in google webmaster tools but I can’t submit in sitemap. Whenever I try this error comes ” 404 (Page Not Found) Error ” . I installed Yoast Plugin but it did not help me to solve the problem. Then I installed ” Google XML Sitemaps ” plugin but still can’t submit in google sitemap.

    Then I went back to my wordpress dashboard, clicked the settings and there was a xml-sitemap. There was a message something like that ” create your sitemap “, I clicked and the following message came
    ” Your sitemap was last built on 17/09/2013 12:34 am.
    Your sitemap (zipped) was last built on 17/09/2013 12:34 am.
    Google was successfully notified about changes.
    Bing was successfully notified about changes.
    The building process took about 0.79 seconds to complete and used 3.25 MB of memory.
    If you changed something on your server or blog, you should rebuild the sitemap manually”

    I went back to my ” Google XML Sitemaps ” plugin page and the following was there
    ” google-sitemap-generator/sitemap.php (active)” and there were some codes there.

    But still can’t submit in google webmaster sitemap. What Should I do now? What is all ?

    1. Zubair

      Yes same conditions for my site.

      http://opakistanidramas.com

      google is not indexing quickly.

  10. Sonia Sharma

    there is nothing extra to be covered this is the whole process for setting up wordpress.Thanks learned great things from you.

  11. yogesh

    Hey Tom
    This single article covers many things regarding webmaster tool.I dont know who to submit sitemap in webmaster tools but your article solve my problem.Thanxx for sharing this wonderfull piece of information with us.

  12. Kaspersky Coupon

    I like the idea of setting preferred domains in GWT. I normally do not set this as I set my domain redirected to www version. But after reading your recommendation to set preferred domains, I should set this from now on. Thanks for this.

    1. Wiredtree Review

      i’ve personally tried the preferred domain settings in GWT. but it doesn’t make any difference to me thou.

      what’s your result so far?

  13. Istiak Rayhan

    Hey Tom,
    Nice and detailed post. For your reader, another easiest way to verify ownership is using All in SEO Pack Plugin. All you need to do is just enter the Google Webmaster Verification code on General setting of the plugin.
    Thanks for nice sharing.

  14. Debolina

    Amazing post. Handling webmaster is a lot easier for me now. Thanks!!

  15. Lyle Fredette

    Thanks for this excellent tutorial – it saved me a lot of time.

    I know the “www or not” topic is a bit old, but I thought I’d post this quote from Google’s Webmaster Tool anyway. It’s for people who see a message that their site is not indexed, “You may need to verify ownership of both the www and non-www versions of your domain. Because setting a preferred domain impacts both crawling and indexing, we need to ensure that you own both versions.”

    Cheers,

    Lyle

  16. Hilary Linderman

    This was a great tutorial, clear and easy to follow. Thank you.

  17. sunil

    thnx for nice post. kindly let me know in preferred url setting in webmaster which url should we select www or non www.

    1. Tom Ewer

      Author

      It’s personal preference — I wouldn’t worry too much about it. I use both across different sites.

  18. Zlar08

    Hi,

    I am newbee in wordpress. With lots of efforts seems like it’s just about to be finished. I need to instal some needed plugins, and was going to instal SEO by Yoast. When reading your site I realized that I should remove Google XML Sitemaps , am I right?

    Thanks,
    Zlar08

    1. Tom Ewer

      Author

      Yep — not needed if you have SEO by Yoast 🙂

  19. Mahendra chhimwal

    hello there
    I find difficulty in verifying web master tool in my site.Google does not verify it after putting the html code of web master tool in place you said above .What can be the problem ?help me please.
    $Mahe$ .

  20. Thomas Zickell

    I know that this is necessary for some users but never believed that it would actually be something someone attempting to optimize their site would not already know. Please do not take this as me trying to say anything negative about the knowledge of someone I don’t know because none of us were born with this knowledge we all learned somewhere. However my humble opinion is in today’s world you’re better off calling a firm that you have checked out if you do not already know that your site needs to be indexed by Google Webmasters tools and have never used it before ever. If you are really interested in search engine optimization try SEOmoz SERPS or search engine land. You can learn a lot this is bolting the training wheels to your bike it’s necessary but your dad did it not you please understand this is good knowledge to know that you should do everybody should do this but don’t expect a real edge over people that are really doing SEO for that you will need to learn it the correct way or pay someone to do it. I suggest a mix last but not least always use excellent hosting with WordPress Google website factors in the speed of your website I recommend people like WPengine.com page.ly zippykid.com & websynthesis.com why do you recommend the host I just recommended because every one of them will fix your site for free & clean up your malware if you get hacked, automatically back up your site every 12 hours, have extremely knowledgeable fast working people to make your support experience outstanding. all of them offer a content delivery network some you have to pay more for than others because I I also recommend a content delivery network if you really want to get your site moving. Zippy kid is probably the one to deliver the most for your money as they include a content delivery network and 100,000 views a month $25 a month, Page.ly 24.99 a month 20,000 views a month $50 plan offers access to a CDN for $20 a month, wp engine 20,000 views per month optional CDN $20, web synthesis 2000 unique visitors a month $24 no CDN but they will manage use cloudflare or Max CDN I would have a look at CDN77.com has a wonderful Price and easy-to-use
    I hope I have been of some help to you

  21. James Kirk

    Hey Tom! Good stuff. Just a couple of observations which you may agree with or not. Mostly I tend to do what you have laid out here because, well, like you mentioned–shake hands with the entity that has the power to send a whole lot of traffic to your site!

    Completely agree with your assertion that site owners/admins should create child themes for any/all themes they have installed. While theme packages don’t typically get update “that often”, when they do, and you don’t have the child theme in place, well, ouch!

    But I certainly would not suggest inserting the GWT verification code directly in the header.php file. Instead, it is much better to use Yoast’s WordPress SEO plugin which provides a simple and direct way to insert the code from not only Google’s Webmaster tools, but also Bing’s as well as the Alexa ranking service.

    As to the “www” vs non-www URL setup? My feelings are folks should be doing this at the DNS and their server level. Definitely let GWT know which is the version you’ve set up for your site, but it’s overkill to set up both versions at GWT and then have to worry about that. Why not just set it up once on your end and once in the tools there and not worry about it going forward?

    Since you suggested Yoast’s SEO plugin, I also suggest adding the sub site maps that plugin creates for quicker indexing by GWT. The are /post-sitemap.xml, /page-sitemap.xml, /category-sitemap.xml, and /post_tag-sitemap.xml. GWT will allow these to be individually submitted so that’s cool.

    Finally, while Yoast is now selling a Video sitemap generator, there are some free ones available in the WordPress repository and your readers can find some good ones I use on all my installs in order to sitemap not only the above stuff, but also creating separate maps for video, images and even mobile content. Check those out here (links are on that page to the other plugin generators): http://wordpress.org/extend/plugins/xml-sitemaps-for-videos/

    Cheers! 🙂

    1. Tom Ewer

      Author

      Hey James,

      Thanks for the comment!

      RE verification code — it’s a fair point. I agononised a bit over what method to suggest, and yours is definitely a great option if you have Yoast installed (I actually wrote a post today saying that you can use the plugin for this very reason). I went with the “insert in theme file” option because I wanted to show a method that didn’t rely on any third party plugins.

      RE canonical URL setup — different strokes for different folks! I think we could debate this all day and end up agreeing that both work, even if we might feel that one way is “better” or “easier” than the other. If you start using words like “DNS” and “server level” to certain folks, they will (quite rightly) give you a blank stare! The way I’ve highlighted is pretty easy to follow.

      Agreed RE sub-sitemaps.

      Thanks for the suggestions RE video sitemaps!

      Cheers,

      TOm

  22. AMYunus

    For sitemap, should we submit to both of url (with-www and non-www)? thanks.

    1. Tom Ewer

      Author

      Hi there,

      You only need to submit the sitemap to the canonical URL account. The only purpose of the non-canonical account is to inform Google that it should be paying attention to the canonical URL.

      Does that makes sense?

      Cheers,

      TOm

Leave a Reply

Your email address will not be published. Required fields are marked *

Over 65,000 WordPress professionals are already using ManageWP

Add as many websites as you want for free, no credit card required. Sign up and start saving time!

Have questions? Get in touch!

Over 65,000 WordPress professionals are already using ManageWP

Add as many websites as you want for free, no credit card required. Sign up and start saving time!


Have questions? Get in touch!

Over 65,000 WordPress professionals are already using ManageWP

Add as many websites as you want for free, no credit card required. Sign up and start saving time!


Have questions? Get in touch!

Over 65,000 WordPress professionals are already using ManageWP

Add as many websites as you want for free, no credit card required. Sign up and start saving time!


Have questions? Get in touch!