Encountering the dreaded PHP Memory Exhausted error in WordPress can be perplexing, but fear not! This guide takes you through various ways to increase the PHP memory limit, ensuring a smooth and error-free WordPress experience.
Throughout this guide, we’ll use examples like ‘256M’ to illustrate memory limits. However, it’s crucial to note that these are just examples. Your website’s unique demands may require different memory values. Consider these examples as starting points and monitor your site’s performance, adjusting these values for optimal functionality.
Quick Fix: wp-config.php Modification
Understanding wp-config.php and its Role in Memory Allocation
At its core, WordPress relies on PHP, a server-side scripting language. The wp-config.php file, placed in your WordPress site’s root directory, plays a significant role in configuring various settings, including the PHP memory limit. This limit dictates how much server memory WordPress can consume to execute its operations. Importantly, tweaking this limit in wp-config.php impacts only the specific WordPress site it belongs to, offering a tailored solution without affecting the entire server. If you have another WordPress installation nested in a subfolder, each installation operates independently, and changes made in one won’t impact the other.
Step-by-Step Guide: Increasing PHP Memory
1. Access the Root Directory:
Using an FTP client, or your hosting control panel, find the root directory of your WordPress installation. The root directory is often named after your website or located in a folder named “public_html” or “www” and it is where all your site’s files live.
2. Locate wp-config.php:
Once in the root directory, find the wp-config.php file. This file holds critical information for your WordPress site.
3. Edit wp-config.php:
Open wp-config.php using a text editor. Find a line that says “That’s all, stop editing! Happy blogging.” Just above this line, insert the following code:
define( 'WP_MEMORY_LIMIT', '256M' );This line instructs WordPress to increase its memory limit to 256 megabytes.

4. Save and Upload:
After inserting the code, save the changes to the wp-config.php file. In File Manager, click the “Save Changes” button or a similar option to confirm the changes. If you’re using an FTP client, save the file locally and then upload the updated file back to the root directory.
Immediate Impact
Congratulations! You’ve successfully given your website more memory. After making these changes, refresh your WordPress site. You’ll likely see the PHP memory exhausted error disappear. Increasing the PHP memory limit this way gives WordPress more “thinking space,” helping it run smoothly without any hiccups.
An Alternative Approach – Editing .htaccess
Understanding .htaccess and its Influence on PHP Memory
While wp-config.php governs WordPress-specific configurations, the .htaccess file influences how your Apache server handles various aspects of your website, including PHP memory settings. Located in the root folder of your WordPress installation, .htaccess is a powerful configuration file that, among other things, controls how your server processes PHP scripts.
Importantly, changes made in the .htaccess file affect not only the main WordPress site but also any subfolders or additional installations within the same directory structure. If you have a WordPress site nested in a subfolder, adjustments in the .htaccess file of the main installation can impact how the server processes PHP for both the main site and any subfolders.
Step-by-Step Guide: Editing .htaccess
1. Locate .htaccess:
Navigate to the root folder of your WordPress installation. The .htaccess file is placed here. Be aware that this file might be hidden, so ensure your file explorer or FTP client is configured to display hidden files.
2. Insert the Memory Limit Directive:
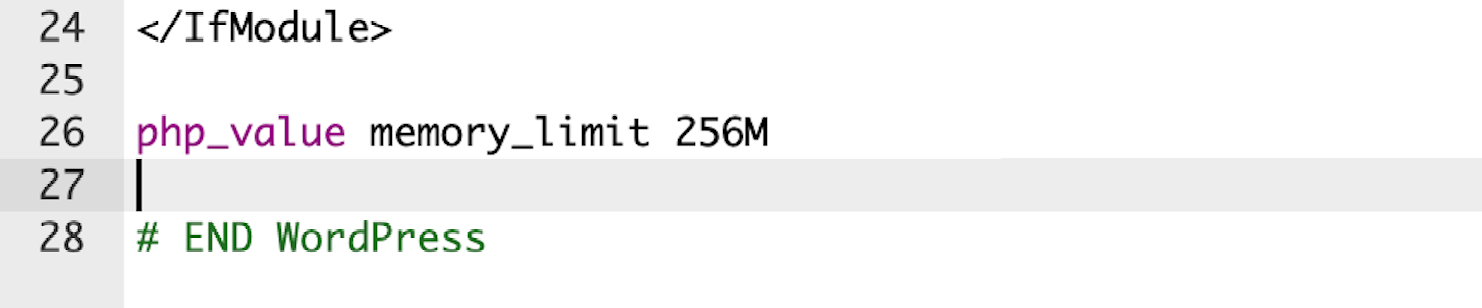
Open the .htaccess file using a text editor. Look for the line that says # END WordPress. Directly above this line, insert the following code:
php_value memory_limit 256MThis directive instructs the server to allocate 256 megabytes of memory for PHP scripts.
3. Save and Upload:
Save the changes made to .htaccess and upload the modified file back to your server. This action ensures that your server allocates the specified amount of memory to PHP processes.
Immediate Impact
Once you’ve edited the .htaccess file to increase the PHP memory limit, the changes take effect immediately. Your WordPress site gains access to the specified amount of memory, allowing it to handle resource-intensive tasks more efficiently. This can result in improved performance and reduce instances of the PHP Memory Exhausted error.
Understanding php.ini and Its Global Impact on PHP Settings
Unlike the site-specific configurations in wp-config.php and server-wide instructions in .htaccess, the php.ini file governs PHP settings globally across your server. Adjusting values in php.ini has a broader impact, influencing the behavior of all PHP applications on your server. Because changing values in php.ini has a broader impact, most shared hosting environments restrict direct access to this file for security reasons. In such cases, reaching out to your hosting provider becomes necessary.
Step-by-Step Guide: Editing php.ini
1. Locate php.ini:
Navigate to the root directory of your WordPress installation on your server. Look for the php.ini file. Not all servers may have this file, as it depends on the server configuration. If it doesn’t exist, consider contacting your hosting provider to inquire about the possibility of creating or modifying it.
2. Edit php.ini:
Open the php.ini file with a text editor. Search for the line containing memory_limit and modify the value according to your requirements. For instance, set it to memory_limit = 256M to allocate 256 megabytes of memory. Save the changes.
3. Verify Changes:
Restart your web server to apply the changes. Check your WordPress site to ensure the adjusted memory limit is reflected. Monitor the site’s performance to confirm the impact of the increased PHP memory allocation.
Important Note: If your hosting environment doesn’t allow direct access to php.ini, you may need to contact your hosting provider for assistance. Some shared hosting providers might offer alternative ways to modify PHP settings.
Using ini_set in Theme’s functions.php:
If you’re hesitant about altering server-wide configurations, WordPress provides a more localized approach using the ini_set function within your theme’s functions.php file.
1. Open functions.php:
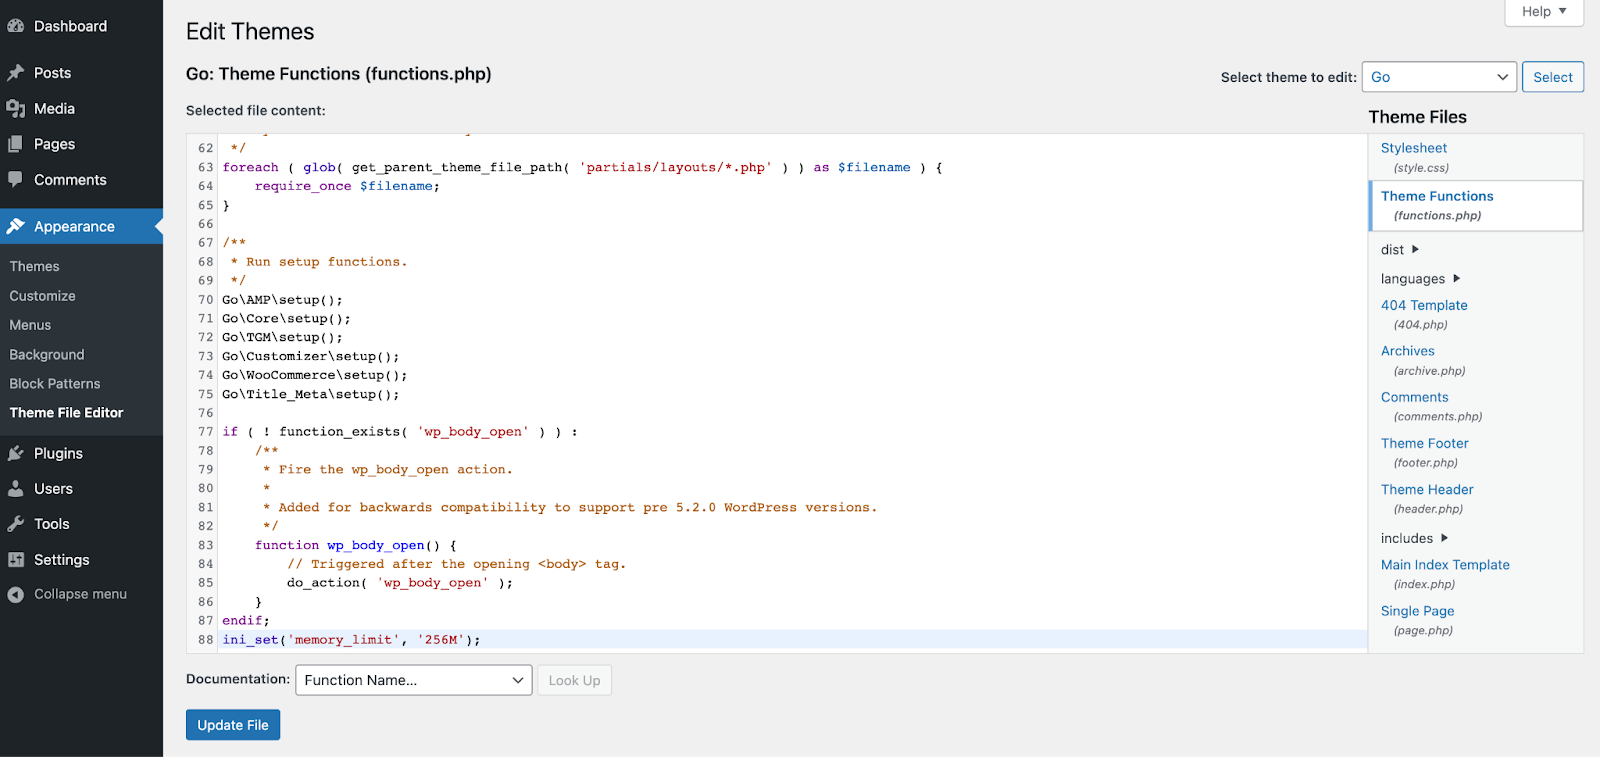
Within your WordPress dashboard, navigate to “Appearance” and then “Theme Editor.” Select the functions.php file for editing.
2. Insert the ini_set code:
Add the following code snippet to set the PHP memory limit: ini_set('memory_limit', '256M');
3. Save changes:
Save the modified functions.php file. This approach allows you to adjust memory limits specifically for your WordPress theme.
Immediate Impact:
These adjustments offer a more nuanced control over PHP memory allocation. While php.ini influences the entire server, the ini_set function within functions.php tailors memory settings to your WordPress theme, potentially resolving memory-related issues as long as that particular theme is active.
Lesser-Known Approache – .user.ini file
Creating and Utilizing .user.ini
While not as widely recognized as other methods, the .user.ini file is often employed in shared hosting scenarios where individual users on the same server seek a way to personalize PHP settings. In cases where your hosting provider supports this approach (please note that not every hosting provider does), the .user.ini file becomes a valuable tool. It resides in your WordPress site’s root folder, allowing users to tailor PHP settings on a more personal level, without affecting the entire server. This method can be particularly useful in shared hosting environments where direct access to php.ini might be restricted.
Step-by-Step Guide: Creating and Utilizing .user.ini
1. Create .user.ini:
Using a text editor, create a blank file named .user.ini. This file will serve as your personalized PHP configuration tool.
2. Adjust the Memory Limit:
Inside the newly created .user.ini file, insert the following line to specify the memory limit:
memory_limit = 256MCustomize the value according to your site’s requirements.
3. Save and Upload:
Save the changes made to .user.ini and upload the file to your server, placing it in the root folder of your WordPress installation. This approach ensures that your personal PHP settings remain distinct from those of other users on the server.
Knowing When to Seek Help from Hosting Support
While the steps outlined above empower you to take charge of your WordPress site’s PHP memory settings, there are instances where reaching out to your hosting support becomes crucial. If you frequently encounter the PHP Memory Exhausted error and instead of addressing the root cause of the issue, you consistently increase the PHP memory limit to higher values to prevent the error from occurring, you might be just masking the underlying problem. This could be inefficient code, memory leaks, or other performance issues. Without addressing the core issue, your website might still face performance challenges, and relying solely on increased memory limits can lead to a false sense of stability. This is why it’s important to know when to seek help from your hosting provider’s support team. They possess the expertise to navigate server configurations, troubleshoot potential restrictions, and provide tailored solutions. Hosting support can be particularly instrumental in shared hosting environments where certain permissions or file access may be restricted for security reasons. Don’t hesitate to leverage their expertise when needed to ensure a smooth and secure resolution to any PHP memory-related issues.
In conclusion, this guide has provided you with practical solutions for addressing PHP Memory Exhausted errors in WordPress. For additional insights into resolving various WordPress errors, you may find our guide on common WordPress issues helpful. Explore these resources to enhance your website’s performance and ensure a smoother user experience.
Leave a Reply