WordPress has a handy Export / Import tool to move content from one site to another, but it has some unintuitive quirks you should know about if you’re planning on using it.
One of the common “gotchas” is that exporting just posts or pages doesn’t also include their media attachments — like images and PDFs — even if you check the appropriate box during the import process. The import process works fine; it’s the exporting that can be tricky and is all-important.
The following instructions will point out all the gotchas and provide the exact instructions you need to move just the content you want to a new site, with zero downtime and including the attachments.
Getting Started
First of all, it helps to realize that WordPress’ export function doesn’t include the “attachment” post type unless you select the “All content” export option. The problem is that if you don’t want to import all your pages, custom post types (CPTs), nav menus, etc. — just some of them — you lose your attachments. You could move the files via FTP, but then you’ll have a bunch of files on your new site’s server that aren’t attached to posts in the database, and you’ll have files on your server that aren’t being used because they only apply to pages and posts that you didn’t import to the new site.
In order to get the old site’s attachments to import to the database and attach to their imported posts, pages, and CPTs, you need to have both the attachment post_type and the post post_type items in the same import file.
To be clear, it will NOT work to import posts first and then attachments in two separate files. It ONLY works as desired if imported at the same time within the same import file.
How to Selectively Export Posts PLUS Attachments
I needed to move some of my posts and attachments from cliffpaulick.com to endzonerealty.com. I started a tech-savvy Tulsa real estate brokerage and previously used cliffpaulick.com as my REALTOR® website. Now, I want my endzonerealty.com site to look like it’s had quite a few posts over the past few years, and I want to use cliffpaulick.com as more of an About Me (the human) site, not just a “Cliff the REALTOR®” sort of site.
For the purposes of exporting and importing, let’s call cliffpaulick.com the “old site” and endzonerealty.com the “new site”, even though the old site won’t be gone after we’re done.
If I were moving all of the domain’s content, I’d just do a full export/import and redirect all of the old domain’s links to the new domain’s links via the .htaccess file or some other programmatic method. However, I need a more granular solution. The old site’s attachments and selected posts need to be in the same import file, as stated above, but I only want some, not all, of the old site’s posts.
Here’s what we need to do:
- Prepare for Exporting
- Export
- Import
- Redirect only the moved posts to their new locations
I’m not a PHP master, so maybe there’s a better way, via the export_wp function, to export just the ‘post’ and ‘attachment’ post types into a single .xml file, but here are two ways it can be done manually.
Prepare for Exporting
Before clicking the Export button, we want to make sure all the old site’s posts are ready to go. Each site is different, so consider these items for your old site:
- Convert any old < / iframe >, < / embed >, or < / script > code to use shortcodes or an alternative method, because they won’t import (in my experience).
- Similarly, edit any shortcodes that won’t be available on the new site, whether theme or plugin specific. If necessary, add the shortcodes to the new site.
- Clean up your categories and tags, since they’ll all import as-is. If you have tags with no posts in them, delete the tags. Same for categories.
- Clean up your Media. Go to Library -> Unattached to see if you want to delete any of those. Look for the “missing image” image to find files in your database but not on your server and delete those via wp-admin (or re-upload).
- Make sure your new site can import all filetypes from your old site (e.g. bmp, docx, etc.). This is important when importing to a MultiSite site, regardless of exporting from single or multisite. Make sure your new site’s allowed upload file type settings include the file types found on your old site’s server.
- For Option 1, below, create a new category called “new-site” or something like it, and assign it to all of the posts you want to move to the new site. In my case, posts in the “Real Estate” category were pretty much what I wanted to export anyway, but combing through posts in other categories, I found some additional posts that I wanted to import.
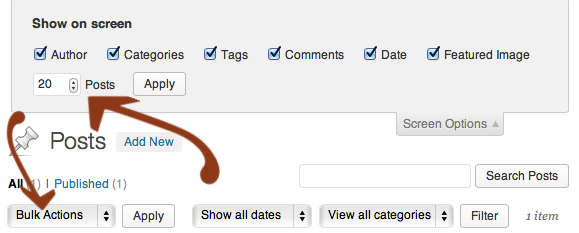
- Tip: to edit many posts at once, go to the All Posts admin page, click “Screen Options” drop-down in the upper-right, and change the number of posts to display from ’20’ or ’15’ to ‘100’ or so. Then Select All checkboxes, deselect the ones you don’t want to edit, then select “Edit” from the “Bulk Actions” drop-down, and you’ll be able to add many to the “new-site” category very quickly. Screenshot:

Change number of posts displayed and edit many posts at once in wp-admin - Cleanup your custom fields, including those set by plugins that redirect to another page, display special content that won’t be relevant on the new site, etc. Custom fields get imported with each post.
- Find your posts marked “sticky” and decide if they should remain as such on the new site. If not, un-sticky them.
- If you’re wanting to export custom post type (CPT) posts, make sure they are exportable (the can_export argument in the register_post_type function).
- If your old site is on shared/cheap hosting, WordPress recommends letting them know you’ll be doing this conversion. I would recommend notifying a low-budget host of both the export and import sites, since the process can be resource intensive.
- See the Tips and Tricks section at the end of this post for more considerations before starting.
Export/Import Option 1: Export Selected Posts, Export All Attachments, Combine into One File, Import
This method is what I chose to do because it makes for a cleaner (but longer) export process on the old site but a cleaner (and shorter) import and deleting process on the new site. However, there’s a bit more human error factor here so don’t rush through the process, especially when merging the export files into a single import file.
- Perform a full (files + database) backup of your old site.
- Perform a full backup of your new site.
- Clean up your old site’s posts, as described in the previous section.
- Perform a full backup of your old site again (or just a database backup if you prefer).
- Download and activate rcain’s export attachments only plugin modification so you don’t have to edit WordPress core files to get the Media option to show up (since Media is a _builtin post type).
- In wp-admin, go to Tools -> Advanced Export and generate the export file, selecting your desired category for the Restrict Category option. FYI: Only categories with posts in them will show up in the Categories drop-down box.
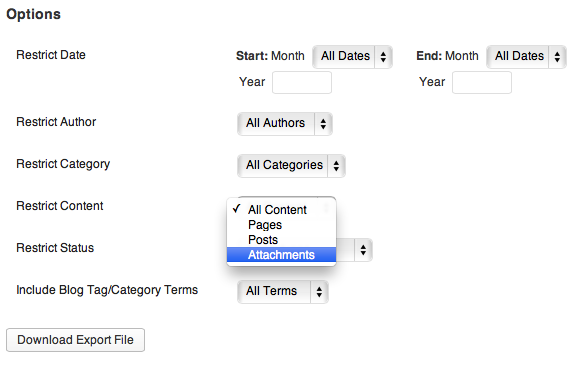
- Again in wp-admin -> Tools -> Advanced Export, now generate the export file for attachments.

WordPress Advanced Export – attachment post_type - Open the posts export file in a text editor on your computer.
- Perform a Search and Replace to replace all references to the old site to instead reference the new site. For example, replace www.cliffpaulick.com with endzonerealty.com, and save as a different filename (just to be safe).
- Close the original posts export and open the attachments export so that you have both files open.
- Near the top, find the first <item> in the post export and copy through to the last </item> at the bottom of the file.

- In the attachments export file, find the last </item> and paste from the posts export and save to a new file (just to be safe).
This is your new import file. - In your new site’s WordPress Dashboard, go to Tools -> Import and select WordPress. If prompted, download and activate the importer plugin. (FYI: I tried rcain’s version (linked above) but didn’t experience any differences, maybe because my attachments didn’t have any relative file paths.)
- At Tools -> Import -> WordPress, upload the file, continue, choose the user to import as, check the box to “Download and import file attachments”, continue, and wait a few minutes. (FYI: If on a multisite setup, I believe the site quota is ignored and more than 100% is allowed to be imported. Regardless, you might want to edit the site’s quota before running the import, just to be safe.)
- Once completed, take note of any files that didn’t import, if any, and try to resolve those issues manually. Likely, it’s a file type/extension restriction on your new site’s settings.
- Take a full backup of the new site.
- On the new site, go to Media -> Library -> Unattached. Check all (that weren’t previously there; that really do not belong on the new site) and Delete Permanently. This will delete from the database and the server. Basically, we’re deleting all the attachments that imported that weren’t attached to one or more of the category of posts we imported. Make sure to review these before deleting, as some may be in use by your new site (i.e. were there before the import). The new site’s content import has been completed.
- On the new site, mass edit the imported posts and remove the “new-site” category.
- On the old site, install and activate the Page Links To plugin by Mark Jaquith, which actually changes the post’s permalink to be the redirect location.
- On the old site, edit each published post’s Page Links To field to point to the new location (save some time by deleting the drafts, since they got moved over anyway, if you selected to). The WordPress Importer’s default is to assign the posts from the old site to keep their same post_id on the new site, except when that post_id already exists. So, for most posts, you can probably do something like this: redirect cliffpaulick.com’s post_id 58 to http://endzonerealty.com/?p=58 via Page Links To.
- After some time, maybe a week, month, year, or longer, you can delete all those posts instead of leaving them published with a Page Links To redirect. Or, if you prefer to setup all the redirects programmatically, you’ll need to account for all the different ways visitors can get to a single post: post ID, current slug, previous slug, trailing slash, non-trailing slash, etc. Doing it manually will allow you to view each post on the new site to make sure the content displays well.
- On the new site, you’ll probably want to go through the posts one-by-one, editing/deleting comments, featured images, custom fields, etc.
Export/Import Option 2: Export All, Import All, Delete Unneeded Stuff
This method is much easier to import, but you’ll need to carefully go through your new site’s content and get delete-happy post-import. If you’re moving the large majority of the old site’s content, this is probably the better option.
- Follow the backup, cleanup, backup steps above.
- In the old site’s WordPress Dashboard, go to Tools -> Export and leave the default “All content” selected and download the export file.
- Follow steps 13-16, above, to import.
- So now you’ve imported your ENTIRE old site into the new site. You’ll need to go through your new site’s entire content to figure out what to delete (i.e. what you didn’t want to import). For example, if you imported 10 tags and 12 posts that you didn’t want to import, find them and delete them. Because each site is different and have different post types, you’ll probably just want two browser windows open and go through the wp-admin area of the old and new, comparing and deleting as you go.
- Once your new site has the content you want it to have — and doesn’t have the content you don’t want it to have — you’ll want to follow step 17, above, to delete the attachments unused by the new site.
- Then follow the rest of the steps above, steps 18-22.
Tips and Tricks
In addition to the tips included at the start of this post (in the Prepare for Exporting section), following are some more bits of information you might benefit from in your migration, since every job’s different.
- If you’re still uncomfortable or not yet familiar with the WordPress export screen, you can review the Export SubPanel in the Codex. It’s not the SubPanel used in rcain’s Advanced Exporter plugin, though.
- The export file is referred to as a WXR file, which is a WordPress-specific XML file. Learn about XML at Wikipedia.
- Within the WXR file (i.e. the file created by running the Export download), you’ll see <wp:post_type>nav_menu_item</wp:post_type> and other post type entries. These tell the import process what post type each entry should be imported as; a WordPress menu in this example.
- Option 1, above, is based on the idea of only importing, for example, “post” and “attachment” post types. Option 1, above, has the extra “merge” procedure because WordPress’ export of “Posts” (in the wp-admin export options) only exports “post” post types, not also “attachment” post types.
- The content of each post type’s individual post content is surrounded by <item> opening and </item> closing tags.
- Make sure you have FTP (preferably SFTP) access to both the old and new sites before starting the import process on the new site.
- Make sure your old and new sites both have their files/folders writeable (which is typically the case, but it could make for a disappointing attempt to move the media files if not).
- If you have to move some files via FTP, you might want to use Add From Server plugin to get those files into the WordPress database instead of only being stored on the server without WordPress being aware of them.
- One of these remote image downloader WordPress plugins could come in handy if you find yourself in need. You definitely shouldn’t need it, but I’m including it here for awareness’ sake (e.g. maybe if you skipped step 9, above).
- Before you think you’re completely done, make sure to use WordPress’ built-in search for unattached media by clicking the “scan for lost attachments” link within the Media Library.
- Make sure the new site has all the post types your old site has that you want to import. For example, if you have the SlideDeck plugin in use on the old site, make sure the SlideDeck plugin is installed and activated on the new site before doing the import that contains the SlideDeck post type. Same goes for all other non-default post types, including the Link Manager for new 3.5 installs.
- Consider importing all new content into a new user, like ‘wpimport’ on the new site. This will allow you to find exactly what content was imported during your finalization process and, once the new site is all cleaned up, you can always delete the user and assign all of the ‘wpimport’ user’s content to another user of your choice (e.g. ‘cliff’, your actual user account).
- FYI: WordPress’ export file doesn’t include revisions, only the published, draft, and other post statuses that an administrator usually sees in wp-admin.
- For security’s sake, remember to update the passwords and roles of any imported users.
Can I Just Make a Full Copy (i.e. Clone) of an Old Site to Create My New Site?
Yes! With ManageWP’s service, you can do just that.
Head over to the ManageWP User Guide page how to clone a WordPress site to see a video of how easy this is to do. You could call it Option 3. It’s the most comprehensive way to nearly duplicate an entire site, but you’re going to do some additional deleting on the new site.
Tuff Stuff
If that process doesn’t tire you out, nothing will. To celebrate your successful “migration” and help put a smile on your face, get inspired by this flying goose!

Share Your Experiences
Hopefully this was just what some of you needed.
Please share your experiences and tips in the comments below.
Images courtesy of Todd Slagter and Steve Jurvetson

Leave a Reply