Your WordPress admin area is the hub of your website. Simply log in to your account and you can access your customer data, connect with visitors, install new plugins, modify your site’s code, and much more. Unless you take steps to protect your dashboard, so can a hacker.
If a malicious third-party manages to gain unauthorized access to your admin dashboard, the results could be devastating. Fortunately, there are several ways to secure this area against hackers and minimize threats against it.
In this post, we’ll share seven techniques to protect your WordPress admin area against malicious attacks. By following our advice, you can make it more difficult for hackers to access your account – even if they have your username and password. Let’s get started!
Why it’s important to protect your WordPress admin area
If a malicious third party manages to hack your WordPress account, then they’ll have access to all your data. This includes the private information for everyone who’s ever registered with your website. If you accept payments, it could even include financial information such as credit card details.
This kind of data breach could cause irreparable damage to your reputation. Depending on your local laws, it could even land you in legal hot water, as your website has an obligation to protect confidential customer data.
Even if you manage to avoid losing all your customers and facing legal repercussions, the cost of cleaning up after a cyberattack is immense. It’s preferable to avoid having to go down that road.
There are plenty of attacks that specifically target the WordPress admin area, including brute force attacks. These involve a hacker bombarding your login page with common password and username combinations in the hope of finding a match.
WordPress is particularly vulnerable to brute force attacks, as by default both the WordPress admin username and login URL are the same for every installation. If you’re using these defaults, then an attacker only needs to guess your password.
By making a few changes to your WordPress login screen, you can help protect your account against a wide range of attacks.
7 ways to protect your WordPress admin area
If a hacker breaks into your dashboard, they could potentially steal your confidential customer data, install malicious software, lock you out of your own account, or even delete your website entirely. To help protect your visitors, data, and content, it’s essential that you take steps to protect your WordPress admin area.
1. Never use the default admin username
By default, the first user account for every new WordPress installation is assigned the username admin. If you stick with this, then hackers already know your username and only need to acquire or guess your password to break in.
If you’re currently using admin as your username, then it’s highly recommended that you change it. You can do so by selecting Users > All Users in your dashboard sidebar, then opening your profile for editing:
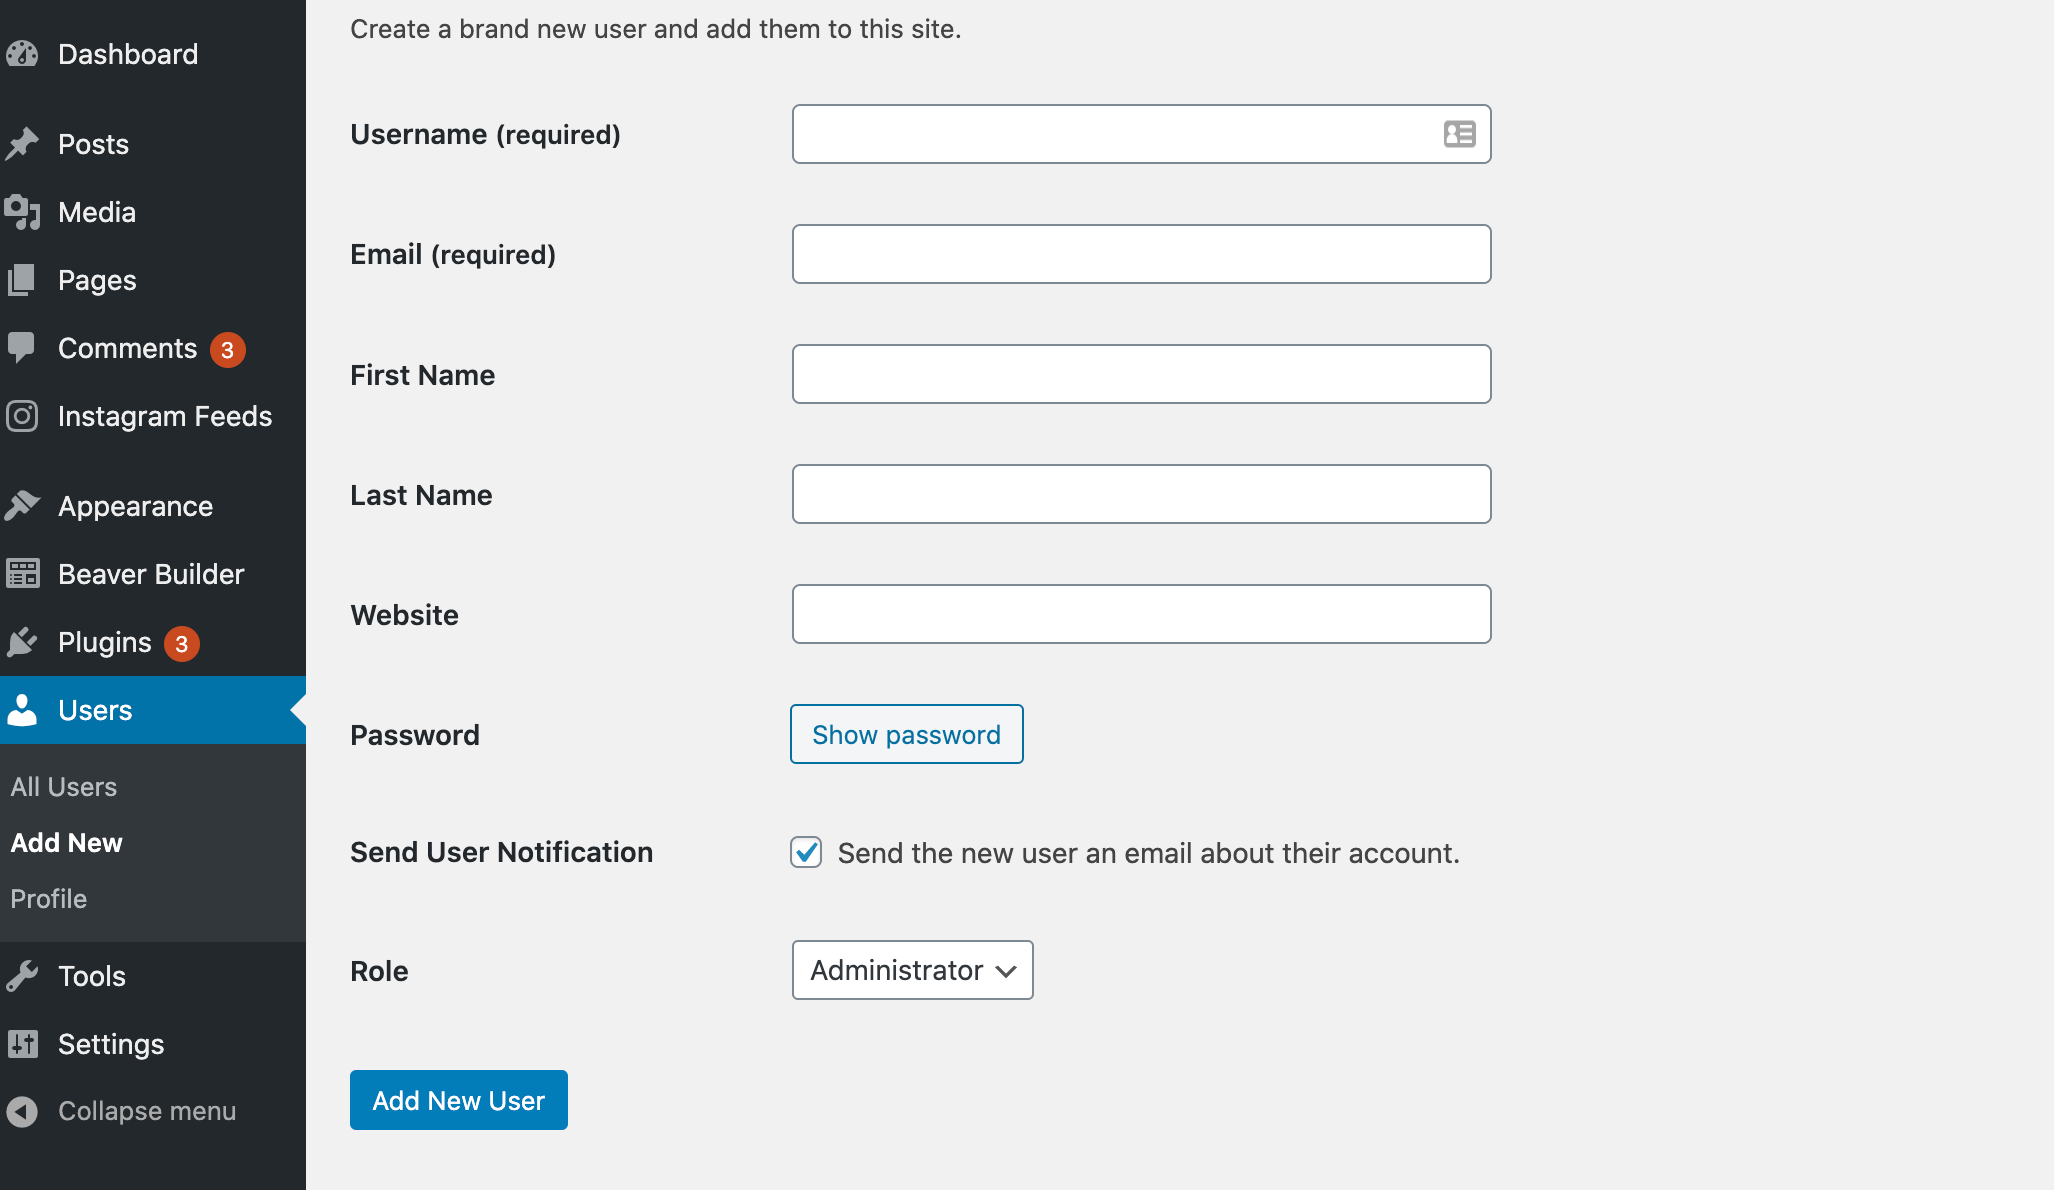
While you’re here, you should also ensure that you’re using a secure password that features a combination of uppercase and lowercase letters, numbers, and symbols.
Alternatively, you can create a completely random password using WordPress’ built-in generator or a third-party tool such as LastPass. If you’re concerned about forgetting it, consider storing your credentials using a password manager.
2. Password protect your wp-admin folder
Any third party can request your wp-admin folder and login page without passing any kind of authentication. The wp-admin folder contains important administrative files, so you should protect it with a username and password.
You should be able to add this extra layer of security via your hosting control panel. In cPanel, open the Directory Privacy folder:
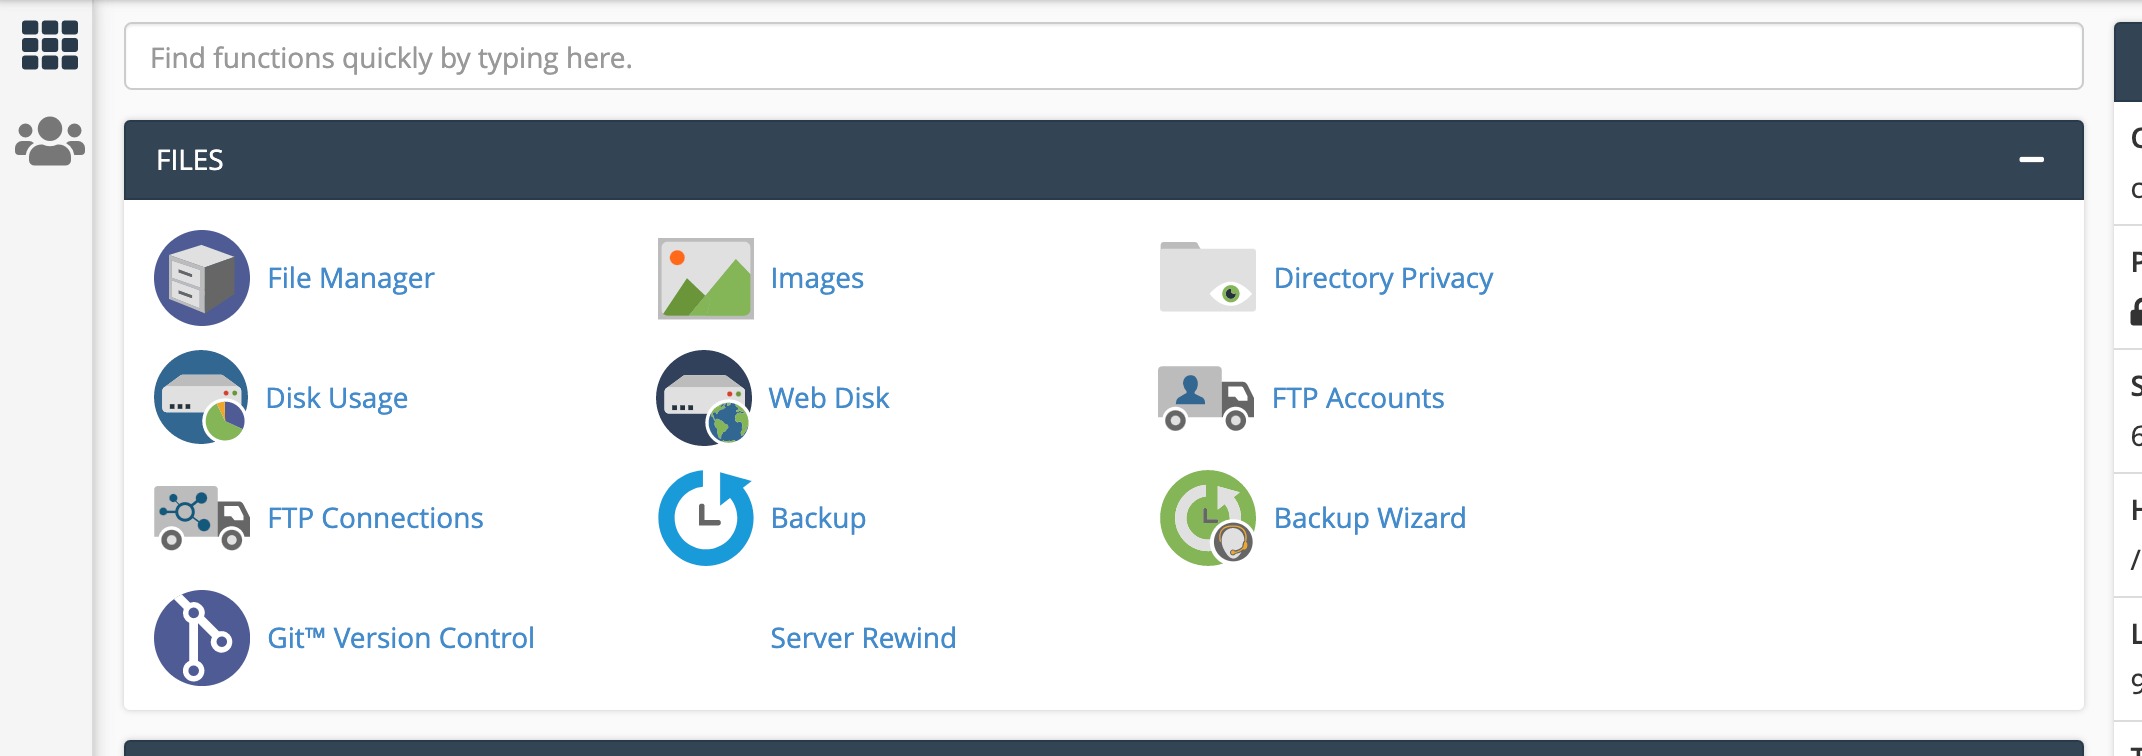
Then navigate to public_html / wp-admin. Here, select the Password protect this directory checkbox:
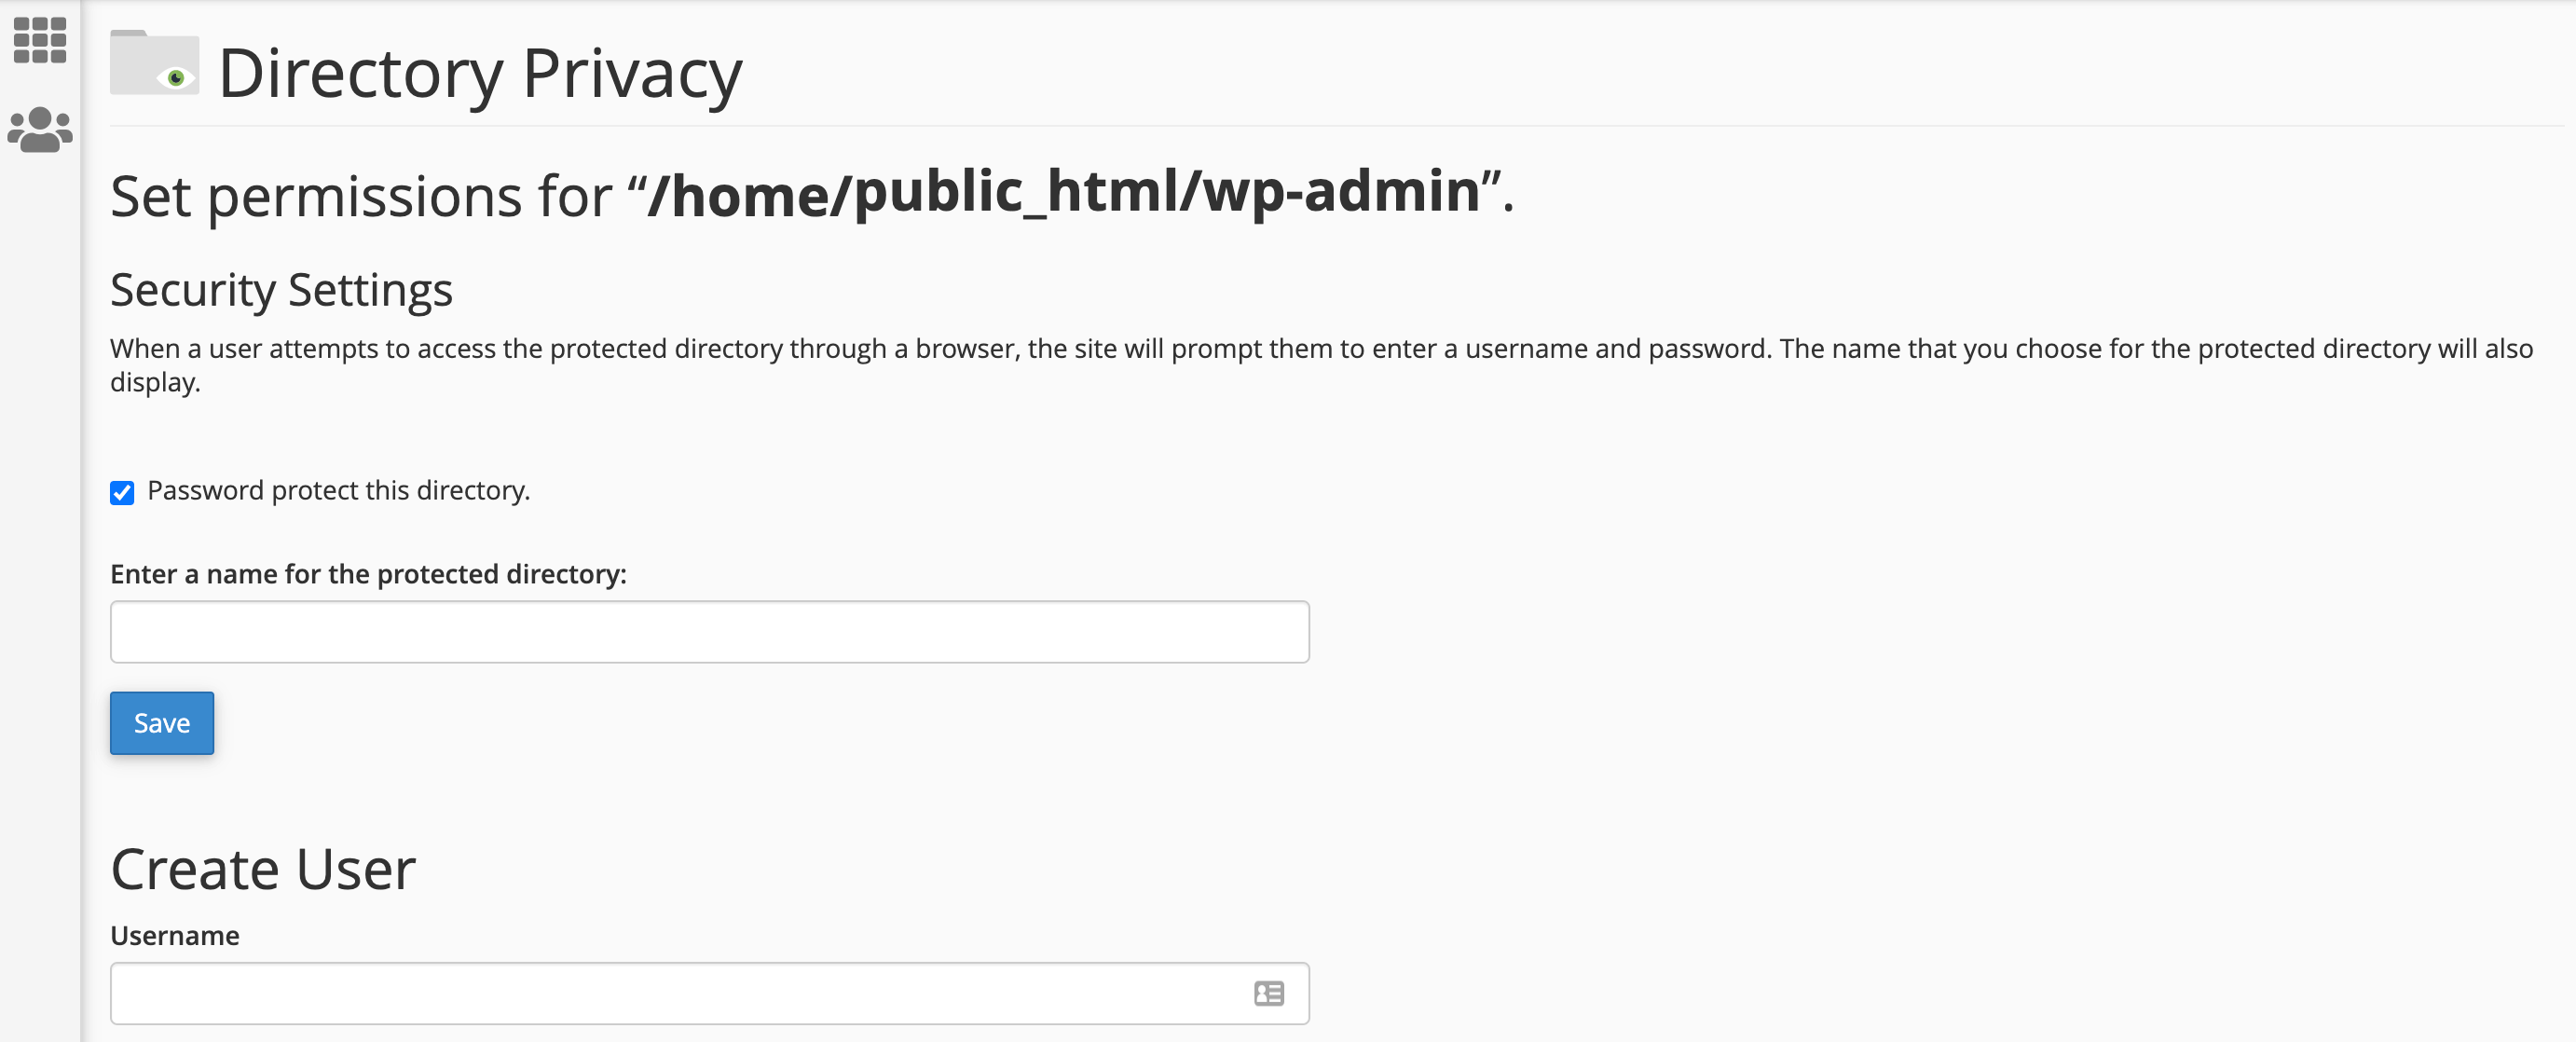
When prompted, create credentials for your wp-admin folder and click on Save. Now, whenever someone tries to access the wp-admin directory, WordPress will request this username and password.
3. Create a custom login URL
You can access the login screen of any WordPress website by appending /wp-login.php to that website’s URL. For example, if your domain is www.example.com, then your login page is at www.example.com/wp-login.php.
If you’re using the WordPress default, then your website’s login page is public knowledge. Even worse, if you’re using the standard /wp-login.php URL and the default admin username, then a hacker already has two of the three pieces of information required to access your admin area.
You can create a custom login URL using a plugin such as MelaPress Login Security. Once it’s installed, select Login Security > Settings > Hide Login Page from your dashboard menu. You can then enter a new URL into the Login Page URL field.
Save your changes and your WordPress admin area will now be accessible only via this new URL. Even if a hacker has your username and password, they’ll be unable to reach your login screen.
4. Limit login attempts
WordPress doesn’t block users from attempting to log in, even if they enter the incorrect password multiple times. This leaves your website vulnerable to brute force attacks. Hackers could potentially use an automated script to bombard your account with hundreds or even thousands of potential passwords.
You can limit login attempts using the Wordfence Security plugin. Once you’ve installed it, navigate to Wordfence > All Options. Under Firewall Options, select Brute Force Protection:
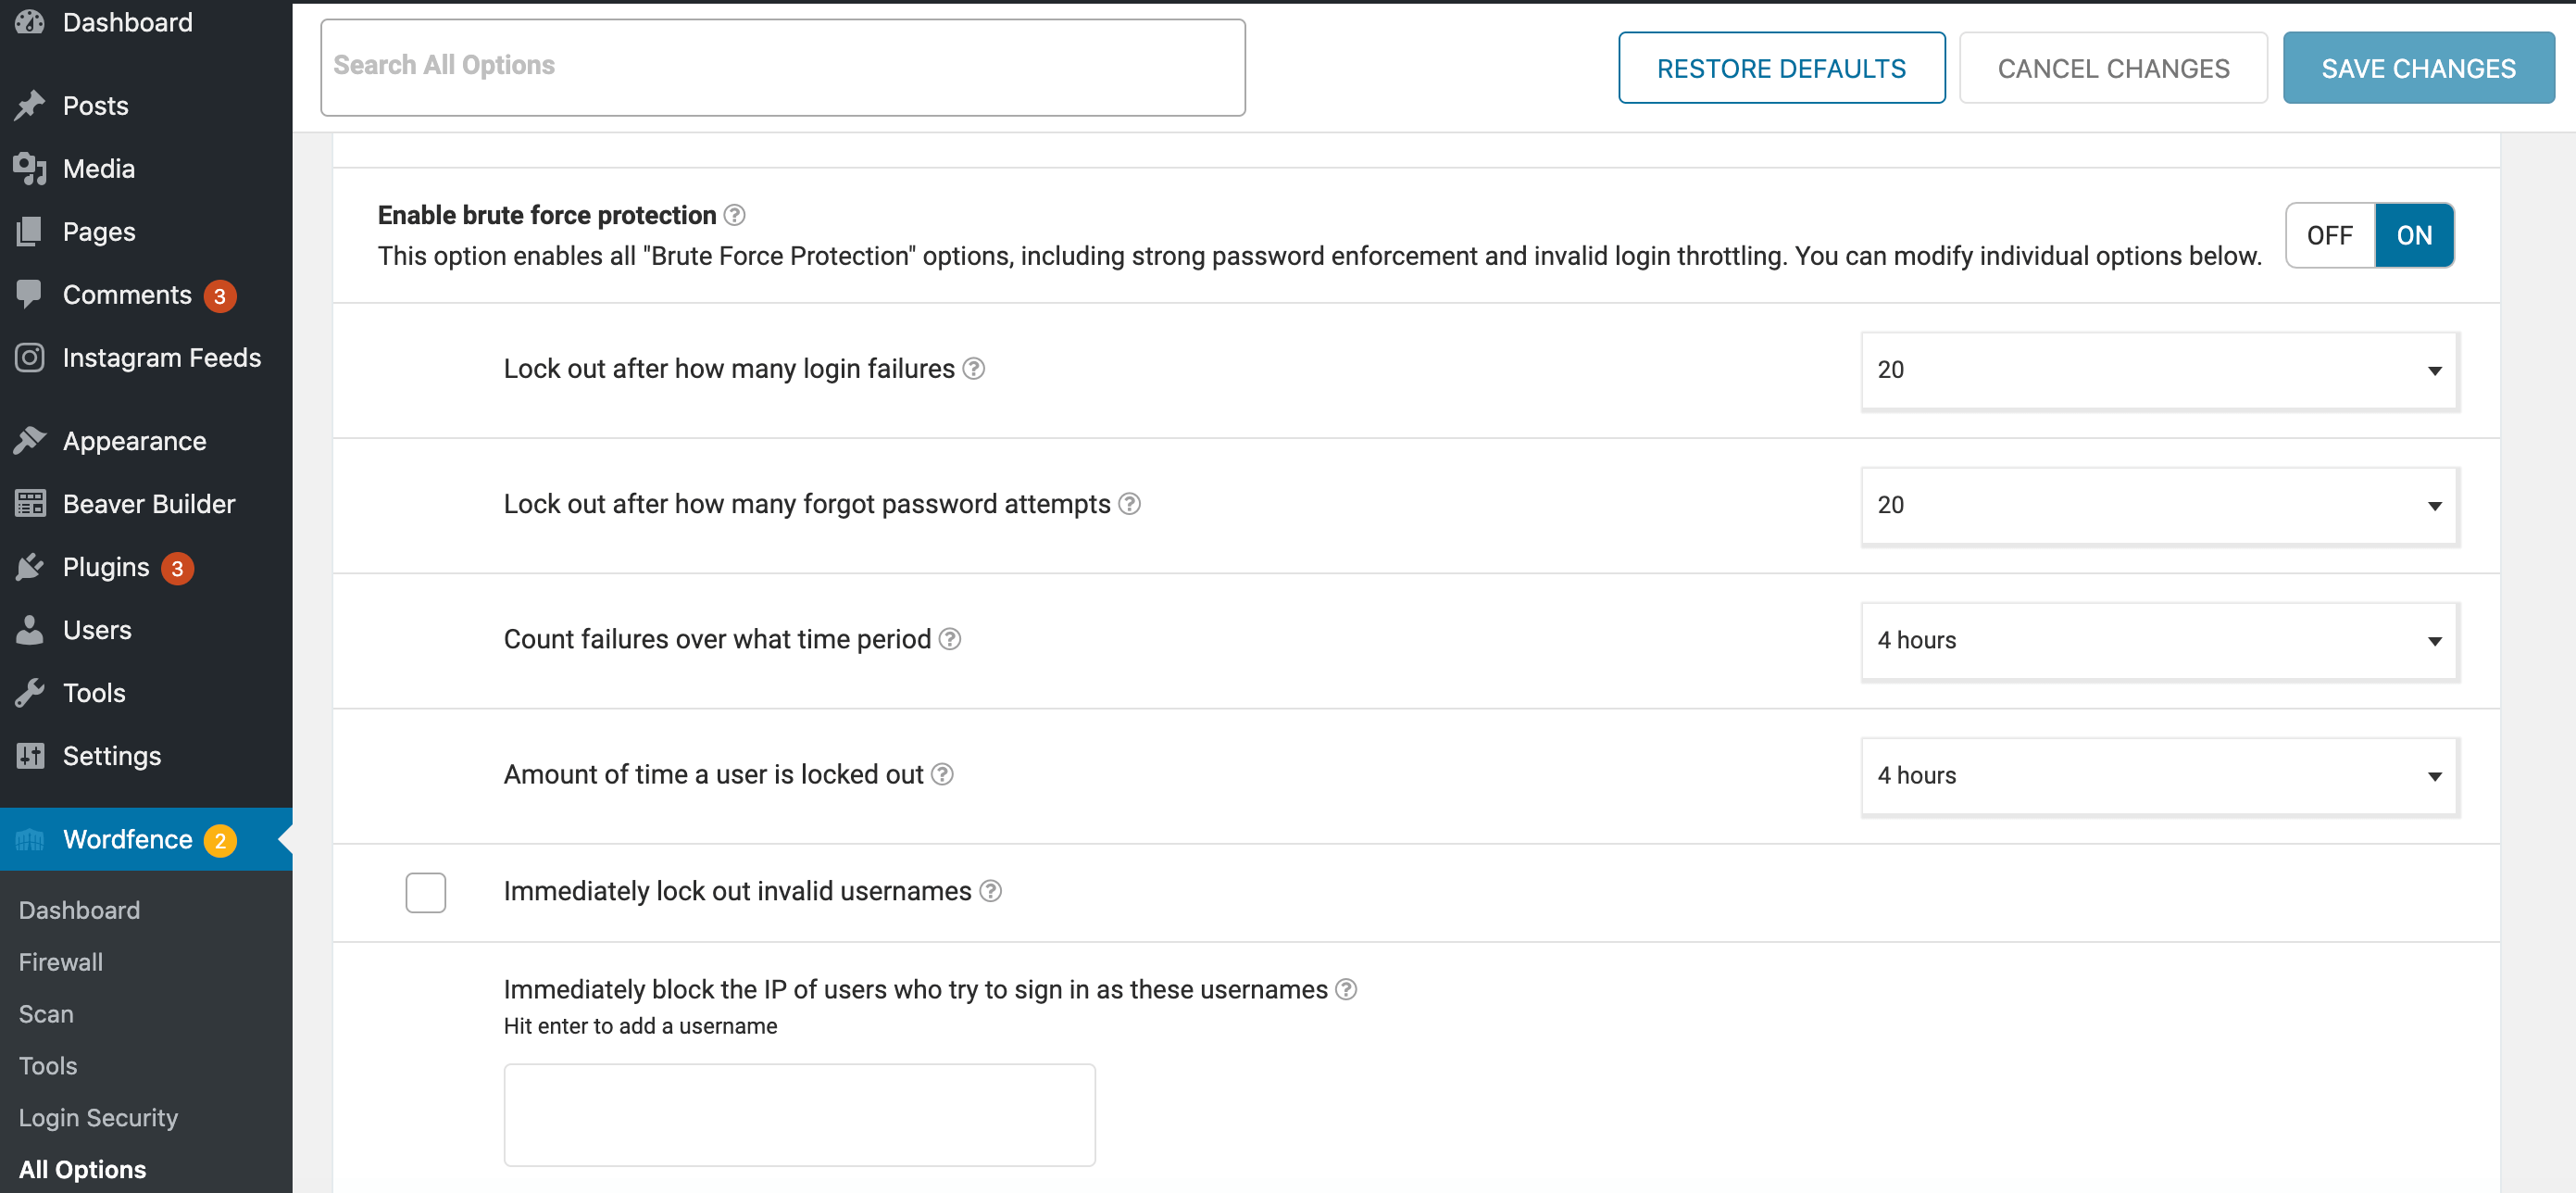
Next, make sure you activate the Enable brute force protection setting. You can then specify how many failed login attempts WordPress should permit before blocking the offending IP address.
5. Set up Two-Factor Authentication (2FA)
2FA is a security system where users must pass an additional check before gaining access to your WordPress admin area. You can add it to your WordPress account using a security plugin such as Wordfence.
As part of Wordfence’s 2FA feature, you’ll install an authentication app on your smartphone or tablet. When you try to log into your WordPress admin area, a security code will be sent to your mobile device.
You can verify your identity by entering this code on your WordPress login screen. Assuming that the hacker doesn’t have access to your personal smartphone or tablet, 2FA is an effective way to secure your account.
You can also protect your ManageWP account using 2FA so that attackers can’t gain access to your sites this way, either. To activate this feature, log in to your account. You can then click on your username, followed by Settings > Security:
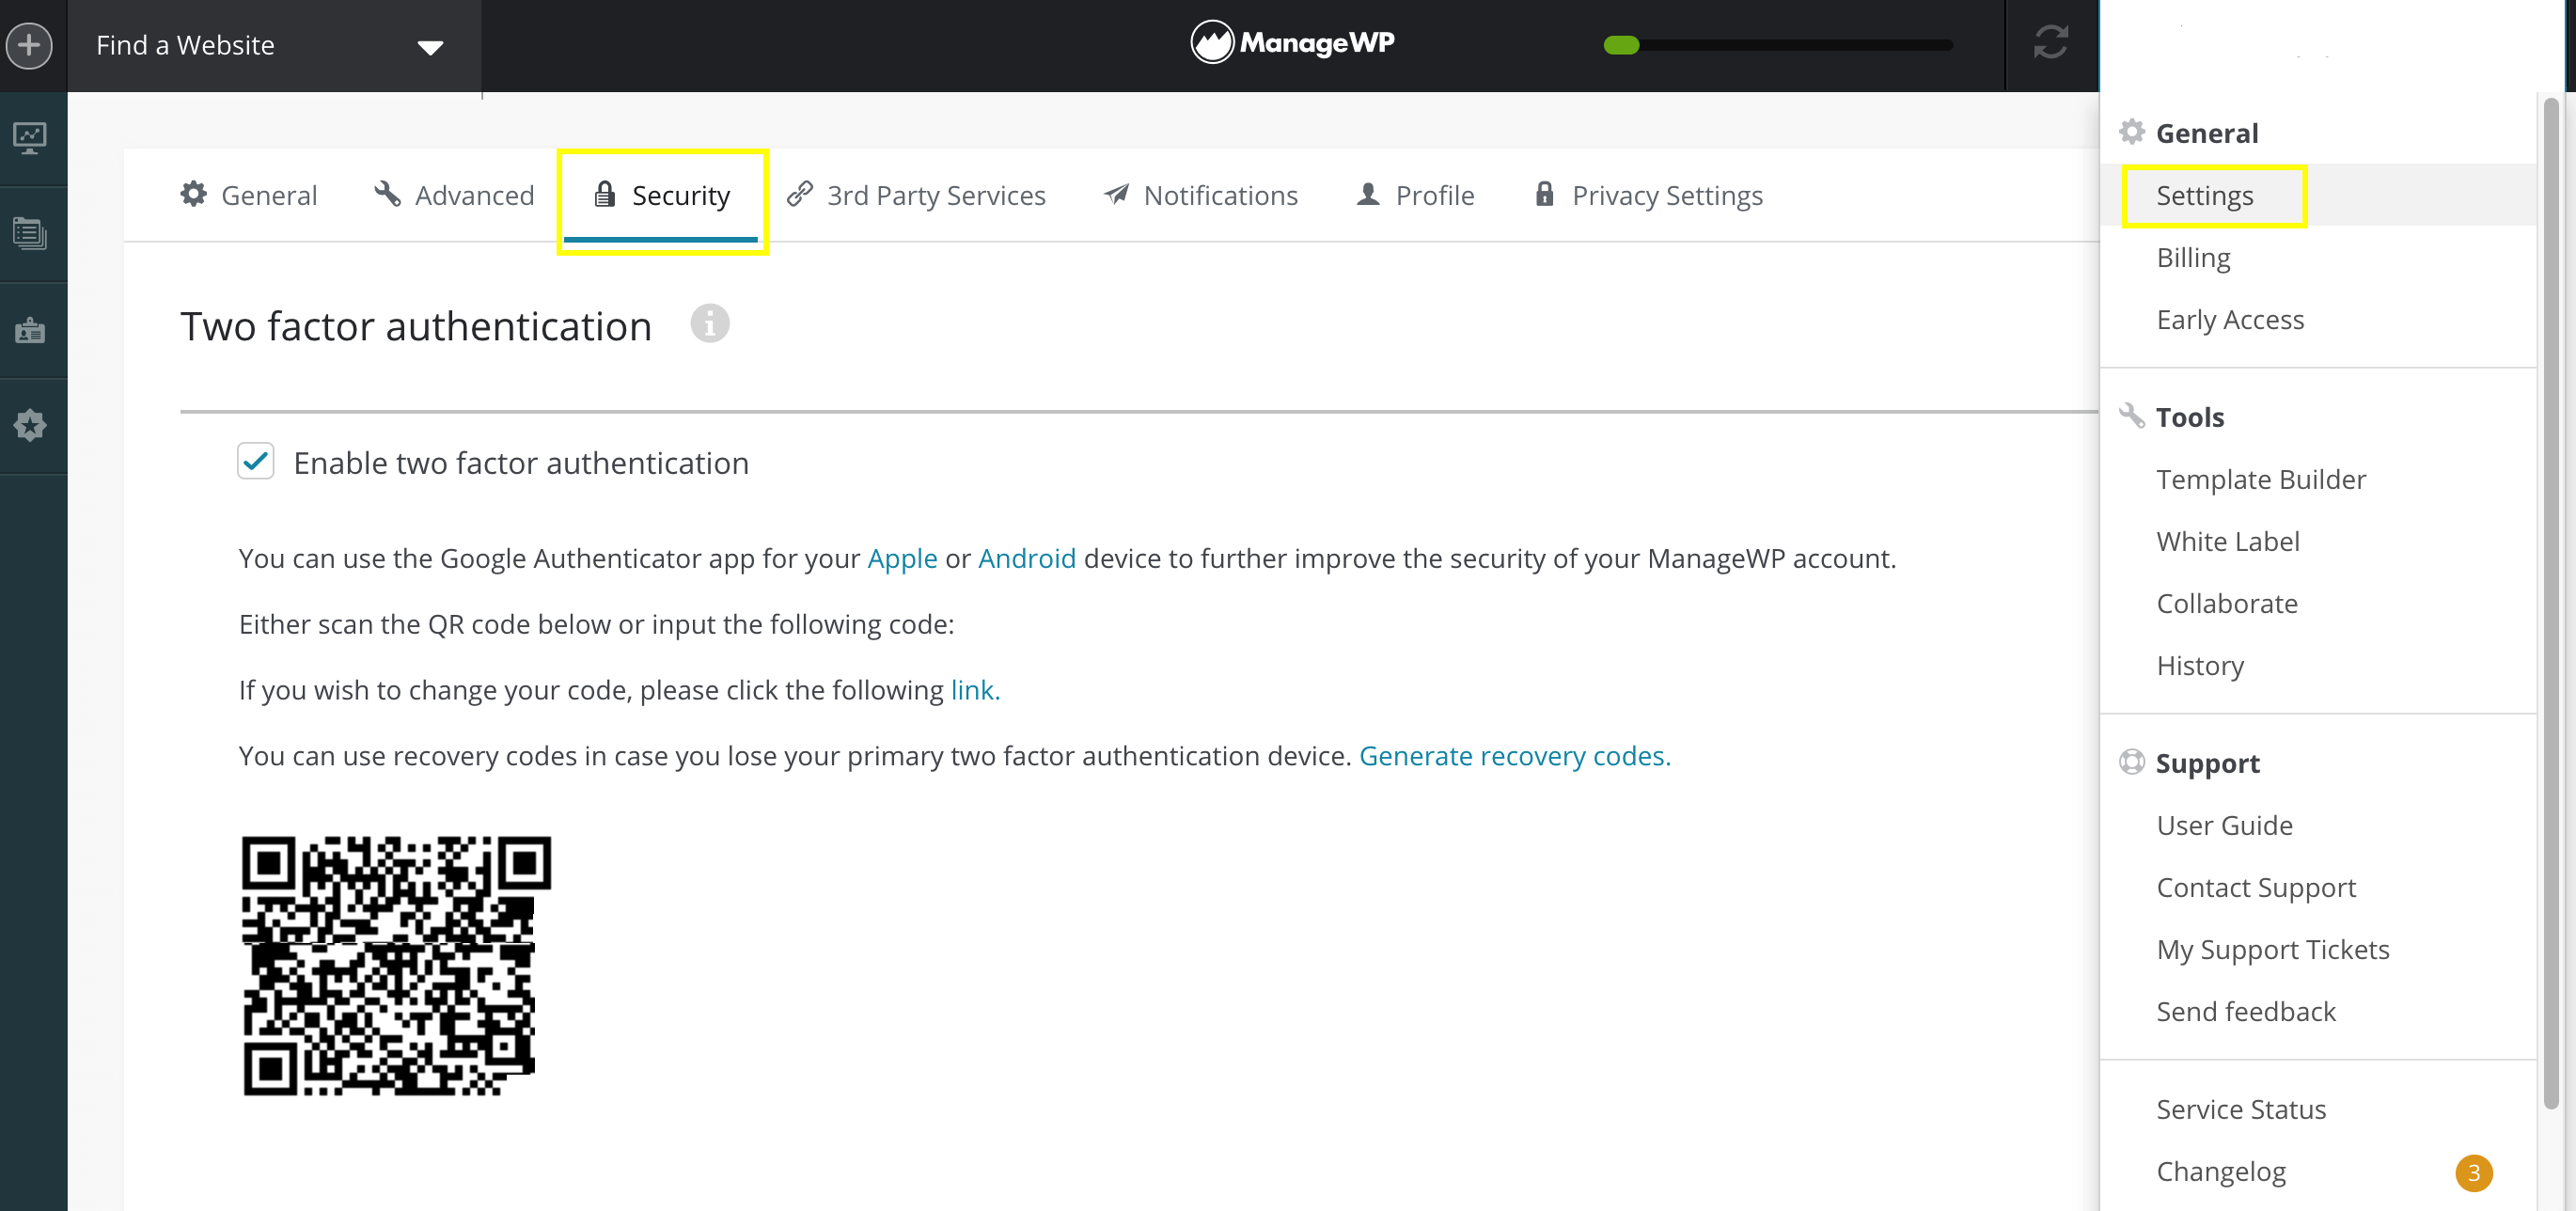
ManageWP will then guide you through the process of configuring 2FA. ManageWP uses the Google Authenticator app, which is available for iOS and Android.
6. Use a Website Application Firewall (WAF)
A WAF monitors your website’s traffic and prevents suspicious requests from reaching your site. You can set one up using a plugin such as Wordfence.
When you first install the Wordfence Web Application Firewall, it’s recommended that you leave it in learning mode for at least a week. This enables Wordfence to monitor your website and learn how best to protect it, while still permitting legitimate visitors through.
You can also optimize the firewall by navigating to WordPress > Firewall > Click here to configure. As part of the optimization process, Wordfence will select a recommended server configuration for your website. However, you can manually select your server configuration if required.
7. Restrict login access to specific IP addresses
If only a few users require access to your WordPress admin area, then you can limit logins to specific IP addresses by editing your site’s .htaccess file. This enables you to block users from all unknown IP addresses.
It’s recommended that you create a full backup before editing your .htaccess file. You can access it via File Transfer Protocol (FTP) or by using your web host’s file manager:
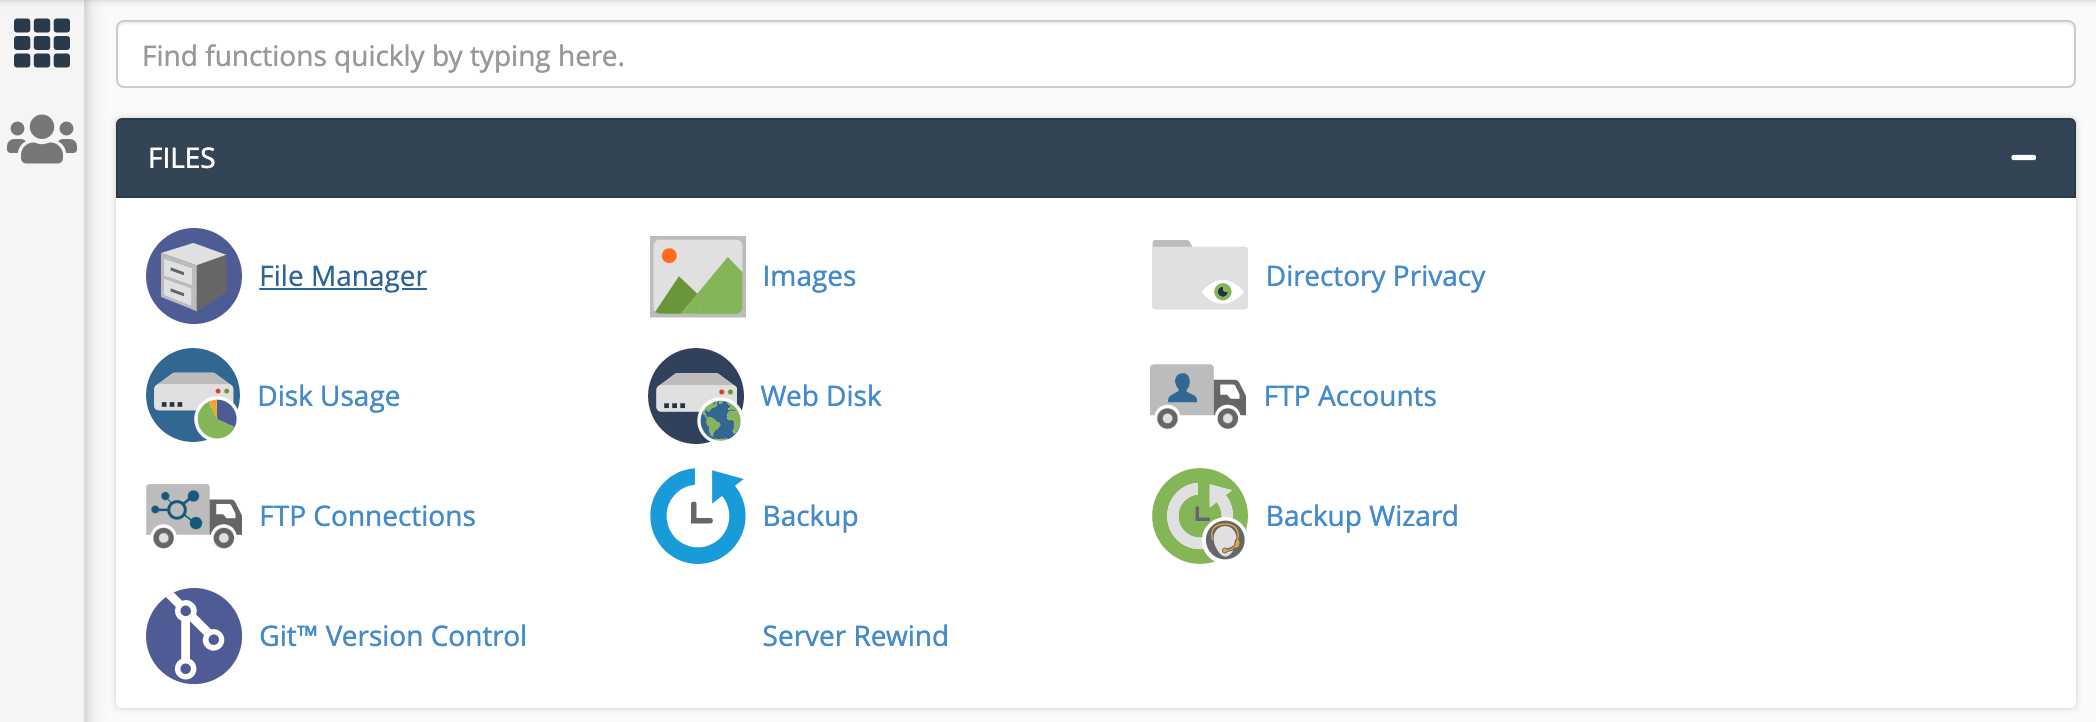
Once you’ve found .htaccess and opened it for editing, you can add the following code:
AuthUserFile /dev/null
AuthGroupFile /dev/null
AuthName "WordPress Admin Access Control"
AuthType Basic
<LIMIT GET>
order deny,allow
deny from all
# whitelist IP address
allow from xx.xx.xx.xxx
</LIMIT>
Make sure you replace xx.xx.xx.xxx with your own IP address and save your changes. Now, users will only be able to access your WordPress admin area from the specific IP addresses listed here.
Conclusion
Malicious third parties want to access your WordPress administrative area, but there are steps you can take to protect your website against these attacks. This can help you avoid damaging your reputation, facing legal consequences, and paying for expensive site cleanups.
To help keep your website, data, and visitors safe, we recommend you make it as difficult as possible for hackers to access your login page, by replacing the standard wp-login URL with a custom link, using a WAF, and limiting login access to specific IP addresses if you can.
Do you have any questions about how to protect your WordPress admin area? Let us know in the comments section below!
Image credit: Unsplash.

Leave a Reply