Your WordPress website security is only as strong as the tools and measures you implement to safeguard it. So if you’re not using two-factor authentication (2FA), you’re leaving your passwords and sensitive information at risk.
2FA (also known as two-step verification or multi-factor authentication) adds an extra layer of protection to your website by requiring at least two types of user verification on your WordPress login page. It can help keep your data safe and protect against brute-force attacks.
In this post, we’ll explain why two-factor authentication is important for site security and how it can limit your exposure to data loss and identity theft. Then we’ll discuss steps you can take to add it to your WordPress website. Let’s get started!
Why two-factor authentication is important for WordPress website security
There are many different security attacks WordPress sites are susceptible to. One of the most dangerous and prevalent types is brute-force or ‘dictionary’ attacks, which refer to when attackers use bots to repeatedly guesses login credentials until they find the right combination.
Using strong passwords that include complex combinations of letters, special characters, and numbers, is highly recommended. However, to take your WordPress login page security a step further, we recommend implementing 2FA.
2FA adds an additional verification step to the login process. After you enter your username and password, a six-digit code is sent to your personal device. You’ll need to submit that code to complete the login process.
Therefore, in order for an unwanted intruder to break into the login page of your WordPress site, they would need to know your credentials, and have access to your phone or email inbox. This second layer of security can go a long way in deterring cybercriminals.
Two-factor authentication can also help keep your customers’ critical information safe, which can increase trust and loyalty. Plus, adding it to your WordPress site is quick and easy with a mobile app and plugin.
How to add two-factor authentication to your WordPress site (In 4 steps)
In order to add a two-step verification layer to your WordPress site, you’ll need to use an authenticator app and plugin. For this tutorial, we’ll be using Google Authenticator.
If you’re a ManageWP user, you can also use our free Two-Factor Authentication feature to easily connect the Google Authenticator mobile app to your account. However, if you’re not maintaining your sites on our platform, you can accomplish the same effect by following the four simple steps below.
Step 1: Install the Google Authenticator app on your mobile device
The first step to adding two-factor authentication to your WordPress site is to install the Google Authenticator app on your smartphone or another mobile device. If you have an Android device, you can do so through the Google Play Store:

For an iPhone or iPad, you can download the app through the Apple Store. If you need further guidance or assistance with downloading the mobile app, you can refer to the Google support documentation.
Step 2: Activate the Google Authenticator plugin on your WordPress site
Once you have the Google Authenticator app downloaded to your device, the next step is to install the plugin to your WordPress site. There are multiple solutions you can use to connect your site to Google Authenticator. For this tutorial, we’ll use Google Authenticator by miniOrange:

This free, popular plugin is easy to set up and offers a user-friendly interface. In addition to multiple authentication methods – including QR codes and push notifications – it also ships with multi-language support as well as brute-force attack prevention and IP blocking features.
You can install and activate this plugin right from your dashboard by searching “Google Authenticator” on the Plugins > Add New screen:
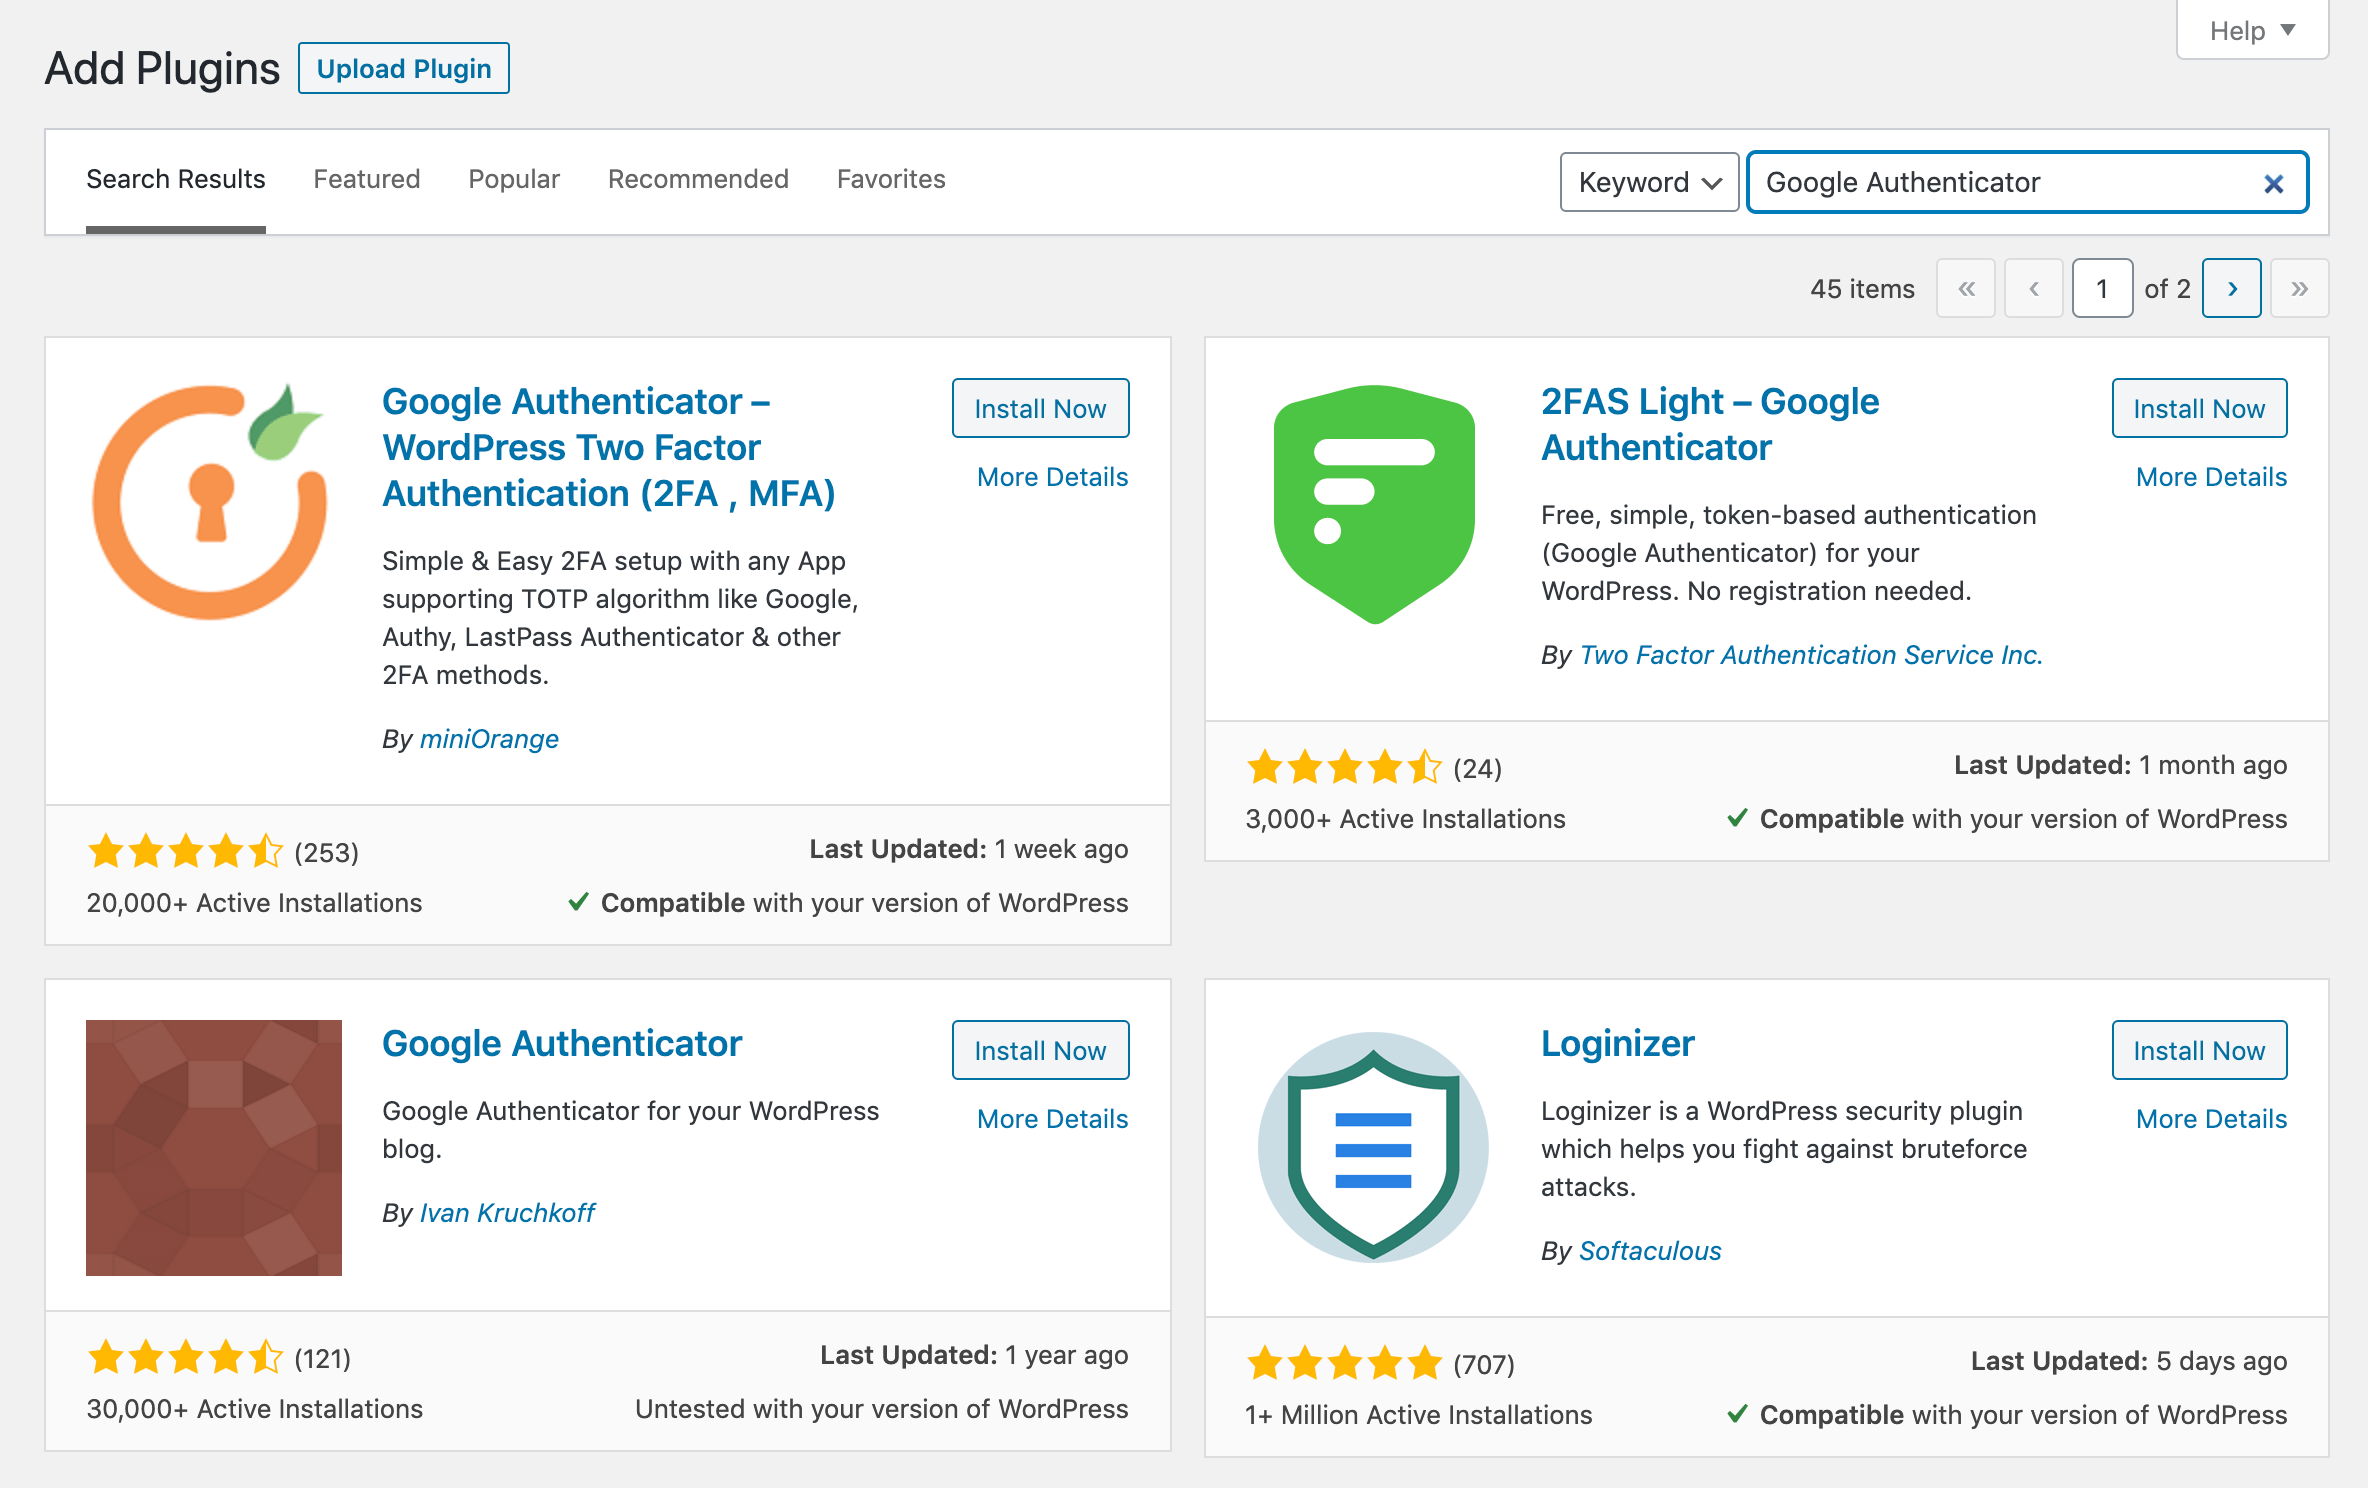
Just click on the Install Now button, followed by Activate.
Step 3: Configure the Google Authenticator plugin with the app
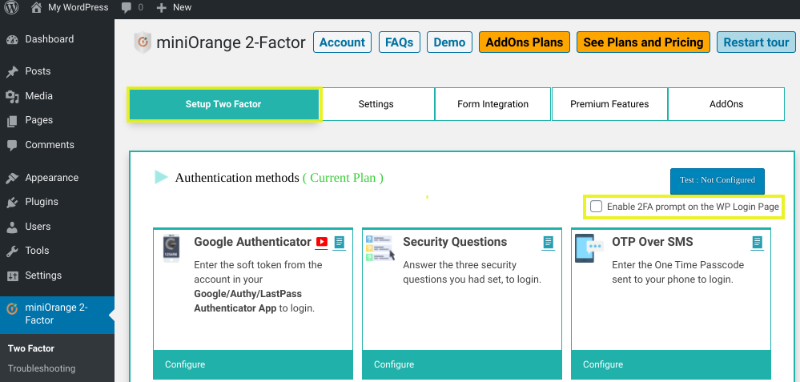
After you activate the Google Authenticator plugin, it will automatically bring you to the plugin setup page. Under Setup Two Factor, check the box next to Enable 2FA prompt on the WP Login Page:
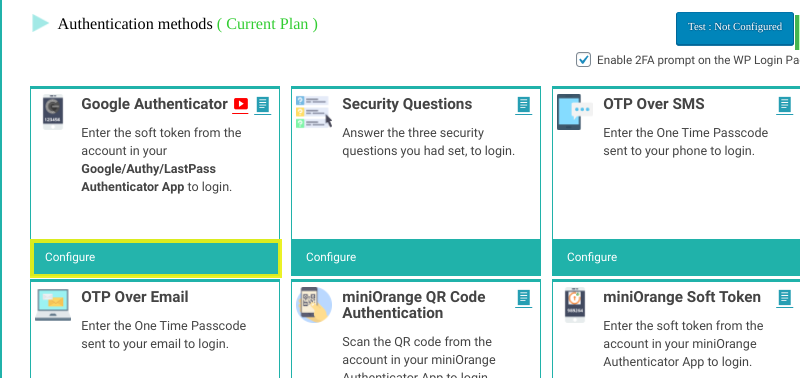
Next, under the Google Authenticator authentication method, select Configure:
This will bring you to the setup screen, which consists of two steps. First, open the Google Authenticator app on your mobile device and tap Scan barcode. Next, hold your camera up to the QR code displayed under Step 1 to scan it:
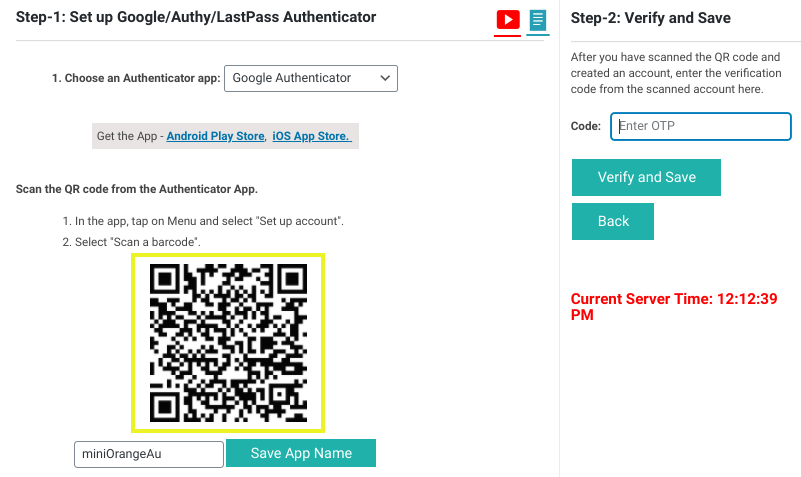
If for whatever reason you’re unable to scan the QR code, you can also manually enter the secret key provided below it. Once you’ve done so, the mobile app will automatically generate a six-digit verification code.
Enter that in the Code field under Step-2: Verify and Save to the right of the setup screen:
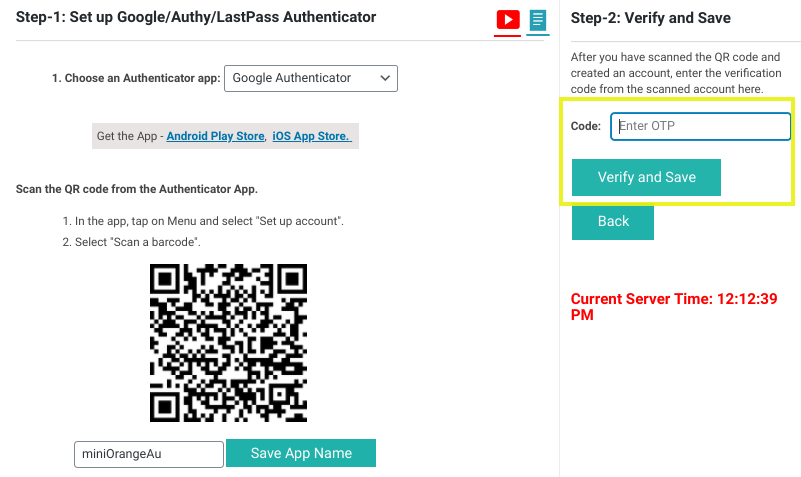
When you’re done, click on the Verify and Save button.
Step 4: Test the two-factor authentication to make sure it works from your WordPress login page
Once you verify and save the Google Authenticator verification code, you should see a success message:
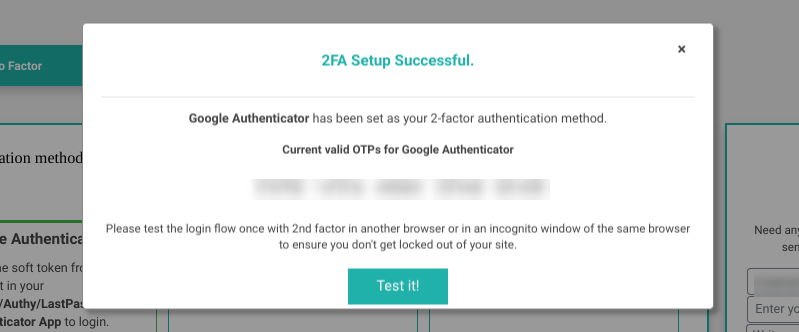
Now, the only thing left to do is to confirm your 2FA works properly. To do so, you can select the Test it! button. This will prompt you to once again enter a six-digit verification code sent to the Google Authenticator app on your mobile device.
To confirm the two-factor authentication works from your WordPress login page, visit it from an incognito tab in your browser. In addition to the standard username and password fields, there will now be a third field for the two-factor authentication code:
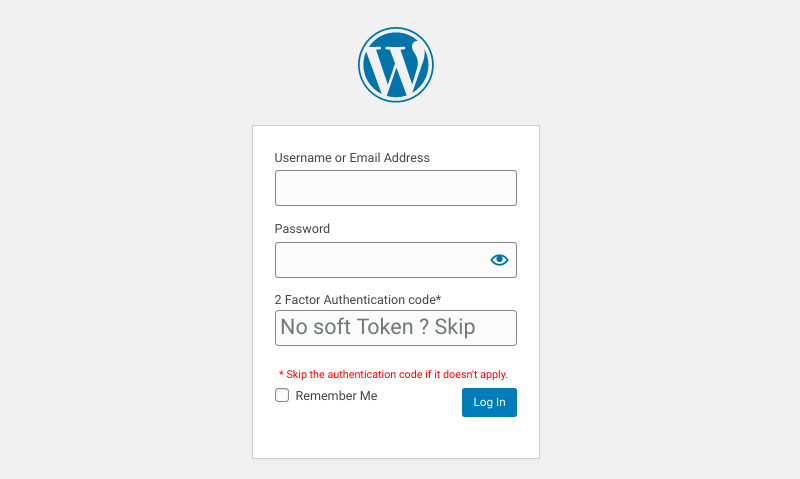
That’s it! You’ve now successfully added two-factor authentication to your WordPress site.
Conclusion
To make your WordPress website as secure as possible, it’s important to take both active and passive measures to protect your data. In addition to using strong passwords and limiting login attempts, it’s also smart to implement two-factor authentication to prevent identity theft and brute-force attacks.
As we discussed in this post, you can add 2FA to your WordPress site in four easy steps:
- Install the Google Authenticator app on your mobile device.
- Activate the Google Authenticator plugin on your WordPress site.
- Configure the Google Authenticator app with the WordPress plugin.
- Test to make sure the two-factor authentication works from your WordPress login page.
Do you have any questions about using two-factor authentication for your WordPress website security? Let us know in the comments section below!
Image credit: Pexels.

Leave a Reply