
Recently, Google webmaster analysts explained that Image Search will soon evolve in a way that will influence how we approach media file optimization. To summarize, it’s going to become increasingly important to prioritize next-gen formats.
Simply put, next-gen images refer to modern formats that are compressed in a way that enables them to load faster. The most common is the WebP file type, which creates versatile, high-quality visuals that are smaller than both JPEGs and PNGs.
In this post, we’ll explain what WebP images are and the benefits of using them. Then we will walk you through four of the methods you can use to serve media files in next-gen formats for WordPress. Let’s get started!
An overview of WebP and next-gen image formats
Next-gen – short for ‘next generation’ – image formats are modern file types that boast impressive quality and advanced compression capabilities compared to the traditional JPEG, PNG, and GIF. They produce smaller sizes, which means they can help significantly increase the speed of webpages.
The most common types are:
- JPEG XR. The standard format for enhanced HDR images. JPEG XR uses more enhanced compression techniques than the original JPEG.
- JPEG 2000. This is the newest iteration of the JPEG image format. It uses lossless compression with minimal sacrifice to visual quality.
- WebP. Supports both lossy and lossless compression. WebP lossless images are almost 30 percent smaller than PNG and JPEG files.
Not every browser supports each type of next-gen format. For example, while Chrome and Firefox can load WebP files, Safari doesn’t yet. Conversely, Safari can display JPEG 2000 images but Firefox and Chrome do not.
In addition to the fact that the overwhelming majority of people use Chrome, WebP was developed by Google and is the most lightweight option. Therefore, it’s safe to assume that this will become the most popular and preferred type of next-gen image.
The benefits of using next-gen images
As you’re probably aware, images account for much of the loading time on websites. This is why optimizing them through compression is strongly recommended. However, thanks to their small file size, next-gen files load even faster in browsers, which can help improve User Experience (UX) for your site visitors.
Although WebP images are about three times smaller than other formats, they include the same capabilities of PNGs, JPEGs, and GIFs. This means they support both transparency and animation. In addition to making your site – and the web as a whole – faster, they can also simplify the optimization process for you too.
Website speed and performance are major factors taken into account by Google when determining rankings. Every second counts. Therefore, serving next-gen images on your WordPress site can also have Search Engine Optimization (SEO) benefits.
How to serve next-gen images for your WordPress site (4 methods)
Most, if not all, of the images currently on your WordPress site, are likely either JPEGs, PNGs, or GIFs. This is smart because, as we mentioned, not every browser supports next-gen formats and, therefore, can only load these file types.
However, that doesn’t mean you can’t still reap the benefits of serving next-gen images on your WordPress site for browsers that do support them. You can use these formats without coding or changing your existing files. Let’s take a look at four methods of going about this.
1. Download the WebP Express plugin
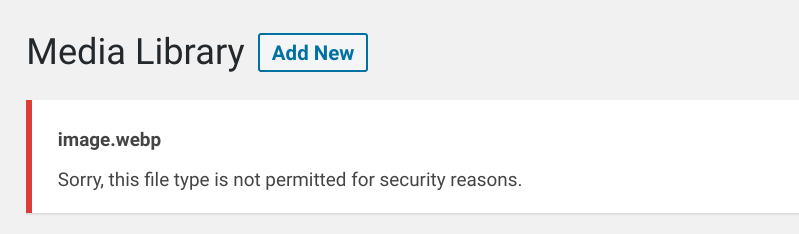
WordPress does not currently support WebP images – at least not via your Media Library. If you try to upload a .webp file, it will produce a message saying the file type is not permitted for security purposes:
However, that doesn’t mean you can’t use WebP images on your WordPress site. There are workarounds for this error, but you can also simply download the WebP Express plugin:
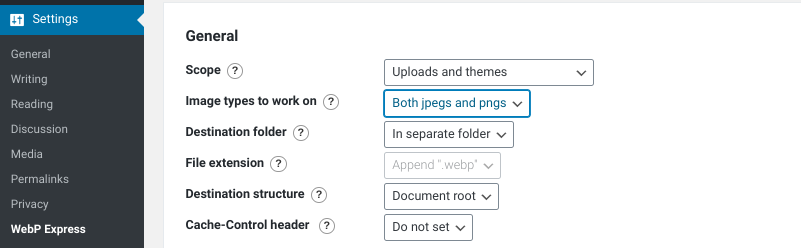
This plugin works by adding a line of code to your site that will transform your images into WebP files for users whose browsers support them. After you activate it, you can configure the settings from your WordPress dashboard by going to Settings > WebP Express:
You can choose which images to use it for, including only JPEGs, only PNGs, or both JPEGs and PNGs. Then the plugin will begin working automatically.
If visitors using your site are in a browser that supports WebP, the plugin will autogenerate WebP images. If not, your site will serve the JPEG or PNG you originally uploaded.
2. Use ShortPixel to serve images on your site as WebP
The ShortPixel Image Optimizer plugin is another tool you can use to serve WebP images alongside your existing files on your site:
![]()
This is a free image optimization plugin that can help speed up your WordPress site by compressing your images. It also automatically resizes them and enables you to convert them to the file format of your choice.
In order to use ShortPixel’s features, you’ll need to create an account on their website. This is free to do, although they also offer premium plans to choose from. However, you don’t need to pay to serve WebP images on your WordPress site.
After you install and activate ShortPixel, you can locate the plugin settings by going to Settings > ShortPixel. Under the Advanced tab, there will be a WebP images section where you can enable it:
![]()
If you’re using the Cache Enabler plugin, you don’t need to do anything else. However, if you’re not, make sure you check the box next to Using the <PICTURE> tag syntax setting.
When you’re done, click on the Save and Go to Bulk Process button:
![]()
This will bring you to the processing screen. Depending on the number of images on your site, this could take several hours to complete. Be sure to leave this window open until it’s finished.
WebP images can only be created once your files are optimized. Therefore, completing the bulk process is necessary in order to convert them.
3. Edit your WordPress .htaccess file
The primary purpose of serving next-gen images is to increase your site speed. To that end, adding another plugin may seem counterproductive.
If you don’t want to use a plugin to serve WebP images on your site, there’s another method you can try. However, we only suggest using this approach if you’re comfortable editing your site files and have some technical know-how.
To serve next-gen image formats on your WordPress site without a plugin, you can modify your .htaccess file in your root directory. Adding the following snippet of code will serve .webp images instead of the .png or .jpg files if the page is loading in a browser that supports this new format:
<IfModule mod_setenvif.c>
  # Vary: Accept for all the requests to jpeg and png
  SetEnvIf Request_URI "\.(jpe?g|png)$" REQUEST_image
</IfModule>

<IfModule mod_rewrite.c>
  RewriteEngine On

  # Check if browser supports WebP images
  RewriteCond%{HTTP_ACCEPT}image/webp

  # Check if WebP replacement image exists
  RewriteCond%{DOCUMENT_ROOT}/$1.webp-f

  # Serve WebP image instead
  RewriteRule(.+)\.(jpe?g|png)$$1.webp[T=image/webp]
</IfModule>

<IfModule mod_headers.c>
  Header append Vary Accept env=REQUEST_image
</IfModule>

<IfModule mod_mime.c>
  AddType image/webp .webp
</IfModule>
It’s important to note that in order for this automatic conversion to occur, the .webp file needs to be in the same folder as the standard image file.
4. Use the <picture> element in your HTML
Another, simpler option is to use the <picture> tag. This makes it so each user’s browser will automatically choose the appropriate file format to display. For example, the HTML would look something like:
<picture>
  <source srcset="/path/to/image.webp" type="image/webp">
  <img src="/path/to/image.jpg" alt="">
</picture>
If the browser doesn’t support WebP images, then it will fall back to the format that you specify via the <img> element. In the above example, that would be JPG.
Conclusion
Media files play a pivotal role in your WordPress site’s performance. While compression and optimization can help reduce the size and quality of PNGs, JPEGs, and GIFs, you can kick it up a notch by using next-gen image formats such as WebP.
In this post, we discussed four methods you can use to serve WebP images on your WordPress site:
- Download the WebP Express plugin to autogenerate WebP images.
- Use ShortPixel Image Optimizer to serve images on your site as WebP.
- Edit your .htaccess file in WordPress.
- Use the <picture> element in your HTML.
Do you have any questions about using next-gen image formats for WordPress? Let us know in the comments section below!
Image credit: Pexels.
Leave a Reply