
Performance is essential for any website’s success, and it all starts with your server. Let’s talk about how to boost your site’s speed by handling some key optimization tasks!
Maintaining your website’s performance is essential for success. By performance, we’re talking about how fast your site is. The fact is, a lack of speed makes for a terrible User Experience (UX) and can also impact your Search Engine Optimization (SEO).
Fortunately, there are plenty of ways you can boost your website’s performance. Some of them have to do with optimizing your site itself, and others with its server. In most cases, starting with server optimization is the right move, since you’ll see better returns.
In this article, we’re going to dig deeper into why website performance is essential, and talk about how to measure yours. Then we’ll go over three ways you can improve your server’s performance. Let’s take a look under the hood!
Why Your Website’s Performance is Essential to Its Success
Imagine if every website you visited took five or more seconds to load. In this day and age, those five seconds can feel like an eternity.
There’s really no reason your site should take that long to load for visitors who have access to a decent internet connection. It’s up to you, then, to make sure your website doesn’t make visitors frustrated.
When it comes to your website’s performance, there are a lot of factors that can affect loading times. However, we can break them down into two broad categories:
- Server-side problems
- Issues within your website
For this article, we’re going to focus on server-related optimization tips. Ideally, these will enable you to shave some seconds off your loading times. That way, you can keep users around, improve their experience, and avoid SEO penalties due to high bounce rates.
A Quick Guide on How to Measure Your Website’s Performance
Before you start tinkering with your server, it’s important to benchmark your website’s performance. Without testing its loading times, it can be hard to tell how much effort you need to put into website optimization.
As a rule of thumb, your website shouldn’t take more than two seconds to load. Once you move past that invisible line, things start going downhill fast. However, even if your loading times are already under two seconds, that doesn’t mean there isn’t room for improvement.
To measure your website’s loading times, you’ll want to use a tool such as GTmetrix. All you have to do is enter the URL of the page you want to test and click the Analyze button:

Once you hit the Analyze button, give the tool a few seconds to do its job. When it’s done, you’ll get a full report on your website’s performance, including loading times, overall scores, and recommendations on how to improve them:
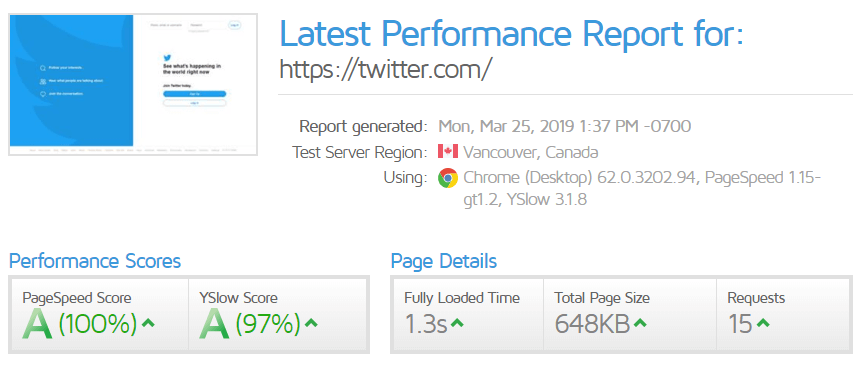
Keep in mind that loading times can vary depending on several factors, such as how many people are using your website during the test.
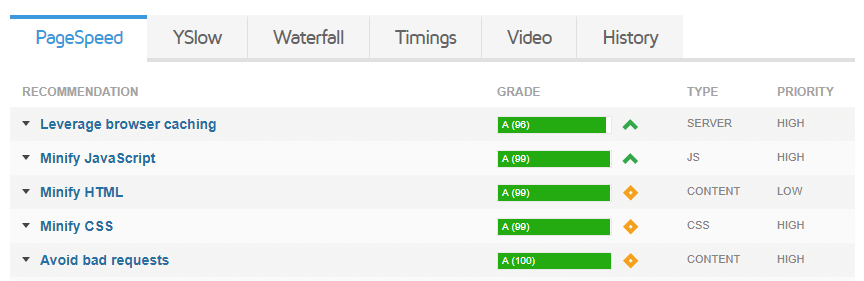
Likewise, pay attention to the recommendations GTmetrix gives you, which you can find below the results area. For the example above, we used Twitter.com to run our test, and it got nearly perfect results:
Ideally, you’ll run these tests periodically so you can be aware if your website is starting to slow down. If it is, then it’s time to optimize its setup, which we’ll talk about now.
How to Boost Your Website’s Performance: 3 Server-Related Recommendations
As we mentioned before, in this article we’re going to focus on server-side optimization tips. Often, they’ll give you much better returns than tinkering with your site’s configuration, so they’re a great place to start.
1. Use a Content Delivery Network
When you ‘cache’ a website, you save a copy of it so that the next time you access it, the site loads much faster. Content Delivery Networks (CDNs) are clusters of servers in key regions that cache copies of websites. Then, when users attempt to access a site that uses a CDN, they’re served the fast-loading cached versions.
That may sound a bit redundant, but in practice, CDNs offer a whole host of benefits, including:
- Faster loading times. Most CDNs have servers around the world, so they can serve websites from the closest location to each request.
- Less strain on your servers. CDNs can take some of the load off your servers, and they can help ensure smooth performance during spikes in traffic.
- Protection in case of downtime. If your website goes down and you use a CDN, visitors should still be able to access the cached version of your site while you sort things out.
There are a lot of excellent CDN options you can use. However, as you might imagine, for all you’re getting, most of these services come with a price tag.

Integrating Cloudflare with WordPress is pretty straightforward. Plus, with Cloudflare’s free plan, you can test how a CDN works before committing to spending money on one.
2. Leverage Browser Caching
In addition to using a CDN, you can take advantage of ‘regular’ browser caching to store key files from your website on your visitors’ computers. That way, whenever they return, they won’t need to reload the site in its entirety.
To leverage browser caching using WordPress, you’ll need to edit the .htaccess file. That particular file governs the way WordPress interacts with your server, and there are a lot of exciting ways you can use it. By default, here’s what that file should look like:
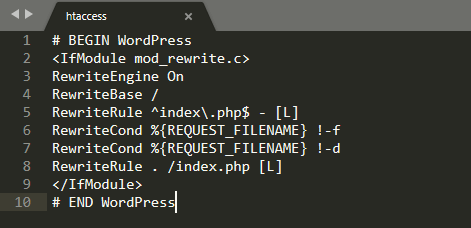
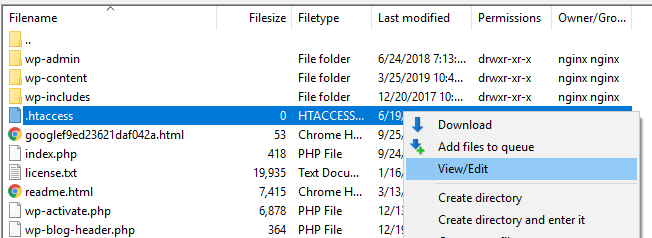
However, a lot of web hosts use custom versions of .htaccess to improve performance for their users. In any case, to access this file, you’ll need to use FTP to connect to your server. If you don’t have an FTP client, we recommend using FileZilla.
Once you connect to your server via FTP, navigate to your site’s root folder, which should be named either public_html or after your site. That particular folder contains all your WordPress core files, so tread carefully.
Locate the .htaccess file and right-click on it to choose View/Edit. This will open the file using your local text editor, enabling you to make changes to it.
To leverage browser caching, you’ll need to add some code.
Adding Caching Code to .htaccess
Here’s a simple example of some caching rules:
<IfModule mod_expires.c>

ExpiresActive On

ExpiresByType text/css "access 1 month"

ExpiresByType text/html "access 1 month"

ExpiresByType image/gif "access 1 year"

ExpiresByType image/png "access 1 year"

ExpiresByType image/jpg "access 1 year"

ExpiresByType image/jpeg "access 1 year"

ExpiresDefault "access 1 month"

</IfModule>
This code tells browsers what file formats they should cache locally and for how long. In this case, we set rules for our CSS, HTML, and image files. The latter, in particular, tend to add a lot of ‘weight’ to websites. So caching them can improve performance significantly.
You’ll also notice the last line that says ExpiresDefault. That covers all the file formats we didn’t set specific rules for, so you don’t miss anything.
While updating your .htaccess file, make sure you don’t overwrite any of the existing code unless you know what it does. Saving a copy of the file before making changes to it can also be wise.
3. Enabling GZIP Compression
GZIP compression enables your server to reduce the size of files for faster transfer to users. It’s standard practice for most servers nowadays. However, if your server doesn’t use GZIP compression by default, you can enable it through your .htaccess file.
You already know how to access this file, so let’s dive right into the code. Here’s what a standard set of GZIP rules should look like:
AddOutputFilterByType DEFLATE application/javascript

AddOutputFilterByType DEFLATE application/xml

AddOutputFilterByType DEFLATE font/opentype

AddOutputFilterByType DEFLATE font/otf AddOutputFilterByType DEFLATE font/ttf

AddOutputFilterByType DEFLATE image/svg+xml

AddOutputFilterByType DEFLATE text/css

AddOutputFilterByType DEFLATE text/html
Just as with browser caching, you need to add instructions for each type of file you want to enable GZIP for. Keep in mind, there are some varying schools of thought on which files you should and shouldn’t enable compression for. Using GZIP for most of your website’s files is usually a smart move, though.
In some cases, visitors might try to access your website using old browsers that don’t support compression. That means your server will waste resources trying to ‘serve’ those files.
To avoid that, you can use what’s called Vary:Accept-Encoding headers. Return to your trusty .htaccess file and append a few more lines of code:
<IfModule mod_headers.c>

<FilesMatch ".(js|css|xml|gz|html)$">

Header append Vary: Accept-Encoding

</FilesMatch>

</IfModule>
With that code, you can avoid running into a “Specify a Vary: Accept-Encoding Header” warning when using tools such as GTmetrix.
Conclusion
When it comes to optimizing your website’s performance, every millisecond you can shave off your loading times is excellent news. The best place to start is your server. Once you’ve done that, you can take a closer look at your website’s content to see if there are elements you can optimize there as well.
As far as servers go, there are several ways you can improve their performance, including:
- Using a CDN.
- Leveraging browser caching.
- Enabling GZIP compression.
Do you have any questions about how to boost your server’s performance? Let’s talk about them in the comments section below!
Image credit: Pixabay.
Leave a Reply